Step 6: Configure CA SiteMinder Identity System in Policy Manager
Learn how to configure a CA SiteMinder identity system in Policy Manager.
Table of Contents
- Introduction
- Configure CA SiteMinder Identity System in Policy Manager (Legacy)
- Configure CA SiteMinder Identity System in Policy Manager (Integrate Other Akana Products)
- Configure CA SiteMinder Policies
Introduction
Define a CA SiteMinder Identity System to use the CA SiteMinder Security Provider. This is accomplished using the Add Identity System function in the Policy Manager Management Console.
Configuration steps are provided for both Legacy usage and integration of CA SiteMinder with other Akana products.
Configure CA SiteMinder Identity System in Policy Manager (Legacy)
This procedure illustrates how to configure a CA SiteMinder Identity System for legacy usage.
Step 1: Specify Identity System Details
- Log in to Policy Manager (http://{hostname}:{port}/ms/index.do).
- Configure > Security > Identity Systems. The Identity Systems Summary screen displays.
- Click Add Identity System. The Add Identity System Wizard screen displays.
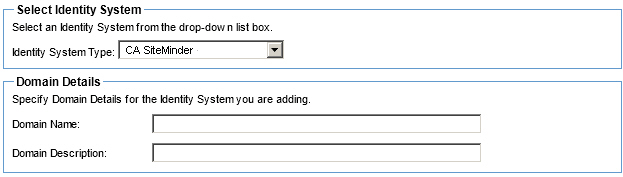
- In the Select Identity System section, select CA SiteMinder from the Identity System Type drop-down menu.
- In the Domain Details section, specify the Domain Name and Domain Description.

Step 2: Create SiteMinder Agent Configuration File
- Click Next to continue. The CA SiteMinder Agent Configuration screen displays.
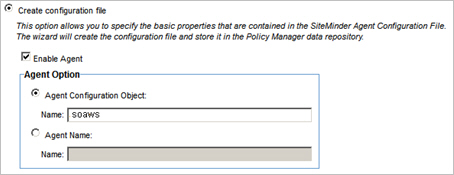
- Click the Create configuration file radio button.
- Click the Enable Agent checkbox.
- Click the Agent Configuration Object radio button.
- In the Name field, specify the Agent Configuration Object name you defined in Installing CA SiteMinder Web Agent on Client Machines.
Step 3: Configure Host Configuration File
- Click Next to continue. The Host Configuration File screen displays.
- Click the Upload Configuration file radio button.
- Set the Host Configuration file to the location you specified when you installed the CA SiteMinder Web Agent. The file is located on the server's file system:
Example server file path: /opt/siteminder/webagent/config/SmHost.conf

Step 4: Configure SiteMinder Agent Options
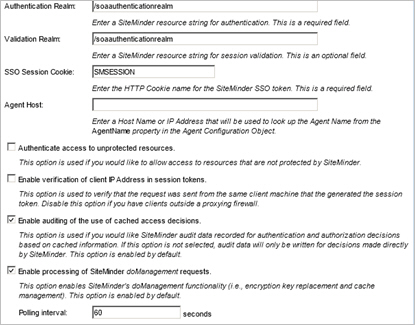
- Click Next to continue. The CA SiteMinder Agent Options screen displays.
- Set the Authentication Realm to the one you created in section Step 3: Install CA SiteMinder Objects > Create Domain and Realm Configuration.
Note: Enable verification of client IP Address in session tokens should not be checked.
Step 5: Cache Options
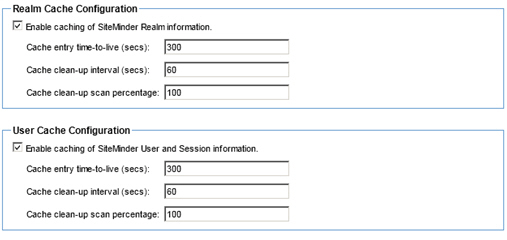
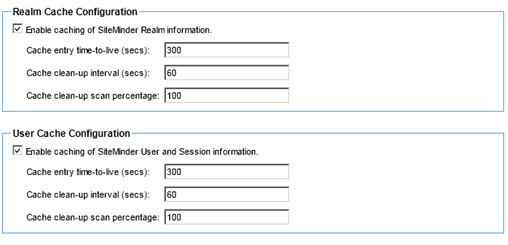
- Click Next to continue. The Cache Options screen displays.
- Select the cache option defaults, or customize the cache configuration.
Step 6: Configure User Directory Options
Note: Skip the Login Process Options screen. This screen is not used for the Legacy configuration.
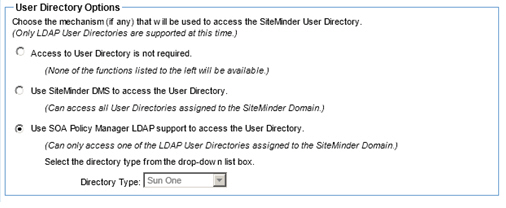
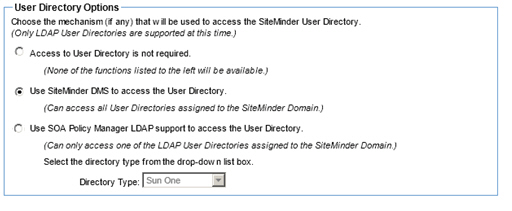
- Click Next to continue. The User Directory Options screen displays.
- If you need to manage CA SiteMinder users (for example, to assign CA SiteMinder users to contracts), then select Use Policy Manager LDAP support to access the User Directory and configure the Connection Properties and Attribute Details.
Note: The default is set to Access to User Directory is not required.
Step 7: Specify Connection Properties
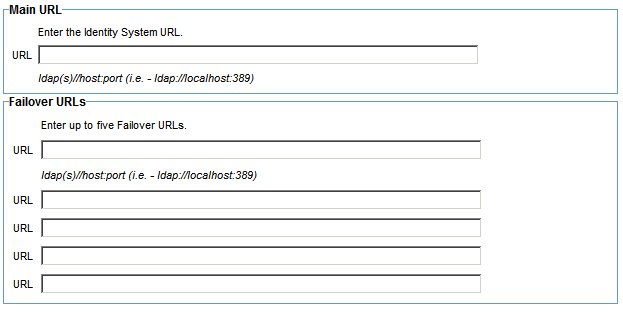
- Click Next to continue. The Connection Properties screen displays.
- Configure the connection properties for the selected Identity System. You must configure the Main URL, and optionally specify up to five Failover URLs.
Step 8: Configure Attribute Details
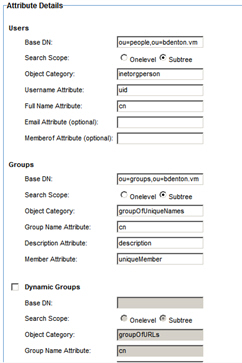
- Click Next to continue. The Attribute Details screen displays.
- Configure the attribute mapping and search scope for Users and Groups.
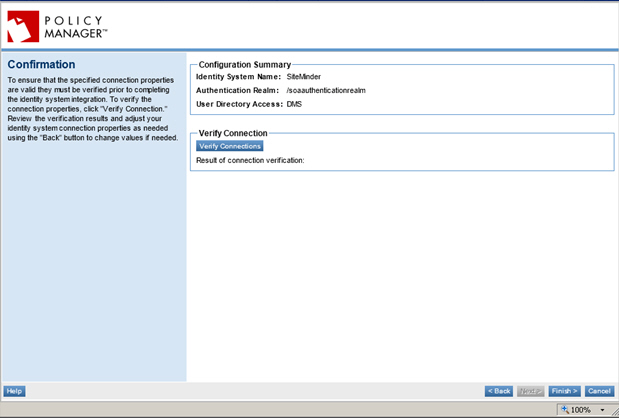
Step 9: Test the Connection
- On the Confirmation page, click Verify Connection to complete the identity system configuration.
- After the connection is successfully verified. Click Finish. Your CA SiteMinder Identity System is saved and displays on the Identity System Summary screen.
Configure CA SiteMinder Identity System in Policy Manager (Integrate Other Akana Products)
This procedure illustrates how to configure a CA SiteMinder Identity System for use with other Akana products. This configuration option enable Single Sign-On support when a custom login screen is required.
Step 1: Specify Identity System Details
- Log in to Policy Manager (http://{hostname}:{port}/ms/index.do).
- Configure > Security > Identity Systems. The Identity Systems Summary screen displays.
- Click Add Identity System. The Add Identity System Wizard screen displays.
- In the Select Identity System section, select CA SiteMinder from the Identity System Type drop-down menu.
- In the Domain Details section, specify the Domain Name and Domain Description.
Step 2: Create SiteMinder Agent Configuration File
- Click Next to continue. The CA SiteMinder Agent Configuration screen displays.
- Click the Create configuration file radio button.
- Click the Enable Agent checkbox.
- Click the Agent Configuration Object radio button.
- In the Name field, specify the Agent Configuration Object name you defined in section Step 2: Install Web Agent on Client Machines.

Step 3: Configure Host Configuration File
- Click Next to continue. The Host Configuration File screen displays.
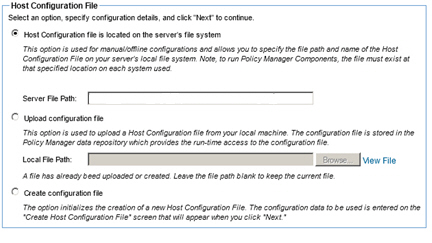
- Select the Host Configuration File option that best suits your requirements.
- Host configuration file is located on the server's file system - Use this option if each host must have its own host configuration file. The host configuration file is located on the server's file system.

- Create configuration file - Use this option if you would like to define a host configuration file. After selecting this option, the Create Host Configuration File screen displays. See the next step Create Host Configuration File for more information.

- Upload Configuration file - Use this option to upload an existing host configuration file from your local machine.
Note: This option will be used in this procedure.

- Click the Upload Configuration file radio button.
- Specify the Local File Path of the host configuration file to the location you specified when you installed the CA SiteMinder Web Agent. The file is located on the server's file system:
Example server file path: /opt/siteminder/webagent/config/SmHost.conf

Step 4: Configure SiteMinder Agent Options
- Click Next to continue. The CA SiteMinder Agent Options screen displays.
- Set the Authentication Realm to the one you created in section Step 3: Install CA SiteMinder Objects > Create Domain and Realm Configuration.
- The Enable verification of client IP Address in session token option should be unchecked.

Step 5: Cache Options
- Click Next to continue. The Cache Options screen displays.
- Select the cache option defaults, or customize the cache configuration.
Step 6: Configure Login Process Options
- Click Next to continue. The Login Process Options screen displays.
The Login Process Options screen allows you to specify how the Identity System will be used to provide Single Sign-On support when a custom login screen is required. It is used with Akana products that support OAuth/Open ID Providers and that are also integrated with CA SiteMinder.
When Single Sign-On support is enabled, the Identity System can be used to authenticate Resource Owner credentials when OAuth or OpenID is issuing access tokens. Single Sign-On support is controlled by a Login Process Manager that you can enable or disable.
- Two methods are used to collect credentials during the login process.
- Credentials can be collected using a mechanism to call the Login Process Manager (Calling Provider). With this method, the OAuth or OpenID provider will use its native facility to collect the resource owners username and password. These will then be passed to this new Identity System for authentication by CA SiteMinder.
- CA SiteMinder Login Process Manager can redirect to a URL that will cause the CA SiteMinder processing to happen. With this method, use CA SiteMinder's defined login page (or any other mechanism defined by a CA SiteMinder Authentication Scheme). This is done by redirecting to a CA SiteMinder protected resource on a web server with a CA SiteMinder Web Agent.
This protected resource is a simple HTML page (provided by Akana) that will redirect the browser back to the OAuth/OpenID Provider to complete the token issuing process after a successful CA SiteMinder Login. A sample redirection page can be found here:
sm60\samples\com.soa.examples.security.provider.ui\WebContent\connector\example\completeLogin.htm
If you will be using the CA SiteMinder Identity System with OAuth or Open ID Providers that are part of other Akana products, configure this option based on your requirements. If you will not be using this option, uncheck the Enable OAuth/OpenID login via CA SiteMinder checkbox.
Note: This procedure illustrates using the CA SiteMinder login processing will be used option to enable the OAuth/OpenID login in the Akana API Platform (Community Manager).
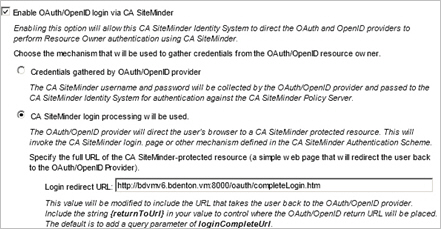
- Click the Enable OAuth/OpenID login via CA SiteMinder checkbox.
- Click the CA SiteMinder login processing will be used radio button.
- In the Login Redirect URL text box, specify a CA SiteMinder protected URL. This value will be modified to include the URL that takes the user back to the OAuth/OpenID provider.
- Include the string (returnToUrl) in your value to control where the OAuth/OpenID return URL will be placed.
Step 7: Configure User Directory Options
- Click Next to continue. The Configure User Directory Option screen displays.
Two different methods of providing identity browsing are supported: LDAP support or CA SiteMinder DMS. For this configuration we will be using CA SiteMinder DMS.
- Click Next to continue. The User Directory Options screen displays.
- Click the Use CA SiteMinder DMA to access the User Directory radio button.
Step 8: Configure CA SiteMinder DMS Configuration
The SiteMinder DMS Configuration screen provides support for CA SiteMinder searches and is used to configure connection and processing options for the DMS access to the CA SiteMinder User Directories that have been defined in the CA SiteMinder Domain that contains the SOA Authentication Realm defined on the CA SiteMinder Agent Options page.
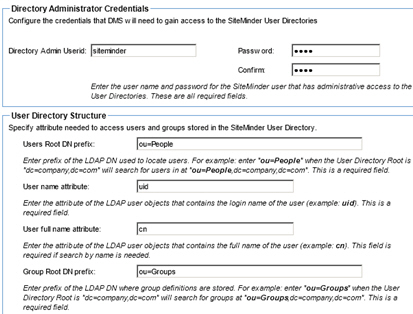
- Specify the Directory Administrator Credentials.
- In the Directory Administrator Credentials section, configure the credentials that DMS will need to gain access to the CA SiteMinder User directories.
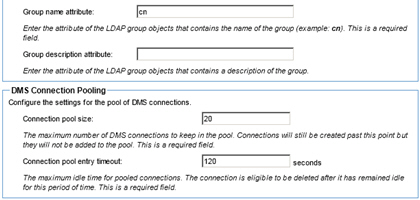
- In the User Directory Structure section, specify the attributes needed to access users and groups stored in the CA SiteMinder User Directory. Specify the Root DN for all searches in the Users Root DN prefix text box, then split your search results by specifying User name, User full Name, and Group Root DN prefix, Group name and Group description attributes. A sample entry for each is included for each attribute.
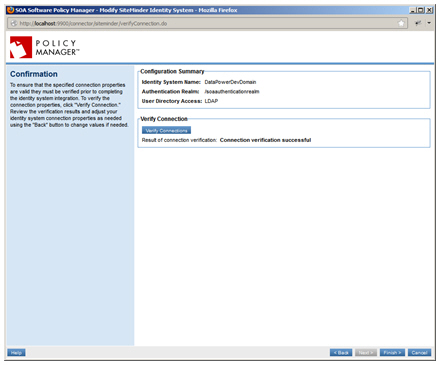
Step 9: Test the Connection
- On the Confirmation page, click Verify Connection to complete the identity system configuration.
- After the connection is successfully verified. Click Finish. Your CA SiteMinder Identity System is saved and displays on the Identity System Summary screen.
Configure CA SiteMinder Policies in Policy Manager
The next step is to define a series of Operational Policies that will be used to process the SiteMinder SSO token for the end-user identity. This task is accomplished creating an Aggregate Policy and adding and configuring the following policy types to the Aggregate Policy using the Policy Manager Management Console.
- WS-Security Transport Binding
- WS-Security Supporting Tokens
- Authentication Policy
After the Aggregate Policy is created and the three policies are added, the Aggregate Policy can then be attached to the service that requires CA SiteMinder authentication using the Policy Attachments Portlet.
Step 1: Add Aggregate Policy
The first step in the policy creation process is to add an Aggregate policy. This policy type serves a container for the CA SiteMinder policies you will be creating in the next section.
- Log in to Policy Manager (http://{hostname}:{port}/ms/index.do).
- Enter the following navigation path: Workbench > Browse.
- Navigate to the Policies > Operational folder of the Organization that includes services you would like to authenticate using CA SiteMinder. The Policies Summary screen displays.
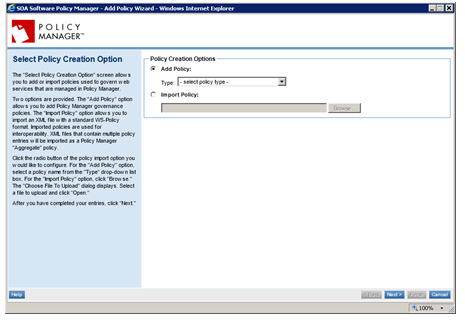
- Click Add Policy. On the Select Policy Creation Option screen, add three policies according to the criteria below. After saving the policy, click Modify on the Policy Details screen to configure each policy.
- Refer to the table below for a specification of each policy.
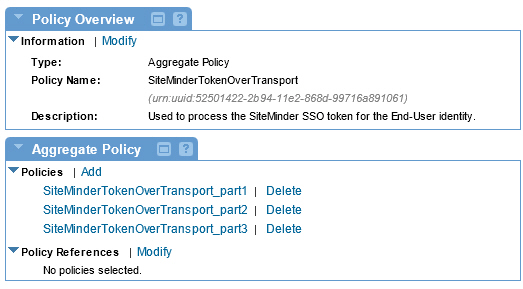
CA SiteMinder Policy Configuration Policy Name: SiteMinderTokenOverTransport
Policy Type: Aggregate
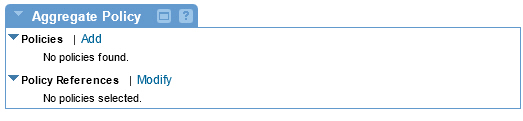
Step 2: Configure Aggregate Policy
Navigate to the Policy Details screen for the Aggregate policy you just created.
- In the Policies section of the Aggregate Policy Details portlet, click Add. The Select Policy Creation Option screen displays.
- Follow this approach and add three CA SiteMinder policies to the Aggregate policy according to the criteria below. After saving the policy, click Modify on the Policy Details screen to configure each policy.
- Refer to the table below for a specification of each policy.
CA SiteMinder Policy Configuration Policy Name: SiteMinderTokenOverTransport_part1 Policy Type: WS-Security Transport Binding
Policy Name SiteMinderTokenOverTransport_part2 Policy Type: WS-Security Supporting Tokens
Supporting Token Type: Binary Security
Token Inclusion: Always to Recipient
Subject Category: End-User
Binary Security Token Type: urn:soa.com:security.tokens:siteminder-ssotoken
Policy Name: SiteMinderTokenOverTransport_part3 Policy Type: Authentication
Subject Category: End-User
Authentication Domain: CA SiteMinder
After configuring all three policies the Policy Details page for the Aggregate Policy will look similar to the following: