Managing Policies
Overview of the basic actions you can perform to manage policies, and tools for managing policy definitions.
For information about using policies in the context of the Community Manager developer portal, see Business Policies.
Table of Contents
- Add Policy
- View Policy Details
- View Policy Overview
- Attach Policy
- Modify Policy Information
- Activate a Policy
- Make a New Policy Version
- Change Organization
- Copy Policy
- Delete Policy
- Export Policy
- View Policy References
- Assigning a Policy at the Operation Level
- Using Regular Expressions in Policies
- Using JSONPath in Policies
- Using XPath in Policies
Policy Management Functions
The policy management functions below apply to policy definitions in the Policies folder.
Policy management functions are available on the Policy Summary drop-down menu or via the Actions Portlet on the Policies > Details page.
Add Policy
Used to define policies that are used to manage web service endpoints. Notes:
- A policy is initialized with a default configuration. You can then customize the policy to address the unique requirements of your web service management system.
- When you've configured the policy, you'll need to activate it via the Policy Workflow Portlet before it is visible and available for attachment in the hierarchy tree.
- After you've activated the policy, you can then attach it to objects it will be managing, including Organizations, Services, Operations, Bindings, and Access Points.
To add a policy
On the main Policies Summary page, select Add Policy, select a policy type, and assign a name and description. The Add Policy Wizard creates a policy instance that you can modify on the Policy Details page.
View Policy Details
Once you've activated a policy, you can't change any of the policy information unless you start a new version. However, you can view the details of the current policy.
To view policy details in Policy Manager
- In Policy Manager, go to Workbench > Browse > Organization. Choose the applicable Policies folder (Compliance, Operational, or QoS). The Policies Summary screen displays.
- To view the details for a specific policy, do one of the following:
- Click the policy name and then, in the second section, click View.
- Find the policy on the list and then, from the Actions drop-down on the right, choose View Policy Details.
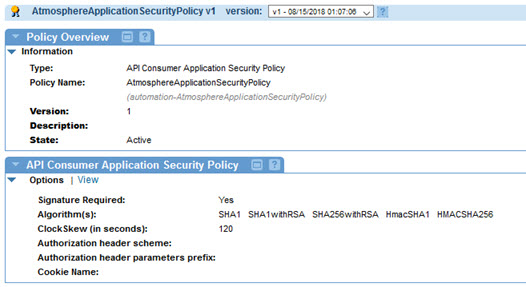
An example is shown below. The top pane is the policy overview, and summarizes policy metadata such as name and type; the second pane summarizes the policy details, including all the technical settings that determine what the policy does.
View Policy Overview
The policy overview is a summary of basic general information about the policy, such as policy type, name, version, and description.
Once you've activated a policy, you can't change any of the policy information, including the overview, unless you start a new version. However, you can view the overview for the current policy.
To view the policy overview, follow the instructions in To view policy details in Policy Manager above. The Policy Overview is at the top.
If the policy is in Draft state, you'll see a Modify link, and you'll be able to modify the policy overview.
Attach Policy
Policies defined in the policies object (the Policies Folder) can be assigned to an organization, and to six different elements of a service. Each policy assignment is based on the business requirements defined for policies supported in each policy category (Compliance, Operational, and QoS) in addition to custom defined policies. Notes:
- When a policy is assigned at the Service Details level, the policy is referenced in all other elements of the service (operations, bindings, access points).
- When a policy is referenced in a Policy Attachments Portlet, it is preceded with (from <object name>).
- Once a policy is referenced, it can only be removed at the source attachment point (in the Policy Attachments Portlet of the service).
- You can add additional policies to each service element using the Policy Attachments Portlet in each Management Console section.
To attach a policy
Go to the Policy Attachments portlet on the Policy Details page where you would like to attach a policy, and select Manage. Select a policy from the tree and save the configuration.
Modify Policy Information
Allows you to change the name and description of a policy.
Activate a Policy
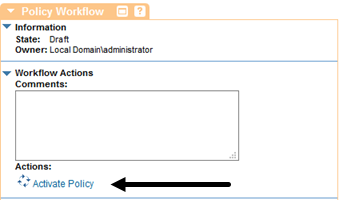
When you create and configure a policy, the policy is in Draft state. When the policy configuration is complete, activate the policy: in the Policy Workflow section, click Activate Policy, as shown below, and then confirm.
A policy in Draft state is not available for general use. Once you activate the policy, it is in Active state and is available for use.
Make a New Policy Version
If you need to change an existing policy that's in Active state, you'll need to start a new policy version. The new version is in Draft state, and can be modified, until you activate it.
Note: When you activate a new version of the policy, it replaces the previous version in all instances where the policy is in use. Only one version of a policy is active at one time. For example, if Version 1 of a policy is attached to a service, and Version 2 is activated, Version 2 becomes the version that's attached to the service, in all instances.
To make a new policy version in Policy Manager
- In Policy Manager, go to Workbench > Browse > Organization. Choose the applicable Policies folder (Compliance, Operational, or QoS). The Policies Summary screen displays.
- On the list, find the policy, and double-click to go to the policy page.
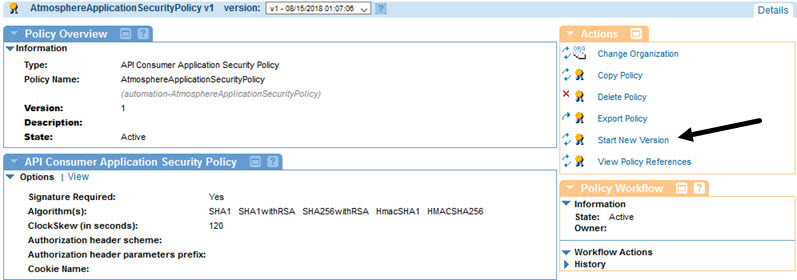
- In the right pane, click Start New Version, as shown below.
- At the prompt, click OK. A new version of the policy is started, in Draft state. You can now modify the policy and then activate it.
Change Organization
Allows you to move the current policy configuration to a new Organization.
- Note that you can only move referenced policies (policies that are attached to an object) within the current Policy Scope (for example, Organization, Service, or Operation).
- If you want to move a policy to a different Organization, the references must stay in scope.
- To determine what references a policy might have, go to the current policy and then select View Policy References.
- To remove policy references, unattach the policy via the Policy Attachments Portlet.
Copy Policy
Allows you to replicate a policy definition and assign a new Policy Name and Policy Key. Using this function, you can configure elements that represent core functionality of a policy, replicate them to a new policy, and then perform additional customization on the copy.
Delete Policy
Deletes the selected policy definition. You cannot delete a policy if it's referenced (attached to one or more objects). The number of policy references is indicated on the Policies Summary page, in the # column. To view policies, select View Policy References.
If you want to delete a policy, you must remove the policy attachment via the Policy Attachments Portlet.
Export Policy
Provides a method of exporting a policy definition to a Package file. This Package file can then be imported into a different Policy Manager deployment using the Import Package function.
View Policy References
Displays a list of objects that the current policy is referencing.
Assigning a Policy at the Operation Level
In some cases, you can assign a policy at the operation level, so that the policy is applied to designated operations within a service, rather than to all the operations in a service.
This feature is available for many policies but not all. Some example of policies that you can assign at the operation level:
To assign a policy at the operation level
- In Policy Manager, in the Organization Tree, select the service. In the right pane, click Operations.
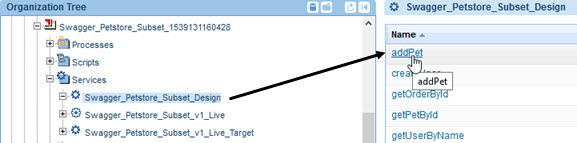
- Find the operation that you want to attach the policy to, and click to access the policy details, as shown below.
- On the Operation Overview page, in one of the Policy Attachment panes, click Manage. The Attachment Point pane appears, with a tree view, as shown below.
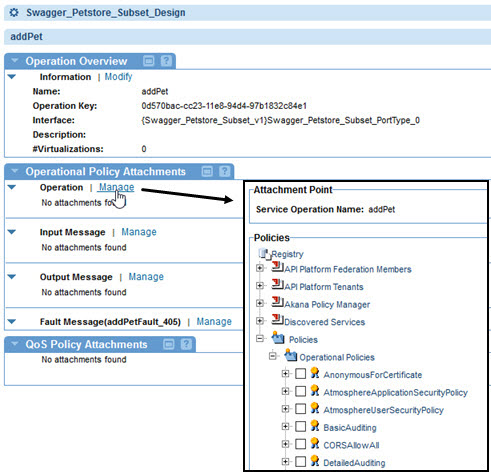
- Expand the tree to find one or more policies you want to attach to the operation, and check one or more boxes to attach the policies.
- Click Apply to save and close. The policy or policies are now applied to the operation.
Notes:
- If there are any policies already attached at the service level, those also apply to the operation. In the example above, no policies are already attached.
- If a policy doesn't appear in the tree view, it isn't available for attaching to the policy.
Using Regular Expressions in Policies
Many types of policies support the use of regular expressions to define values in the policy configuration. To take advantage of this, you'll need a good working knowledge of regular expressions. Some online tools:
- rubular.com is a free online regular expression editor based on Ruby.
- regex101.com is another useful free resource.
For examples of the use of regular expressions in a policy definition, see Using the HTTP Malicious Pattern Detection Policy: Use Cases.
Note: Regular expressions work only with certain content types. For example, you cannot use regular expressions with application/json or application/xml content. Use XPath only with XML payloads. Use JSONPath only with JSON messages. Use RegEx if the content type is neither XML nor JSON.
Using JSONPath in Policies
Some types of policies allow you to filter messages by finding a fieldname in the message body using JSONPath; for example, the Detailed Auditing policy.
An online tool for testing JSONPath:
Example #1
In the example below, a JSONPath expression is used in the Detailed Auditing Policy. This expression identifies instances of all lastfour digits in card numbers, for filtering; the policy removes this information from the log.
Note: An alternative treatment for card information is to use the Auditing Message Policy to mask the information (xxxx).
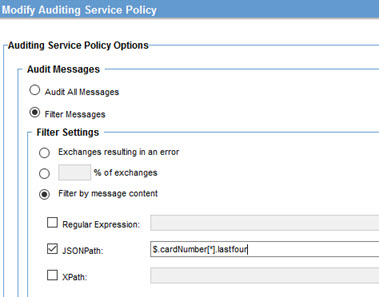
The JSONPath expression:
$.cardNumber[*].lastfour
Example #2
You could use the following JSONPath expression:
$.cardNumber[*].expirationdate
This searches for the cardnumber expiration date, and removes this information from the log.
The element must be defined in the JSON Schema.
Notes:
- Use JSONPath only with JSON messages.
-
Use only dot notation and not double dot notation before property names.
Using XPath in Policies
XPath (XML Path Language) is a query language that you can use to find a node name in an XML document.
Some types of policies allow you to filter messages using an XPath statement; for example, the Detailed Auditing policy.
In the sample policy definition shown below, the policy will filter out the following information in messages:
- In JSON: filters for credit card expiration date and, if found, does not log that information.
- In XML: filters for the PaymentCard object and, if found, does not log that information.
Note: An alternative treatment for card information is to use the Auditing Message Policy to mask the information (xxxx).
The policy definition:
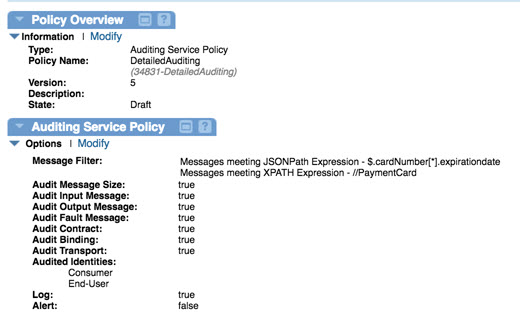
The XPath expression:
//PaymentCard
In this example, all the following XML content would be omitted in the Detailed Auditing policy, or masked in the Auditing Message Policy:
Element='<PaymentCard xmlns="http://www.example.org/OTA/2003/05"
  CardCode="VI"
  CardNumber="4321432143214327"
  CardType="1"
  ExpireDate="0614"
  SeriesCode="123">
     <CardHolderName>John Doe</CardHolderName>
   </PaymentCard>'
Note: Use XPath only with XML payloads.


