Using the Anti-Virus Policy
Learn how to set up the anti-virus policy to direct the scanning of messages for viruses.
For information about using policies in the context of the Community Manager developer portal, see Business Policies.
Table of Contents
- Introduction
- Creating an Anti-Virus Policy
- Configuring an Anti-Virus Policy
- Viewing the Anti-Virus Policy Details
- Activating a policy
- Attaching a policy
- Using an Anti-Virus policy to scan uploaded files
Introduction
The Anti-Virus Policy is used to direct the scanning of messages for viruses. The Network Director itself does not scan for viruses; the virus scanning is managed by an anti-virus server.
The Network Director communicates with the anti-virus server using the Internet Content Adaptation Protocol (ICAP) protocol. The Anti-Virus policy dictates details of the virus scanning, such as:
- What messages should be scanned.
- How to communicate with the anti-virus server.
- What action should be performed when a virus is detected.
Creating an Anti-Virus Policy
There are two steps to creating a policy in Policy Manager:
- Create the policy definition. See below.
- Configure the policy details. See Configuring an Anti-Virus Policy.
Once you've completed both those steps, you can activate the policy so that it's in effect and can be attached to organizations and services.
To create an anti-virus policy in Policy Manager
- In the Organization Tree, find the level at which you want to create the policy. Expand Policies and click Operational Policies.
- In the right pane, in the Policies Summary section, click Add Policy.
- In the Select Policy Creation Option page, do one of the following:
- To create a new policy: Choose Anti Virus Policy and then click Next.
- To import an existing policy: Click Import Policy, browse for the file, and then click Next.
- Enter Policy Name (required), Policy Key, and Description (optional). If you don't specify a key, one is assigned automatically.
- Click Finish and then click Close.
At this point, you've created the policy, but it doesn't do anything. The next step is to configure the policy details. See Configuring an Anti-Virus Policy below.
Configuring an Anti-Virus Policy
Once you've created the policy, you can configure the policy details that determine how the policy works. Then you can activate the policy so that it can be used.
To configure an anti-virus policy in Policy Manager
- In the Organization Tree, find the level where the policy was defined. Click to select.
- In the center pane, in the Anti Virus Policy section, click Modify. The Modify Anti-Virus Policy overlay is displayed, as shown below.
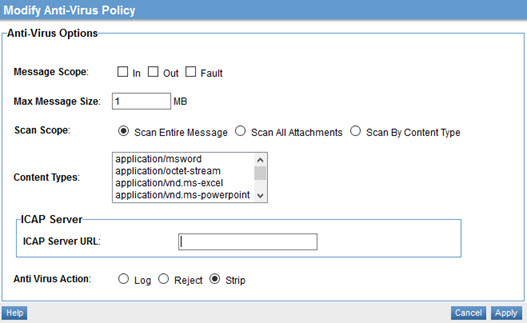
- Specify Message Scope. This determines which messages in a message exchange should be scanned. The values correspond to the WSDL message types of an operation. Choose one or more:
- IN
- OUT
- FAULT
- Choose a value for Max Message Size (MB). Messages exceeding the specified size will be rejected by the policy.
- Choose a value for Scan Scope:
- Scan Entire Message: scans all message content including attachments.
- Scan All Attachments: scans only attachments.
- Scan By Content Type: you can specify message content-types that should be scanned. Choices: application/msword, application/octet-stream, application/vnd.ms-excel, application/vnd.ms-powerpoint, application/vnd.ms-project, application/vnd.ms-works, application/x-msaccess, video/mpeg, x-world/x-vrml. You can multi-select to specify multiple content types.
- Specify the URL of the ICAP server (the anti-virus server).
- Choose the action to be taken if a virus is detected:
- Log: Allows the content through but generates an alert.
- Reject: Rejects the message and generates an alert.
- Strip: Removes the infected portion of the message and generates an alert.
- Click Apply.
Now that the policy is defined, you can activate it and start using it. On the right, under Actions, choose Activate Policy.
Viewing the Anti-Virus Policy Details
You can review the details of the existing anti-virus policy, then change them if needed.
To view the anti-virus policy details:
- Enter the following navigation path: Workbench > Browse > Organization. Choose the Policies folder. The Policies Summary screen displays.
- To navigate to the Policy Details tab, do either of the following:
- Click the policy name and then double-click the Anti-Virus Policy line item.
- Select View Policy Details from the Actions drop-down list box.
The Policy Details page for the Anti-Virus Policy is displayed.
Activating a policy
When you create and configure a policy, the policy is in Draft state. When the policy configuration is complete, activate the policy: click Activate Policy and then confirm. See Activate a Policy.
A policy in Draft state is not available for general use. Once you activate the policy, it is in Active state and is available for use.
Attaching a policy
To use the policy, go to the Policies folder in the respective organization and attach the policy to a web service, binding, or binding operation.
Using an Anti-Virus policy to scan uploaded files
For an example of how you could use an anti-virus policy to scan uploaded files, refer to Configure the Anti-Virus policy to scan for uploaded files in the platform hardening doc.


