Using the Detailed Auditing Policy
Learn how to enable detailed auditing of message size, bindings, and contracts.
For information about using policies in the context of the Community Manager developer portal, see Business Policies.
Note: The difference between the Basic Auditing and Detailed Auditing policies is that the Detailed Auditing policy captures the payload, and the Basic Auditing policy does not.
Table of Contents
- Introduction
- Creating a Detailed Auditing Policy
- Configuring the Detailed Auditing Policy
- Activating a policy
- Attaching a policy
- Detailed Auditing Policy: use cases
Introduction
The Detailed Auditing Policy is an out-of-the-box policy that is part of the Policy Manager default installation. It is an instance of the Auditing Service Policy. It provides detailed auditing of messages and records the message metrics in the Monitoring > Logs tab as well as the messages of each exchange. The policy is located in the Policies folder of the root organization.
Note: You can set up Basic Auditing for successful messages and Detailed Auditing for error conditions.
The following message metrics are recorded:
- Input Message: Audits Input Message content.
- Output Message: Audits Output Message content.
- Fault Message: Audits Fault Message content.
- Message Size: Audits the size of messages in the exchange.
- Binding: Audits binding information.
- Transport: Audits Transport information.
- Contract: Audits the contract governing a message.
The following identities are audited:
- Consumer: Audits consumer identity sent with a request message.
- End User: Audits end-user identity sent with a request message.
Creating a Detailed Auditing Policy
The first step in creating a policy is to define the basic policy information.
To add an operational policy
- Go to Workbench > Browse > Organization, and select Policies > Operational Policies. The Policies Summary is displayed.
- Click Add Policy.
- Choose the policy type and click Next.
- Specify a name (required) and description (optional) and click Finish. At the Completion Summary, click Close. The Add Policy Wizard creates a draft policy instance that you can then configure on the Policy Details page.
For more information, see Add Policy.
At this point, you've created the policy, but it doesn't do anything. The next step is to configure the policy details. See Configuring a Detailed Auditing Policy below.
Configuring the Detailed Auditing Policy
Once you've created the policy, you can configure the policy details that determine how the policy works. Then you can activate the policy so that it can be used.
To configure a Detailed Auditing policy in Policy Manager
- In the Organization Tree, find the level where the policy was defined. Click to select.
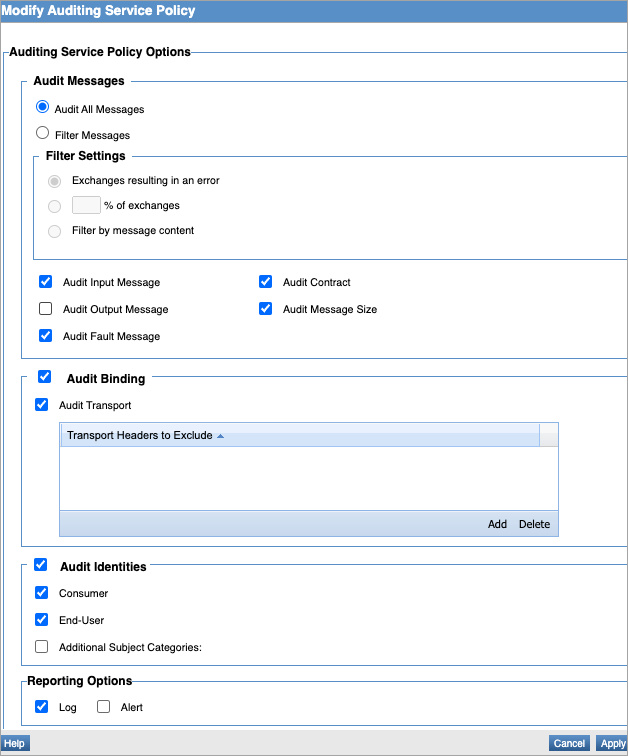
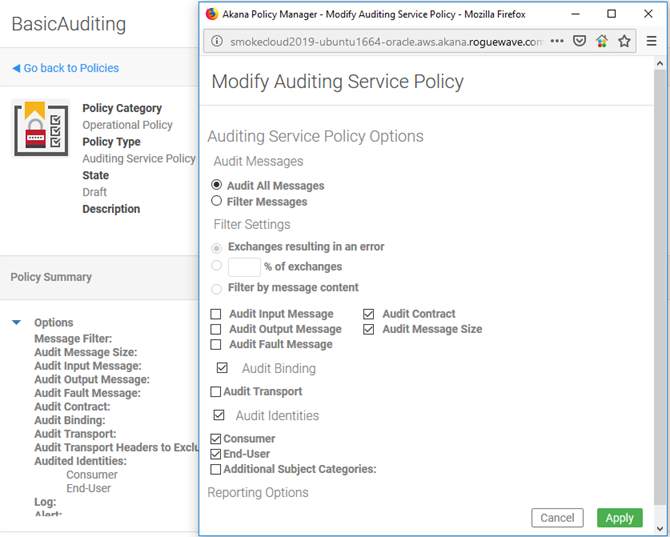
- In the center pane, in the Auditing Service Policy section, click Modify. The Modify Auditing Service Policy overlay is displayed, as shown below.
- Specify values as needed, such as specific transport headers to exclude.
Note: For explanations of the individual fields, see Configuring an Auditing Service Policy. The Basic Auditing Policy and Detailed Auditing Policy are both pre-configured out-of-the-box instances of the Auditing Service Policy that are part of the default installation.
- Click Apply.
Now that the policy is defined, you can activate it and start using it. On the right, under Actions, choose Activate Policy.
Activating a policy
When you create and configure a policy, the policy is in Draft state. When the policy configuration is complete, activate the policy: click Activate Policy and then confirm. See Activate a Policy.
A policy in Draft state is not available for general use. Once you activate the policy, it is in Active state and is available for use.
Attaching a policy
To use the Detailed Auditing Policy, go to the Policies folder in the respective organization and attach the policy to a web service, binding, or binding operation. Then, go to the Services > Monitoring section to view the results for Logs, Real Time Charts, and Historical Charts.
Detailed Auditing Policy: use cases
This section includes the following usage scenario for the Detailed Auditing Policy:
- Detailed Auditing: Audit Entire Message and Message Metrics
- Detailed Auditing on failure, Basic Auditing on success
Detailed Auditing: Audit Entire Message and Message Metrics
Audit entire message and message metrics of each exchange in usage logs of Monitoring tab.
- Create a physical service in the Policy Manager Management Console using Create Physical Service.
- Provide service details and finish the wizard.
- Using Virtualize Service, virtualize and host the physical service on Network Director (ND1), and assign a name (for example, Vs1).
- Attach the Detailed Auditing Policy located in the Root Organization Policies folder to the Vs1 service in Service Details > Policy Attachments > Operational Policies.
- Send requests from the application/client to the Vs1 service.
- The details of the usage logs show the recorded information for each exchange.
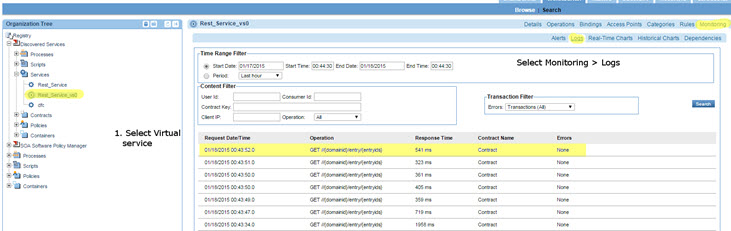
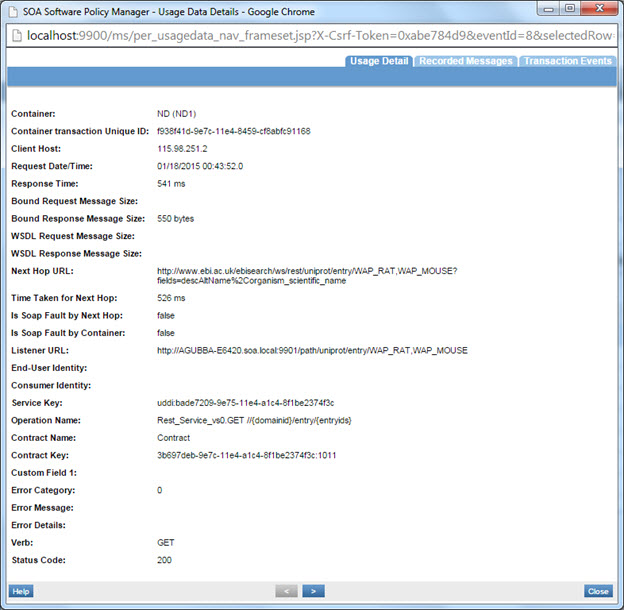
The fields that are recorded in each exchange are:
- Message Size
- Input Message
- Output Message
- Fault Message
- Transport
- Contract
- Binding
- Identities: Consumer/End-User
Detailed Auditing on failure, Basic Auditing on success
You can set up Basic Auditing for successful messages and Detailed Auditing for error conditions, as shown below.
Basic Auditing policy
Default configuration is shown below. No changes needed.
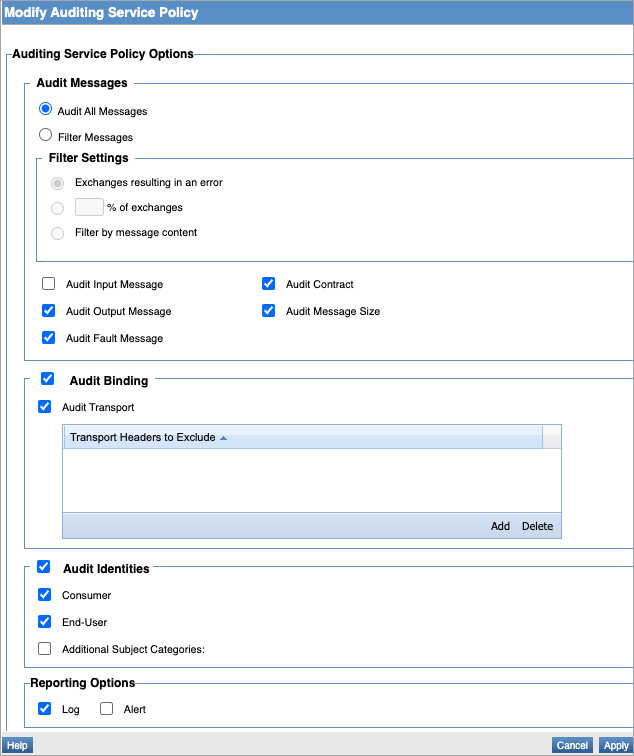
Detailed Auditing
In the below scenario, in the Community Manager developer portal:
- Navigate to Organizations > organization > Policies. Choose the Detailed Auditing policy and choose Start New Version.
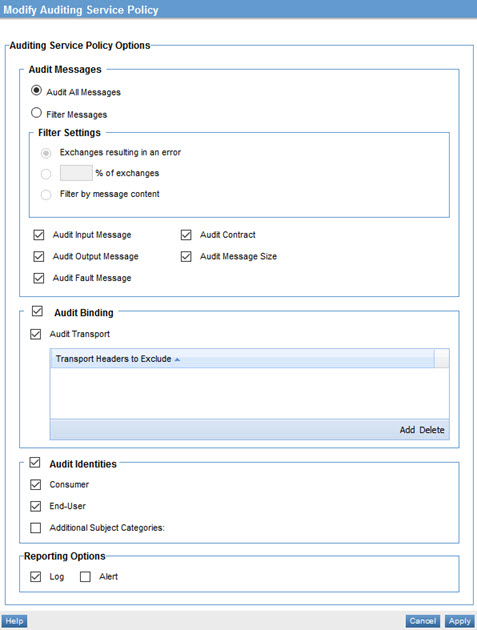
- Choose Filter Messages. The default is Exchanges resulting in an error. Save.
- Activate the policy.
The resulting policy configuration is shown below.

Now, attach these two policies to your API.
With this configuration, you'll have minimal log entries for successful messages. However, any unsuccessful messages will have all message details (subject to configuration settings).
Note: The "OutOfMemory" error occurs when the following two causes are encountered.
Cause:
-
If a file of size 200 MB or more is attached to the request of an API and the default Detailed Auditing policy is attached to the API Product, then an OutOfMemory error will be thrown and the request may fail.
-
If a file of size 200 MB or more is attached to the response of an API and the default Detailed Auditing policy is attached to the API Product, then an OutOfMemory error will be thrown and the request may fail.
Action:
To avoid an OutofMemory error, the solution is not to attach the default Detailed Auditing policy on the virtual service of the API. However, if you wish to audit the requests and responses, then you should create a Message Auditing policy instance that is configured as described below:
-
If a file of size 200 MB or more is attached to the request of an API, then use the following configuration.
-
If a file of size 200 MB or more is attached to the response of an API, then use the following configuration.