Using the WS-Auditing Service Policy
Learn about the WS-Auditing Service policy and policy configuration options.
For information about using policies in the context of the Community Manager developer portal, see Business Policies.
Table of Contents
- About the WS-Auditing Service policy
- Creating a WS-Auditing Service policy
- Configuring a WS-Auditing Service policy
- WS-Auditing Service policy options
- Viewing the WS-Auditing Service policy
- Activating a policy
- Attaching a policy
About the WS-Auditing Service policy
You can attach the WS-Auditing Service policy to Services, Bindings, Operations, and Access Points.
Creating a WS-Auditing Service policy
The first step in creating a policy is to define the basic policy information.
To add an operational policy
- Go to Workbench > Browse > Organization, and select Policies > Operational Policies. The Policies Summary is displayed.
- Click Add Policy.
- Choose the policy type and click Next.
- Specify a name (required) and description (optional) and click Finish. At the Completion Summary, click Close. The Add Policy Wizard creates a draft policy instance that you can then configure on the Policy Details page.
For more information, see Add Policy.
Configuring a WS-Auditing Service policy
To configure a WS-Auditing Service policy
- Go to Workbench > Browse > Organization and select the Policies > Operational Policies folder. The Policies Summary is displayed.
- Find the policy on the list and double-click to go to the Details page for the policy.
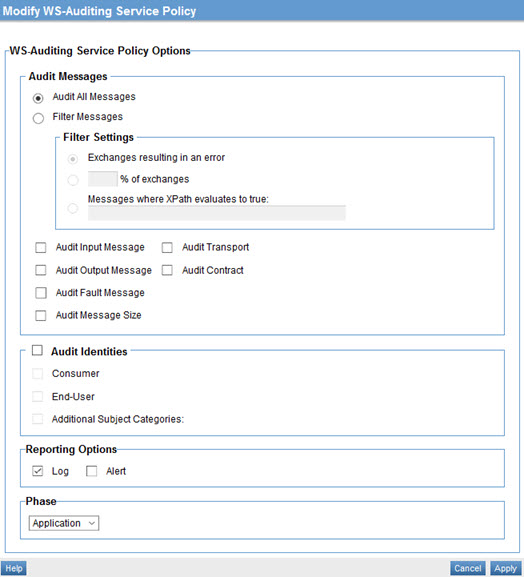
- In the second panel, click Modify to access the Modify WS-Auditing Service Policy page, as shown below.
- Specify values. For information about the fields, refer to WS-Auditing Service policy options below.
- When done, click Apply.
WS-Auditing Service policy options
- Audit Messages
- The Audit Messages section includes two main options:
- Audit All Messages: Enables the auditing of all messages.
- Filter Messages: Allows filtering of messages based on the filter settings. The following options are available when the Filter Messages checkbox is selected:
Exchanges resulting in an error: Audits only messages with errors.
Percentage of exchanges: Audits a random sample of messages based on a specified percentage. If you choose this option, specify an integer percentage from 1 to 99.
Messages where XPath evaluates to true: Enables the ability to audit messages that satisfy a specified XPath. This option includes a table where you can define Prefix and Namespace for each XPath expression. Click Add or Delete to modify the list. You can also sort the list by clicking the table header.
- Audit Messages: additional options
- The Audit Messages section includes the following additional checkboxes:
- Audit Input Message: Enables the auditing of input messages.
- Audit Output Message: Enables the auditing of input messages.
- Audit Fault Message: Enables the auditing of fault messages.
- Audit Message Size: Enables the auditing of the size of messages in the exchange.
- Audit Transport: Enables the auditing of transport information.
- Audit Contract: Enables the auditing of a contract governing a message.
- Audit Identities
- Enables the auditing of specified identities included in a request message. Options:
- Consumer: Audits the consumer identity sent with a request message.
- End-User: Audits the end-user identity sent with a request message.
- Additional Subject Categories: Audits the identity associated with one or more specified Subject Categories sent with a request message. If you choose this option, you can create one or more user-defined subject categories that you want to use. You can also add or delete from the table.
- Reporting Options
- The following reporting options are available:
- Log: Check the box if the audit information must be logged.
- Alert: Check the box if the audit information must be delivered in an event.
- Phase
- A drop-down list box that allows you to select a phase of message processing when auditing shall occur. The following options are available:
- Application: Option that enable auditing of message content in its application readable format.
- Wire: Option that enables auditing of message content in its wire format.
Viewing the WS-Auditing Service policy
To view the WS-Auditing Service policy details:
- Go to Workbench > Browse > Organization, and select Policies > Operational Policies. The Policies Summary is displayed.
- Find the policy on the list and double-click to go to the Details page for the policy.
From this page the following options are available:
- Modify: A link that launches the "Modify WS-Auditing Service Policy" screen.
- Audit Message Size: Indicates whether size of messages in the exchange should be audited.
- Messages Filter: A read-only label that indicates the type of filter being applied to messages.
- Audit Input Message: Indicates whether Input Message content is being audited.
- Audit Output Message: Indicates whether Output Message content is being audited.
- Audit Fault Message: Indicates whether Fault Message content is being audited.
- Audit Contract: Indicates whether the contract governing the message is being audited.
- Audit Transport: Indicates whether transport headers are being audited.
- Audited Identities: Indicates whether the identities (by Subject Category) in the message are being audited.
- Log: Indicates whether audit information is being logged.
- Alert: Indicates whether audit information is being delivered in an event.
- Phase: A read-only label that indicates the phase of message processing (Application or Wire) when auditing occurs.
Activating a policy
When you create and configure a policy, the policy is in Draft state. When the policy configuration is complete, activate the policy: click Activate Policy and then confirm. See Activate a Policy.
A policy in Draft state is not available for general use. Once you activate the policy, it is in Active state and is available for use.
Attaching a policy
To use the policy, go to the Policies folder in the respective organization and attach the policy to a web service, binding, or binding operation.


