Content Development Guidelines for API Admins
Guidelines that API providers can use to manage API content such as API documentation and legal agreements.
Note: For information about tagging API documentation for visibility by different audiences, see API Documentation Visibility Tagging.
Table of Contents
Content Management General Information:
- What document management tasks can I perform in the platform?
- What are the general HTML coding guidelines?
- What are reset.css and base.css and why would I use them?
- Does the platform require that HTML files be saved in a specific code format?
API Documentation:
- What API documentation publishing options does the platform provide?
- What document styles can I use for API documentation?
- Can I add other types of content to my API documentation?
- How do I edit HTML page content for API documentation?
- Who can edit API and legal agreement content?
- How do I organize my API and legal agreement documentation files?
- How do I upload my API documentation in a ZIP file?
- Can I link to an external site?
- What style sheets do I use for my HTML API documentation?
- How do I set the default API documentation page using a parameter file?
- Can I upload existing API documentation and use it in the platform?
- How do I upload API documentation?
- How do I update API and legal agreement documentation I've added to the platform?
- How do I test updated API documentation?
- How do I configure my API documentation so it's searchable in the platform?
Linking in API Documentation:
- How do I link to another location in the same document in Hermosa Theme?
- How do I link to a content file in the same folder in Hermosa Theme?
- How do I link to a content file in a subfolder in Hermosa Theme?
- How do I link to a content file in a parent folder in Hermosa Theme?
- How do I link to a platform content page in Hermosa Theme?
- How do I link to a content page in a platform subfolder in Hermosa Theme?
- How do I link to an external site or document in Hermosa Theme?
- How do I link to another API documentation file in the documentation folder in Hermosa Theme?
- When do I need to reference the tag_lib.min.js file?
- How do I reference the tag_lib.min.js file?
Using File Manager:
- What is File Manager and what functionality does it offer?
- How do I add a file to the API documentation table of contents?
- How do I change the sequence of files displayed in the API documentation table of contents?
- How do I set the default API documentation page using File Manager?
- How do I set the file display name in the API documentation table of contents?
- How do I rename a file in File Manager?
- How do I view a file in File Manager?
- How do I delete a file using File Manager?
- How do I set up my API documentation to offer both authored and Swagger/OAS3 generated doc?
Using Swagger:
- What is Swagger and how does it work?
- What are the Swagger controls and how do I edit page content?
- What style sheets do I use for my Swagger documentation?
- Can I mix Swagger and HTML files in my API documentation?
Legal Agreements:
Content Management General Information:
What document management tasks can I perform in the platform?
Within the platform, editing of API and Legal Agreement content is limited to:
- Uploading API and legal agreement documents via the File Manager.
- Defining name and description of legal agreements.
- Activating / deactivating visibility of legal agreements in API wizards.
- Downloading legal agreement usage reports.
Development of authored API documentation content, and any other static content such as a legal agreement, must be performed outside the platform. The platform creates generated API documentation automatically based on the API definition.
What are the general HTML coding guidelines?
Following the guidelines below will help ensure your file set is consistent in structure, with clean, well-formed HTML that will look correct when viewed under varying circumstances such as in different browsers and in search results.
Recommendations:
- Use an HTML editor that doesn’t add extra tags into your code. Working with HTML in a word processing program, for example, can result in complex HTML with many extra tags. This can be difficult to work with and to debug when needed. There are free HTML editors available for download, and there are more sophisticated tools available for purchase that provide a user interface and a WYSIWYG display without adding complexity to the HTML. Invest in a tool that delivers clean HTML.
- Use CSS for styling in your documents. Use a CSS file that's external to your documents, and upload it with them. Reference the platform's reset.css and base.css files. See What are reset.css and base.css and why would I use them? below.
- Include the <head> tag with links to the CSS. If you use reset.css (see below) and a custom css for your authored API documentation, the <head> tags in your documents would look something like the following:
<html> <head> <title>Document Title</title> <meta http-equiv="Content-Type" content="text/html; charset=utf-8"> <link rel="stylesheet" type="text/css" href="/resources/style/reset.css" /> <link rel="stylesheet" type="text/css" href="/resources/style/base.css" /> <link rel="stylesheet" type="text/css" href="customapidoc.css" /> </head> <body> <p>{Your file content goes here}</p> </body> </html> - Include an appropriate page title tag (<title>) within the <head> tag in each file. Although the page title doesn’t show up when the page is viewed in the platform, it’s picked up by the Search feature and displayed with the search results. For example:
<title>XXX API | Page Title</title>
- The main heading for any documentation page is <h2>. Use of <h1> is reserved by the platform; <h2> is the top heading level for API docs.
- If you need to make sure your content displays correctly for users of Internet Explorer version 9 or earlier, add the following three lines below the stylesheet links:
<!--[if lte IE 9]>
<link rel="stylesheet" href="/resources/style/ie.css">
<![endif]-->
For more information, see How do I make sure my API documentation is rendered correctly for users of Internet Explorer 9 and below?
What are reset.css and base.css and why would I use them?
There are two reasons you might want to reference the platform reset.css and base.css stylesheets:
- Best practices: Reset.css resets styles to a baseline that's consistent across browsers. It's a good practice to reset styles and then define styles, so that the user experience for users reading your API doc is consistent across browsers.
- Document tagging: The various document tags used by the platform are defined in base.css. If you don't reference base.css, the doc tags will not work; if you don't use reset.css, they might not have a consistent appearance.
Best practices
When you're authoring your API documentation, it's a good idea to use consistent layout and styles so help ensure a good user experience.
You'll probably want to define your own styles. You can do that in a cascading style sheet (CSS) that's external to your files, and upload the CSS with your files, making sure that the relative location of the CSS is valid for the uploaded files. For example, you could store it in the same folder as the authored API doc content, or in a subfolder.
You can also reference the stylesheets already available on the platform. The platform's reset.css resets all styles to a consistent baseline. There are inconsistencies in the way that different browsers interpret basic styles; resetting to a consistent baseline, and building from there, helps ensure a consistent user experience across different browsers.
A second css file, base.css, adds some basic values, such as paragraph spacing and heading styles, as well as added functionality for platform documentation pages.
When you reference reset.css, some default styles such as the bulleted and numbered styles are also reset. If your documents include these elements, if you reference reset.css you'll need to define them in your API document CSS.
If you reference reset.css and your own custom css in your document files, the <head> tag of your files might look something like the below:
<head>
<title>Document Title</title>
<meta http-equiv="Content-Type" content="text/html; charset=utf-8">
<link rel="stylesheet" type="text/css" href="/resources/style/reset.css" />
<link rel="stylesheet" type="text/css" href="/resources/style/base.css" />
<link rel="stylesheet" type="text/css" href="customapidoc.css" />
</head>
If you use reset.css, you'll probably want to define basic styles in your own custom css. For example, your definitions for your ol (ordered list, numbered) and ul (unordered list, bulleted) might look something like the example below:
ul {
    list-style: disc outside none;
}
ol {
    list-style: decimal outside none;
}
ul, ul li, ol, ol li {
    margin-left: 13px;
    padding-left: 8px;
}
If you need to add compatibility for users of IE9 and below, you can include a conditional comment to an additional stylesheet. For details and an example, see How do I make sure my API documentation is rendered correctly for users of Internet Explorer 9 and below?
You can also reference an example API doc CSS file.
Doc tagging
The platform offers several tags that you can use to add functionality to your content; for example:
- Including Test Client inline in your authored API documentation
- Including generated API doc inline in your authored API documentation
These tags rely on there being valid links to reset.css and base.css within the <head> tag of the HTML file. If base.css is not there, the tags will not work; if reset.css is not there, they might work but not look right. Both need to be there, with reset.css being listed first.
For more information on the range of tags available and how to use them in your API documentation, see API Documentation Maintenance.
Does the platform require that HTML files be saved in a specific code format?
Yes, all HTML files must be saved in UNIX code format. This requirement is to ensure optimum compatibility across operating systems.
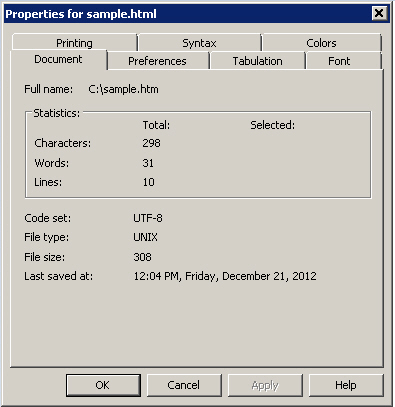
One method you can use to verify if your files have the correct format is to select View > Document Properties in TextPad. If the "Code set" is UTF-8, and "File type" is UNIX, then the code format your file is saved as is correct.
Note that you must also add the following meta data tag in your <head> tag to indicate that the file code set is UTF-8:
<meta http-equiv="Content-Type" content="text/html; charset=utf-8">
API Documentation:
What API documentation publishing options does the platform provide?
After adding an API, you can add documentation for your API using one or more of the following methods:
- HTML—You can upload HTML documentation and associated support files (for example, graphics) using the File Manager.
- Methods—You can add documentation for RESTful services using the Swagger UI add-on that is integrated into the APIs > My APIs > choose API > Documentation section. When you add a RESTful service using the Add a New API Wizard, the system adds the methods/operations defined in the API to a pre-defined system template composed of Swagger HTML, JavaScript, and css assets. You can then add your documentation content and configure what aspects of the API documentation you would like to show or hide based on the state of your current API.
- Reference—If you already have API documentation developed and published to a website, you can create and upload a custom topic that links to the reference documentation.
What document styles can I use for API documentation?
API documentation content should be defined using standard HTML and CSS files. In choosing styles, make sure you’re aware of any corporate or team guidelines, and be consistent across your file set so that users see the same styles and typographical conventions as they read your content.
Can I add other types of content to my API documentation?
As well as formatted HTML for your content, and CSS files to control the visual display, you can upload some other types of content and link to them from your HTML files. For example, you can use the following:
- Images: Upload any image files supported by browsers, such as JPG and PNG, and put them in the same folder as your HTML files, or in a subfolder.
- Flash objects: Upload SWF files and place them in your HTML files or set them up as external links to be viewed in a separate browser window. For example, here’s a code sample that illustrates how to link a training video done in Flash:
<a href="filename.swf" target="_blank">Training video</a>
The extra property after the filename, target="_blank", tells the browser to open the file in a new window instead of displaying the content in the current window (the platform UI).
- ZIP files: These are particularly useful if you’re offering an SDK, or if you want to offer your API documentation as a download as well as making it available in the platform. You can upload a ZIP file via the File Manager and then link to it from an HTML page. Be sure to use the Upload a File option; if you choose Upload a Zip Archive, the file is automatically unzipped when you upload it.
Note: When you're coding the link to the downloadable file, you'll need to use the soa-control-cm-inline-do-not-process-link class. See How do I code download links in my documentation on the Community Manager developer portal so that users can download files?
- PDF files: Upload PDF files and link to them from your HTML files. Note: When you link to a PDF file, be sure to specify a target window of “new window” (target=_blank).
How do I edit HTML page content for API documentation?
The platform supports content pages written in HTML. You must create your API and legal documents in an external HTML authoring tool and upload the documentation using File Manager.
Who can edit API and Legal Agreement content?
API documentation and legal content in the platform can be uploaded and managed by API Admins and Business Admins.
If you are using Simple Dev theme, the API documentation must be uploaded by a Site Admin to a special folder in the Content folder structure, using The Administration menu in Hermosa Theme.
How do I organize my API and legal agreement documentation files?
In the installation directory of the platform tenant, a /documents and /legal directory are automatically created as part of adding an API using the Add a New API Wizard. You can see these folders when you launch File Manager in the following locations:
- API > Documentation: API documentation files.
- API > Agreements: API legal agreement.
The path of the /documents and /legal folder displayed in the File Manager includes an API ID that is assigned when the API is added to the platform. The /documents path is /content/api/{APIID}.{TenantID}/documents. The /legal path is /content/api{APIID}.{TenantID}/legal.
To organize your API and legal documentation files
- Inside the /documents directory, create any folders you might need for your API documentation. For example, you might create a /css folder to store supplementary style sheets, and an /assets subfolders, to store image files that might be included in your documentation.
Note: If you upload a style sheet, it must work in conjunction with the existing document.css style sheet used for API documentation (located at {protocol}://{hostname}:{port}/style>/document.css).
- Copy any custom style sheets to the /documents/css directory where you will be storing your API documentation.
- If you want to upload single documentation files using File Manager, see How do I upload my API documentation?
- If you want to upload your documentation using a ZIP file, see How do I upload my API documentation in a ZIP file?
- If you would like to upload your documentation using a ZIP file, see How do I upload my API legal agreements?
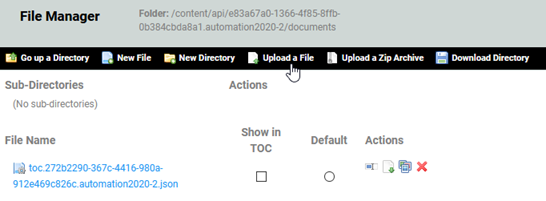
Below is an example of the /documents directory view when you load File Manager for the first time after creating an API:
How do I upload my API documentation in a ZIP file?
You can upload a ZIP file that contains your API documentation using File Manager.
To upload a ZIP file using File Manager
- Go to APIs > My APIs > choose API > Documentation.
- Click the File Manager button.
- In File Manager, click Upload a Zip Archive.
- In the File Upload box, navigate to the location of the ZIP archive file you want to upload. Choose the file, and then click Open. The ZIP file loads and expands into the /documents folder.
Can I link to an external site?
You can include links to your own external website, or any other external site, in your Community Manager developer portal documentation or API documentation.
Remember to use the "target="_blank" attribute on the link so that the external site opens in a new window rather than replacing the platform user interface. Refer to the examples below.
Link to an API website:
<p>For full information and API documentation, please visit the
<a href="http://acmepaymentscorp.com/docs/index.htm" target="_blank">ACME Payments API main page</a>.</p>
Link to the specification for a standard:
<p>For more information about OAuth 2.0, refer to the
<a href="http://oauth.net/2" target="_blank">OAuth 2.0 specification</a>.</p>
To upload your reference file see: How do I upload my API documentation?
What style sheets do I use for my HTML API documentation?
If you want to reference platform styles in your HTML API documentation, you can use the lines below in the <head> tag of your API documentation files to reference the platform CSS files:
<link rel="stylesheet" type="text/css" href="/resources/style/reset.css"/>
<link rel="stylesheet" type="text/css" href="/resources/style/base.css"/>
If you want to use custom styles, you can create or upload a CSS file for your API documentation, and reference that file in your API documentation files. You can add or edit a CSS file in the same way as you do an HTML file. Just make sure you have the correct relative link. For example, in your API documentation folder, you could create a /style subfolder and keep your CSS in there.
The API documentation folder is in this location:
- For Hermosa Theme: /content/api/{APIID}/documents.
- For Simple Dev Theme: /content/documentation. The Site Admin must upload API documentation and styles for Simple Dev. See Where do I upload API documentation for Simple Dev? (Site Admin help).
How do I set the default API documentation page using a parameter file?
When you upload a document or artifact to the Documentation section using the File Manager, a JSON-based TOC (table of contents) file is created (format: toc.{APIVersionID}.json; for example, toc.89be612e-cde6-4a35-944b-80d7b5401099.acmepaymentscorp.json). Information about the way you've set your documents to display on the document table of contents, under the Documentation menu item in the left menu bar, are stored in this file.
Using a file editor, you can manually update the "defaultFile":"{filename}.html" parameter of the file to set your default HTML document.
If you currently have a HTML document loaded and would like to switch back so that users see the generated documentation, you can delete this parameter and reset the default document back to Swagger.
To set the default documentation page in a toc.apiversion file
- In the file system, navigate to the /documents folder of your API (APIs > My APIs > choose API > Documentation, and then choose File Manager).
- If you previously uploaded an HTML file using File Manager, open a file editor, locate the toc.apiversionXXXXX.<productname>.json file, and drag the file into the editor.
- Update the HTML file in the "defaultFile":"<filename>.html" parameter to the new default.
- If you would like to switch back to the Swagger UI, remove the "defaultFile":"<filename>.html" parameter.
- Save the file.
- Return to the platform UI and clear the cache. The selected default document will display on the API > Documentation page.
Can I upload existing API documentation and use it in the platform?
Yes, you can upload your existing file set into the platform via File Manager. Make sure that relative file locations in the platform are the same as in your source files so that you don’t break any links between files (if any exist). The content also needs to be organized in the required document structure. See How do I organize my API and legal agreement documentation files?
Note: You must include head and body tags that reference all the css style sheets used in your API documentation.
How do I upload API documentation?
The API > Documentation section includes an interface that allows you to add and maintain your API documentation.
- Documentation must be in HTML format.
- It should follow the style conventions defined in the platform default style sheet (document.css) located in the apidocs\styles\ folder, and your custom API style sheet (if used) located in your {apiname}\documents\css directory.
- You can configure any document to be the top-level/intro page that displays when you click API > Documentation. See How do I set the default API documentation page using File Manager? or How do I set the default API documentation page using a parameter file?
- All documentation files must be uploaded to the \documents folder that is auto-generated when an API is created using the Add a New API Wizard.
- If you would like specific files to display in the Documentation left navigation, you can click the Show in TOC check box in the File Manager. See How do I set the file display name in the API documentation table of contents?
You can upload documentation using File Manager. You can upload documentation on a file by file basis, or you can upload a ZIP file.
To upload API content via the File Manager
- Go to APIs > My APIs > choose API > Documentation.
- Click the File Manager button.
- In File Manager, click Upload a File.
- In the File Upload box, navigate to the location of the file you want to upload. Choose the file, and then click Upload. You can also upload multiple files in a ZIP file. After uploading your files, set the default page. See How do I set the default API documentation page using File Manager? or How do I set the default API documentation page using a parameter file?
How do I update API and legal agreement documentation I've added to the platform?
To update API and legal agreement documentation that you've added to the platform, you must upload the new file using File Manager. See How do I upload my API documentation? or How do I upload my API legal agreements? for details.
How do I test updated API documentation?
When you add or change API documentation, it’s a good idea to preview it in the browser to make sure it looks correct and no symbol characters are displaying. For example, if you have more than one space separating a word, the additional space may be displayed as a symbol character in some browsers.
When you save the content, it’s displayed for you in your own browser window. However, another user reading API documentation might use a different browser. Since there are differences between browser defaults that might affect the visual display, it’s a good idea to check how your content looks in the most popular browsers.
Simply copy and paste the URL. Although you need to be signed in to edit the content, no login is required for viewing most content pages.
It’s a good idea to make sure your content changes look OK in Internet Explorer, Firefox, and Google Chrome.
How do I configure my API documentation so it's searchable in the platform?
If you would like your documentation to be searchable in the platform, include the <title> tag (for example, <title>Doc Name</title>) at the top of your HTML file, within the <head> tag.
The example below shows the structure and sequence.
Note: this example uses reset.css to reset styles. For more information, see What are reset.css and base.css and why would I use them?
<html>
<head>
  <meta http-equiv="Content-Type" content="text/html; charset=utf-8">
  <title>Searchable Text</title>
  <link rel="stylesheet" type="text/css" href="/resources/style/reset.css"/>
  <link rel="stylesheet" type="text/css" href="/resources/style/base.css"/>
  <link rel="stylesheet" type="text/css" href="customapidoc.css" />
  <!--[if lte IE 9]>
  <link rel="stylesheet" href="/resources/style/ie.css">
  <![endif]-->
</head>
<body>
<h2>Document Heading</h2>
<p>Document Content</p>
</body>
</html>
Linking in API Documentation:
How do I link to another location in the same document in Hermosa Theme?
Use the standard # coding as shown below.
Coding of the link:
<p>For more information, see <a href="#section_2">Section 2</a>.</p>
Coding of the destination content:
<a name="section_2"></a><h4>Section 2</h4>
Note: coding for this type of link is the same in Simple Dev theme.
How do I link to a content file in the same folder in Hermosa Theme?
Use a standard <a href> link with the filename, as shown below.
For more information about the ACME Payments API, see
<a href="index_pmt_api.htm">ACME Payments API: Overview</a>.</p>
How do I link to an API content file in a subfolder in Hermosa Theme?
Use a standard <a href> link with the relative path and the filename, as shown below.
<p>For more information about security with the ACME Payments API, see
<a href="api_payments/acmepaymentsapi_security.htm">Security</a>.</p>
How do I link to a content file in a parent folder in Hermosa Theme?
Use a standard <a href> link with the relative path and the filename, as shown below.
<p>For an overview of the ACME Payments API, see
<a href="../index_pmt_api.htm">ACME Payments API: Overview</a>.</p>
How do I link to a platform content page in Hermosa Theme?
Normally, when coding a relative link to another file, you must include the full filename, including extension, and include folder names that you might need to reference in going up or down the folder structure from one folder to another, as in the examples shown above.
When coding a link to a platform user interface page or main platform content page, you don't need to do that. You can code an absolute link using a special class that substitutes the path.
Note: You can use this approach to link to a platform page from:
- API documentation pages
- Any other HTML pages on the platform, such as help pages
You'll need to do these things:
- Reference the page's unique name. Use the part of the page URL that's after the # sign. For example:
- Page URL: {protocol}//{hostname}/{TenantID}/#/home/apis
- Link reference: #/home/apis
- Apply this class on the link: soa-control-cm-route-link.
Below are the URLs for some platform content pages you might want to link to:
- {hostname}/#/home/support (main Support page).
- {hostname}/#/home/apis (My APIs list)
- {hostname}/#/home/apps (My Apps list)
For example, let's say you want to link from the API documentation to the APIs > My APIs > choose API > list. All you need to do is reference the page name, as follows:
<p>Go to the <a class="soa-control-cm-route-link" href="#/home/apis">My APIs list (Hermosa Theme)</a>,
and choose the API from the list.</p>
How do I link to a platform content page in a platform subfolder in Hermosa Theme?
Let's say that your version of the Community Manager developer portal includes, in the main help, a secondary page for each API, This file resides in a subfolder. You want to link to this page from your API documentation main page.
First, access the file in the Community Manager developer portal to get the URL. You'll see that the URL is:
{protocol}{hostname}/{TenandID}/#/home/learnmore/api_summaries/acmepayments_finance_api.htm
To link to this file from your API documentation page, you'll need to complete these actions:
- Reference the page's unique name in the link. Use the part of the page URL that's after the # sign. For example:
- Page URL:
{protocol}//{hostname}/{TenantID}/#/home/learnmore/api_summaries/acmepayments_finance_api.htm - Link reference:
#/home/learnmore/api_summaries/payments_finance_api.htm
- Page URL:
- Apply this class on the link: soa-control-cm-route-link.
In your file, the link looks like this:
<a class="soa-control-cm-route-link" href="#/home/learnmore/payments_finance_api.htm">Link to the summary page for the ACME Payments Corp Finance API</a>
To users, the link looks like this:
Link to the summary page for the ACME Payments Corp Finance API
In the <head> tag of your file, the script file is referenced like this:
<script language="javascript" src="/ui/apps/atmosphere/123/resources/console/SOA/console/common/tag_lib/dist/tag_lib.min.js" type="text/javascript"></script>
How do I link to an external site or document in Hermosa Theme?
When coding a link to an external site, document, or other file, first test the link yourself in the browser. Include target="_blank" as shown below so that the site or document opens in a new browser tab or window rather than replacing the existing one.
<p>For more information, visit <a href="http://acmepaymentscorp.com/api" target="_blank">http://acmepaymentscorp.com/api</a>.</p>
How do I link to another API documentation file in the API documentation folder in Hermosa Theme?
If you have multiple documentation files in the documentation folder and want to link directly to one of them without using a relative link, you can use the standard coding to reference another file in the same folder, as shown below:
<a href="another_api_doc_file.htm">Another API Doc File</a>
When do I need to reference the tag_lib.min.js file?
The platform includes a JavaScript file, tag_lib.min.js, that you can link to in the <head> tag of your HTML files to support the use of the following tags in your API documentation or other content files:
- soa:testclient (used for including inline Test Client in your authored API documentation: see Inline Test Client in Authored API Documentation).
- soa:generatedoc (used for including inline generated Swagger 2.0 API documentation within authored API documentation: see Combined Authored and Generated API Documentation).
- soa:generateopenapidoc (used for including inline generated OAS 3.0 API documentation within authored API documentation: see Combined Authored and Generated API Documentation).
You do not need to reference this file when using the soa-control-cm-route-link class used in linking to platform pages.
How do I reference the tag_lib.min.js file?
If you are using one or more of the additional tags that rely on the JavaScript file, tag_lib.min.js (see When do I need to reference the tag_lib.min.js file? above), you'll need to include a link to this file.
In the <head> tag of your HTML file, reference the script file like this:
<script language="javascript" src="/ui/apps/atmosphere/123/resources/console/SOA/console/common/tag_lib/dist/tag_lib.min.js" type="text/javascript"></script>
The entire <head> tag might look something like the example below:
<html lang="en" xmlns:soa="http://soa.com">
  <head>
    <meta http-equiv="Content-Type" content="text/html; charset=UTF-8"/>
    <meta http-equiv="X-UA-Compatible" content="IE=edge"/>
<!-- The css files below are needed for the inline testing feature to be displayed correctly -->
    <link rel="stylesheet" type="text/css" href="/resources/style/reset.css"/>
    <link rel="stylesheet" type="text/css" href="/resources/style/base.css"/>
    <!--[if lte IE 9]>
    <link rel="stylesheet" href="/resources/style/ie.css">
    <![endif]-->
<!-- The script files below are needed for the inline testing feature to work correctly -->
    <script language="javascript" src="config.js" type="text/javascript"></script>
    <script language="javascript" src="/ui/apps/atmosphere/123/resources/console/SOA/console/common/tag_lib/dist/tag_lib.min.js"type="text/javascript"></script>
Notes:
- When you reference reset.css, as in the above example, you must also define styles in your custom css. For more information, see What are reset.css and base.css and why would I use them?
- The above example includes an additional CSS reference to support users of IE versions 9 and earlier (lines 10–12, after the base.css reference). For more information, see How do I make sure my API documentation is rendered correctly for users of Internet Explorer 9 and below?
Using File Manager:
What is File Manager and what functionality does it offer?
File Manager is a simple file management tool that allows you to upload documentation source files.
Navigation: APIs > My APIs > choose API > Documentation: click the icon in the upper left-hand corner of the right pane.
File Manager includes the following functionality:
| This File Manager feature... | Allows you to... |
|---|---|
| Go up a Directory | Navigate one level up the directory tree. By default, API documentation is stored in the \documents default directory. If you are creating a folder structure, make it below, not above. All documentation for a specific API should reside in the applicable \documents folder or folders below it. |
| New Directory | Create a new subdirectory in the current directory. |
| Upload a File | Upload a single file; for example, HTML, .swg, and associated documentation support files such as images, one file at a time. |
| Upload a Zip Archive | Upload a ZIP archive into the \documents folder. |
| Download Directory | Download the current directory, and all files and folders below it that you are authorized to access, into one ZIP file. You have the option to save or open the file. |
| Show in TOC | Display a file in the left-hand navigation underneath the Documentation menu. |
| Default | Identify the default file that will load when the user chooses the Documentation menu. |
| Rename | Rename a file. When selected a File Name popup displays where you enter the file to be renamed. |
| View Direct | View the current file via a URL address. |
| Set Display Name | Configure the name that will display in the Documentation section if the Show in Toc option is selected. When selected, a File Name popup displays where you enter the file to be renamed. |
| Delete | Delete a file. |
How do I add a file to the API documentation table of contents?
To add a file to the documentation table of contents
- Go to APIs > My APIs > choose API > Documentation.
- Click the File Manager button.
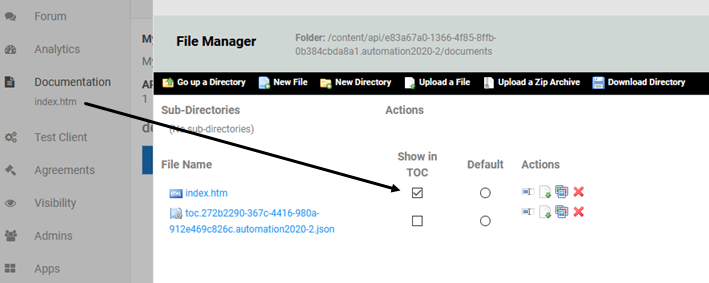
- In File Manager, click the box for the file, under Show in TOC. The filename displays in the Documentation table of contents. Note that this does not make this file the default viewed when users click Documentation, it just adds it to the left menu.
You can take additional steps to control accessibility of the API documentation:
- To set the default, see How do I set the default API documentation page using File Manager?
- To change the display name of the file, see How do I set the file display name in the API documentation table of contents?
How do I change the sequence of files displayed in the API documentation table of contents?
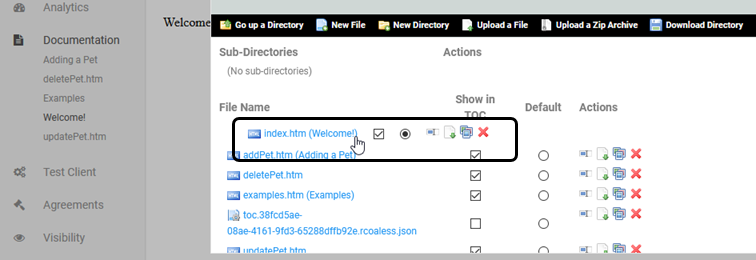
By default, files are displayed in the documentation table of contents by the file name sequence. When you change the display name, the sequence does not change. To change the display sequence of the documentation table of contents, you can simply drag and drop in the File Manager, as shown in the example below. The changes are immediate.
To change the sequence of files in the documentation table of contents
In the example below, the default file is moved to the top of the documentation TOC.
- Go to APIs > My APIs > choose API > Documentation.
- Click the File Manager button. For this example, the initial position of the file is shown below. Files are displayed in alphabetical sequence, and so, by default, the index.htm file is not the first file on the TOC.
- In File Manager, click the file that you want to move, and drag it to its new position in the file sequence, as shown below.
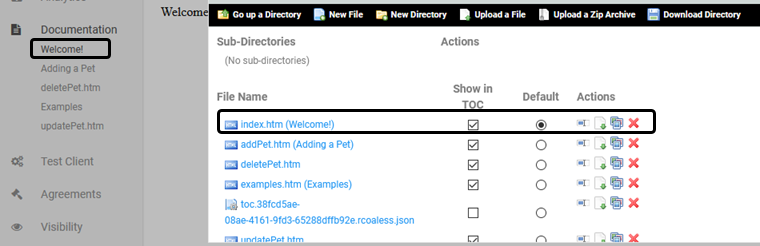
- Review the table of contents to make sure the file is now displayed in the correct position on the Table of Contents, as shown in the example below.
- When done, click outside the File Manager window.
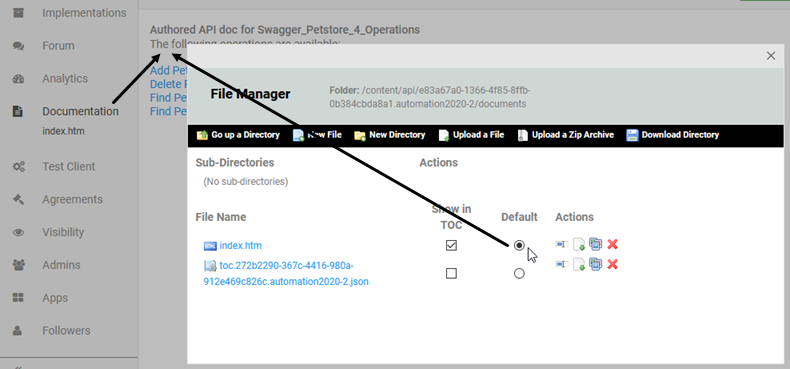
How do I set the default API documentation page using File Manager?
To set the default API documentation page that is displayed when users click to view the API documentation
Note: First, upload the page that you want to display as the default. For instructions, see How do I upload API documentation?
- Go to APIs > My APIs > choose API > Documentation.
- Click the File Manager button.
- In File Manager, click the Default radio button. The selected document will automatically be displayed when users click to view the API documentation.
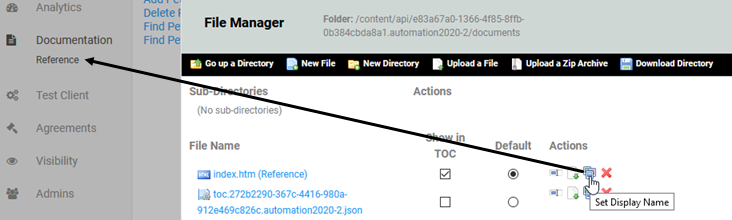
How do I set the file display name in the API documentation table of contents?
To set the display name of a file in the API documentation table of contents
- Go to APIs > My APIs > choose API > Documentation.
- Click the File Manager button.
- In File Manager, click Set Display Name. The Display Name dialog box displays. Enter the name you would like to display in the table of contents for this file and click OK. The name of the file changes in the table of contents, as shown below.
How do I rename a file in File Manager?
To rename a documentation source file
- Go to APIs > My APIs > choose API > Documentation.
- Click the File Manager button.
- In File Manager, click the Rename icon.

- The File Name dialog box displays. Enter the new filename and click OK. Be sure to preserve the file extension, or rename to a valid extension for the file type. The filename changes in the File Manager display.
Note: When renaming a file, it's important to make sure the new name includes a valid file extension that's correct for the file format; for example, index.html or index.htm.
How do I view a file in File Manager?
To view a documentation source file
- Go to APIs > My APIs > choose API > Documentation.
- Click the File Manager button.
- In File Manager, click the View Direct icon. The selected document views in the browser.

How do I delete a file using File Manager?
To delete a document source file
- Go to APIs > My APIs > choose API > Documentation.
- Click the File Manager button.
- In File Manager, click the Delete icon.

- At the confirmation prompt, click OK.
How do I set up my API documentation to offer both authored and Swagger/OAS3 generated doc?
Valid in Version: 2019.1.5 and later
If you don't upload any authored documentation, by default the generated documentation for your API is displayed to your users via API > Documentation on the left menu.
When viewing the default generated API documentation, users can toggle between viewing the documentation in Swagger 2.0 format or Open API 3.0 format. For details and screen captures, see How do I switch between Swagger 2.0 and OpenAPI 3.0 formats in the generated documentation?
However, if you upload authored documentation, by default your users will see the authored documentation, not the generated documentation.
You might want users to be able to view both your authored doc and the generated version. You can easily set this up. Follow the steps below.
To set up your API documentation so that users can see both generated doc and authored doc
- Go to APIs > My APIs > choose API > Documentation.
- Click the File Manager button.
- Upload the authored documentation:
Choose Upload a File or Upload a Zip Archive. If you upload a Zip, File Manager unzips the files.
- Still in File Manager, create a file so that the generated OpenAPI 3.0 documentation will be available via the left menu:
- Click New File.
- Name the empty file default.oas.
- Check Show in TOC.
- If needed, click the Set Display Name icon and type the display name. For example: View as OpenAPI 3.0
- Create a file so that the generated Swagger 2.0 documentation will be available via the left menu:
- Same steps as #4 above.
- Name the empty file default.swg.
- Click outside the File Manager window, and view and test the results.
- Adjust if needed.
Results: authored documentation view
The example below shows an implementation of the above procedure.
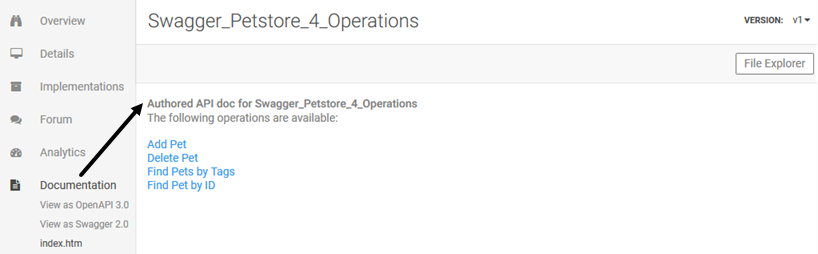
In this example:
- The ZIP file included the main index file for the authored documentation, index.htm, and an individual static file for each operation.
- Both versions of generated doc, Swagger 2.0 and Open API 3.0, were added to the left menu by creating empty default.oas and default.swg files.
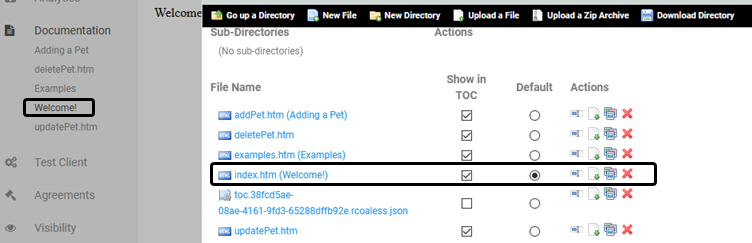
Results: File Manager view
The File Manager settings are shown below.
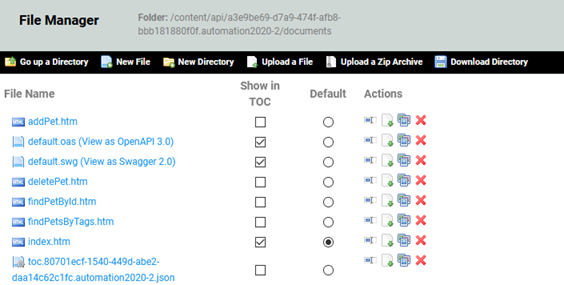
Note that:
- index.htm is specified as the default file to show when the user clicks Documentation.
- index.htm is shown in the left menu but not the files for the individual operations, which are available via links in index.htm. This is a matter of preference.
- To modify the left-menu display text, click the Set Display Name icon and type the name. If there is a display name, it is shown in parentheses in the above view.
Results: generated documentation view
If the user clicks one of the left menu entries for the generated doc, it is available, as shown below:
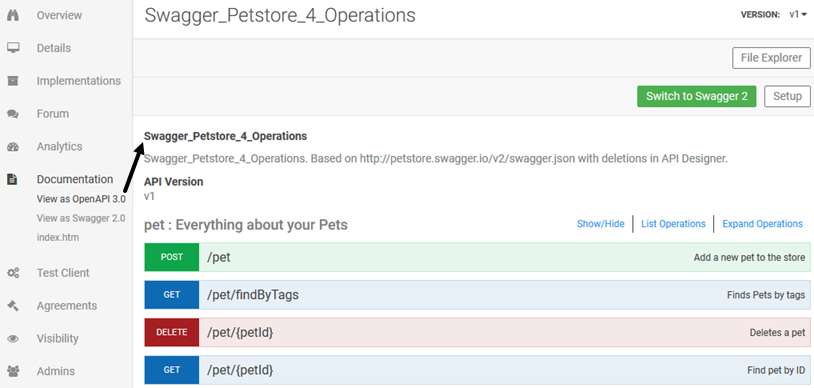
Note that the generated documentation is shown by default, but if you upload authored documentation, it replaces the generated documentation. You must make these placeholder files for the generated documentation so that both types of documentation are available for your users.
Using Swagger:
What is Swagger and how does it work?
Swagger (http://swagger.io) is a specification and complete framework implementation for describing, producing, consuming, and visualizing RESTful web services. It produces dynamically generated documentation that includes methods, parameters and models. The platform includes an implementation of Swagger that works in conjunction with the Add a New API Wizard.
When you define an API, the structure is dynamically generated and added to a predefined Swagger template. The documentation-ready structure is available in the API documentation section where you add a title, description, implementation notes, and parameter information.
The documentation content is stored in a resources.swg file. Using the File Manager you can add this file to your table of contents to make it the default display document when a user goes to the APIs > My APIs > choose API > Documentation page. You can also add the Swagger document URL to your HTML documentation.
What are the Swagger controls and how do I edit page content?
The Swagger documentation includes a series of page controls for displaying and navigating through the method documentation as follows:
Swagger Controls:
- Show / Hide—A toggle that expands or collapses the API methods.
- List Operations—Displays the API operations.
- Expand Operations—Displays the Implementation Notes and Parameter section of the operations.
- Raw—Displays the JSON code that comprises the resources.swg file.
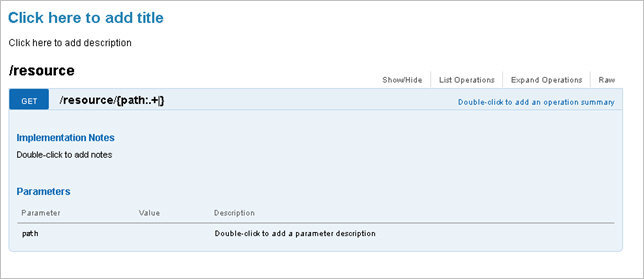
Editing Options:
You can add / edit the following areas in Swagger documentation. Go to the Documentation page that includes the Swagger and perform the desired step.
To add a page title
- Click into the "Click here to add a title" text box and specify your documentation title.
- To save the title, click outside the text box.
To add a description
- Click into the "Click here to add a title" text box and specify your documentation title.
- To save the title, click outside the text box.
To add implementation notes to an API operation
- Go to a method and select List Operations.
- Select the operation you would like to add implementation notes to and click Expand Operations.
- Double click under the "Implementation Notes" label, select "Double-click to add Notes." A text box displays.
- Enter your data and click outside the text box to save.
To add a parameter description to an API operation
- Go to a method and select List Operations.
- Select the operation you would like to add implementation notes to and click Expand Operations.
- In the Parameters section, select "Double-click to parameter description." A text box displays.
- Enter your data and click outside the text box to save.
What style sheets do I use for my Swagger documentation?
The Community Manager developer portal provides a pre-defined Swagger style sheet that is internal to the product and is applied to all dynamically generated Swagger documentation structures.
Can I mix Swagger and HTML files in my API documentation?
The developer platform automatically generates the Swagger documentation and pre-fills it with information from the runtime service definition. It parses the definition file and generates a Swagger document with no adornments (descriptions and so forth) that is technically accurate for each resource and verb.
The API Admin can annotate the Swagger documentation in two ways:
- Directly in the Swagger implementation in the browser by double-clicking on a text field and typing, which generates a properties file.
- By uploading a properties file created offline, or downloaded and then edited offline.
Whether the properties file is uploaded or auto-generated, the Community Manager developer portal merges the properties file with the generated Swagger documentation to produce the resulting document that is displayed to the user (rendered by the Swagger UI JavaScript).
By default, when you add an HTML file to the documents list in the folder for your API documentation, the Community Manager developer portal defaults to using HTML documentation only, rather than a mix of HTML docs and Swagger docs.
For instructions to use a mix of Swagger and HTML files, see Combined Authored and Generated API Documentation.
It's best to modify the display names; otherwise, the display name is the filename, including extension.
Note: If you have a Swagger properties file in the documentation folder, the Community Manager developer portal merges the Swagger properties with the generated Swagger template.
For information about uploading API documentation files, see How do I upload API documentation?
Legal Agreements:
How do I upload my API legal agreements?
In the APIs > Agreements page, you can upload and manage one or more legal agreements for an API. When a legal agreement is active, it is displayed as part of the API Access wizard, and an app developer requesting access must accept the legal agreement to complete the request.
To upload the API legal agreement file via the File Manager
- Go to APIs > My APIs > choose API > Agreements.
- Click Upload Agreement.
- In File Manager, click Upload a File.
- In the File to Upload dialog box, click Browse to navigate to the location of the file you want to upload. Choose the file, and then click Open.
Note: It's best to use an HTML or text file.
- Click the Publish check box to add the document name to the Agreements list, accessible via Manage Agreements.
- Click outside the File Manager to exit.
What style sheets do I use for my API legal agreements?
API legal agreements use the platform default style sheets. Active legal agreements display in the API Access Wizard when a user requests access to your API. To ensure that your legal agreement displays properly in this wizard, download the legal agreement sample file and use it as a template to structure your legal agreement HTML.
View a sample legal agreement file.
For more information about API legal agreements, see Legal Agreement Maintenance.


