API Documentation Maintenance
Add and maintain authored API documentation and/or generated API documentation.
Note: For information about tagging API documentation for visibility by different audiences, see API Documentation Visibility Tagging.
Video content:
- Authored API documentation: Learn how to use Akana to create and edit API documentation to deliver technical content and instructions for easy integration.
- Inline Test Client: Learn how to use Akana to review documentation and test an API by using Test Client within the context of the API documentation.
Table of Contents
Authored API Documentation:
- What is the API documentation maintenance process?
- Who can upload API documentation content?
- How do I add API documentation?
- How do I manage documentation for more than one API version?
- Can I link to API documentation on a different site?
- What are the content development guidelines for API documentation?
- How do I upload my API documentation files?
- How do I download my API documentation files?
- I'm not using doc tagging; why do I still need a metadata.xml file?
- How do I make sure my API documentation is rendered correctly for users of Internet Explorer 9 and below?
- How do I code download links in my documentation on the Community Manager developer portal so that users can download files?
- How do I code external links in my documentation on the Community Manager developer portal?
- Can my API documentation be rendered on a third-party portal? (2019.1.31 and later)
Inline Test Client in Authored API Documentation:
- How do I include inline Test Client in my authored API documentation?
- How do I set up the config.js file to show inline Test Client in my authored API doc?
- How do I set up the config.js file to include body content in the inline Test Client example?
- How do I set up the config.js file to predefine the list of apps available for testing in inline Test Client?
- How do I set up the config.js file to automatically populate security policy values in inline Test Client?
- How do I set up my authored API doc file to show inline Test Client?
- How do I view/test that inline Test Client is working in my authored API doc content?
- How do edit the config.js file for the inline Test Client feature?
- How do I link to the API-specific Test Client for my API, so developers can click through from my API documentation in Simple Dev theme?
- Does inline Test Client support policies assigned at the operation level? (2020.2.0 and later)
Generated API Documentation:
- What is the generated API documentation feature and how does it work?
- How do I add generated API doc to the documentation Table of Contents?
Combined Authored and Generated API Documentation:
- How do I include generated API doc inline in my authored API doc?
- How do I set up the config.js file to show generated API doc inline in my authored API doc?
- How do I reference the config.js file to show generated API doc inline in my authored API doc content?
- How do I view/test that the generated API doc is showing up inline in my authored API doc content?
Authored API Documentation:
What is the API documentation maintenance process?
You'll need to develop your API documentation outside the platform in your own HTML editor. Once your content is ready you can upload it to the site.
Who can upload API documentation content?
In Hermosa Theme, you can upload documentation for a specific API if you are logged in and have one of the following roles:
- An API Admin for the API. This could be the person who set up the API on the platform or any other person who is a member of the API Admin team.
- A Business Admin
API documentation for Simple Dev Theme must be uploaded by the Site Admin in Hermosa Theme.
How do I add API documentation?
You can add documentation for your API to the API > Documentation section in two ways:
- By uploading content using the platform File Manager. See Using File Manager.
- By using the Swagger documentation tool that is integrated with the platform. See Using Swagger.
How do I manage documentation for more than one API version?
If you add a new API version, you can update the existing documentation or create an entirely different set of documents. By default, all documentation files reside in the same folder.
Here are a couple of approaches you could take to maintain files from different versions within the same folder structure:
- Differentiate file names by version. For example, if you have two versions, with some files shared between versions and some files different for each version, you could name the files operationname_v1.htm, operationname_v2.htm, and so on. You could have one main index page that links to files for each version, or you could have a separate index page for each version.
- Use version-specific subfolders. For example, you could store version-specific files in v1 and v2 subfolders and keep shared files in the main documentation folder. In this scenario, you would need to have at least one file for each version in the main folder that would reference the version-specific files in the subfolders, or a single index page providing access to both versions.
Can I link to API documentation on a different site?
You can link to any external site from your API documentation. For example, if you already have a website established for your API and/or your documentation, you could upload a file with some introductory text and a link to direct users to your website for the information about your API.
Remember to use the "target="_blank" attribute on the link so that the documentation site opens in a new window rather than replacing the platform user interface. For examples, see Can I link to an external site?
What are the content development guidelines for API documentation?
The platform provides a detailed set of content development guidelines for API documentation, including publishing, editing, styles, content organization, file upload, testing, and updating. For details, see Content Development Guidelines for API Admins.
How do I upload my API documentation files?
You can upload HTML files and associated images, PDF files, or other content to the API > Documentation section of the platform using the File Manager.
At minimum, you should provide the following files that are the entry point to your API documentation:
- Hermosa Theme: index page in the /documents folder.
- Simple Dev Theme: main documentation page accessed via Documentation link at top of Simple Dev main page.
There are two approaches to file upload:
- ZIP file:
- Hermosa Theme: Zip all the documentation files and upload them following the instructions in To upload API documentation files via the File Manager (Hermosa Theme): below.
- Simple Dev: Zip all the documentation files into one zip file named documentation.zip, and upload it from the Content folder using the Upload a File option which uploads and unzips the file (not the Upload a Zip Archive option, which uploads without unzipping). The documentation folder is created automatically, and the files are placed in that folder. If you use a ZIP file, make sure that you are in the right folder when you upload it, and that it doesn't include extra folders that you don't want. When you upload, the file is unzipped as part of the upload process, using the paths, if any, specified within the ZIP file.
- Individual file uploads:
- Hermosa Theme: Follow the instructions in To upload API documentation files via the File Manager (Hermosa Theme): below.
- Simple Dev: Get the Site Admin to create a documentation folder if there isn't one (exact name and case as given here), change directory into the documentation folder, and then upload the files individually.
For Hermosa Theme, the API Admin can upload the files following the procedure below.
For Simple Dev theme, the Site Admin must upload the files in Hermosa Theme: More > Admin >File Manager and then choose Content File Manager, in a folder below the content folder. The Site Admin must use or create a folder named documentation (so the path is content/documentation). As soon as the files are uploaded in Hermosa Theme, they are immediately visible in Simple Dev theme. Just log in and click the Documentation page to view the API documentation. For more information, see Where do I upload API documentation for Simple Dev? (Site Admin help).
To upload API documentation files via the File Manager (Hermosa Theme):
- Go to API > Documentation.
- Click the File Manager button.
- In File Manager, click Upload a File (to upload and unzip your documentation) or Upload a Zip Archive (to upload a static ZIP file, such as an SDK file that users might want to download).
- In the File Upload box, navigate to the location of the individual file or ZIP file you want to upload. Choose the file, and then click Open.
- Click Upload.
How do I download my API documentation files?
You can download a ZIP file of the documents directory for your API, including all files in the directory and all subfolders and their contents. You can download a ZIP of any content you are authorized to view and edit. Follow the instructions below.
To download your API documentation files via the File Manager
- Go to API > Documentation.
- Click the File Manager button.
- In File Manager, click Download Directory.
- Choose to open or save the file.
I'm not using doc tagging; why do I still need a metadata.xml file?
If your API uses licenses, you must include the metadata.xml file with appropriate tagging. If you don't specify a metadata.xml file with permissions to your content, or if you include a metadata.xml file but don't add the information about your files, your users will not see your documentation, other than the properties file and any legal agreements. This includes a custom CSS file, or any other assets associated with your documentation.
This is always true when the API uses licenses, even if the API is public.
How do I make sure my API documentation is rendered correctly for users of Internet Explorer 9 and below?
If your documentation might be viewed by users of IE version 9 or earlier, you'll need to add the conditional comment shown below into the <head> tag of your documentation.
This also affects the display of the inline Test Client, so if you're using inline Test Client and your users might be using IE version 9 or earlier, be sure to include the lines below:
<!--[if lte IE 9]>
<link rel="stylesheet" href="/resources/style/ie.css">
<![endif]-->
Add this conditional comment below the stylesheet references for base.css and reset.css. For example:
<html lang="en" xmlns:soa="http://soa.com">
<head>
<meta http-equiv="Content-Type" content="text/html; charset=UTF-8" />
<meta http-equiv="X-UA-Compatible" content="IE=edge" />
<title>API Documentation Overview</title>
<link rel="stylesheet" type="text/css" href="/resources/style/reset.css"/>
<link rel="stylesheet" type="text/css" href="/resources/style/base.css"/>
<!--[if lte IE 9]>
<link rel="stylesheet" href="/resources/style/ie.css">
<![endif]-->
<script language="javascript" src="/ui/apps/atmosphere/123456/resources/uiframework/jquery/jquery.js"
  type="text/javascript"></script>
<script language="javascript" src="/ui/apps/atmosphere/123456/resources/console/javascript/dynamic_docs.js"
  type="text/javascript"></script>
</head>
How do I code download links in my documentation on the Community Manager developer portal so that users can download files?
Valid in Version: 2020.1.0 and later
Normally, in HTML authoring, to code a link that allows users to download a file, you might use something like this:
<a href="files.zip?download=true" target="_blank">Download ZIP file</a>
In documentation within the Community Manager developer portal, whether authored API documentation or site content, you'll need to take an extra step to make sure that file download works for your users.
In addition to the normal coding, just add the following class into your download link: soa-control-cm-inline-do-not-process-link.
In the above example, where the download file is in the same folder as the HTML file that contains the link, you'd code it like this:
<a class="soa-control-cm-inline-do-not-process-link" href="./files.zip?download=true" target="_blank">Download ZIP file</a>
In the above:
- The class, soa-control-cm-inline-do-not-process-link, is on the <a> tag.
- The download file is in the same folder as the HTML file, but you must include the ./ designation, as shown above, rather than just the filename. In the Community Manager developer portal API doc, a link in the same folder must always include this, to indicate that it's the current folder.
The example below shows the same link if the download file is in a subfolder:
<a class="soa-control-cm-inline-do-not-process-link" href="assets/files.zip?download=true" target="_blank">Download ZIP file</a>
The example below shows the same link if the download file is in a parent folder:
<a class="soa-control-cm-inline-do-not-process-link" href="../files.zip?download=true" target="_blank">Download ZIP file</a>
How do I code external links in my documentation on the Community Manager developer portal?
There are two ways to code an external link in your Community Manager developer portal content or authored API documentation:
External link to open in a new browser tab
Normally, in HTML authoring, to code a link to an external site you might use something like this:
<a href="http://example.com">Example website</a>
If you wanted the content to open in a new browser tab, you would specify target="_blank" as shown below:
<a href="http://example.com" target="_blank">Example website</a>
In the Community Manager developer portal, a link to an external site is automatically opened in a new page. Do not specify the target.
All you need is the <a> tag is the URL and the link text, as shown in the first example above.
External link to replace existing content
Normally, in HTML authoring, if you want to include a link to an external site, and you want it to replace the existing content, you might use something like this:
<a href="http://example.com">Example website</a>
In documentation within the Community Manager developer portal, with the above example, the external site is displayed in a new browser tab.
if you want to link to an external site and you want the external page to replace the existing content page, you'll need to add the following class into your download link:
- soa-control-cm-inline-external-link
Using the same example as above, if you want the external page to replace your Community Manager developer portal content page, code it like this:
<a class="soa-control-cm-inline-external-link" href="http://example.com">Example website</a>
In the above:
- The class, soa-control-cm-inline-external-link, is on the <a> tag.
- Do not include the target attribute, which forces the content to be displayed in a new page.
Can my API documentation be rendered on a third-party portal?
Valid in Version: 2019.1.31 and later
A third-party portal can be configured to display API documentation files from the Community Manager developer portal, including inline Swagger documentation, inline OpenAPI documentation, and inline Test Client.
This requires some setup which would be done by a site administrator. No additional configuration is required from the API Admin developing the API documentation.
Configuring third-party portal access is a customization task. For additional information, see Rendering API documentation in a third-party portal.
Note: Valid in Version: 2019.1.35 and later: In some cases, a user might get an HTTP 401 Unauthorized message, and not be able to view API documentation displayed in an iframe on a third-party portal, where the third-party portal domain is different from the developer portal domain, because of changes in default settings in newer browsers. There are some settings that the Site Admin can modify to address this (Admin > Settings > Security). The two settings are Authentication and CSRF Token Cookie Attribute - Domain and Authentication and CSRF Token Cookie Attribute - SameSite.
Inline Test Client in Authored API Documentation:
How do I include inline Test Client in my authored API documentation?
You can modify your authored API documentation with a special tag so that when users are viewing the API documentation in the Community Manager developer portal, they can access Test Client inline, in the context of the API documentation. This helps make it easy for your users to test out your API, each operation, with their app (or without any app context, if the API supports anonymous access).
Restriction: The Test Client is accessible to the users after logging in.
To set this up, you'll need to:
- Create a config.js file (a different filename is fine too as long as you reference the correct filename). For instructions on creating this file, refer to How do I set up the config.js file to show inline Test Client in my authored API doc? below. For Simple Dev, this file must include the correct API Version ID for your API; in Hermosa Theme, it's not necessary to include the API Version ID since you upload the API documentation in the context of a specific API.
- In your authored documentation content file, do two things (see How do I set up my authored API doc file to show inline Test Client? below):
- Reference config.js (or whatever filename you used) in the <head> tag, as well as other files needed for this feature to work.
- Include the <soa:testclient config="{MYAPP.profile_name}"> tag in the body.
- Upload the files. See How do I upload my API documentation files?
- Test. See How do I view/test that inline Test Client is working in my authored API doc content? below.
How do I set up the config.js file to show inline Test Client in my authored API doc?
Note: these instructions include procedures for all themes.
If you want readers of your API documentation to be able to view and use Test Client inline in your authored API doc, you'll need to:
- Set up a config.js file.
- Upload it to the platform with your documentation files.
- Reference it within the <head> section of any authored file in which you want to display inline Test Client.
Then, you can use special tags in your authored documentation file, and the API-specific, operation-specific Test Client will appear at runtime, inline in the authored HTML file.
To set up the config.js file to show inline Test Client
- Create a file called config.js and paste the content, using the examples given below as a starting point. Refer to the appropriate example for the theme you are using:
- Customize the values in the sample file to match your own API, using the information in Customizing the config.js file below.
Note that the file content is a little different depending on the theme you are using:
- Hermosa Theme: since API documentation is already in the context of a specific API, the APIVersionID is not needed. See Config.js file for inline Test Client in Simple Dev Theme below.
- Simple Dev: Since API documentation is stored in a general location for all APIs, the valid APIVersionID is included in the JSON object in the config.js file. See Config.js file for inline Test Client in Hermosa Theme below.
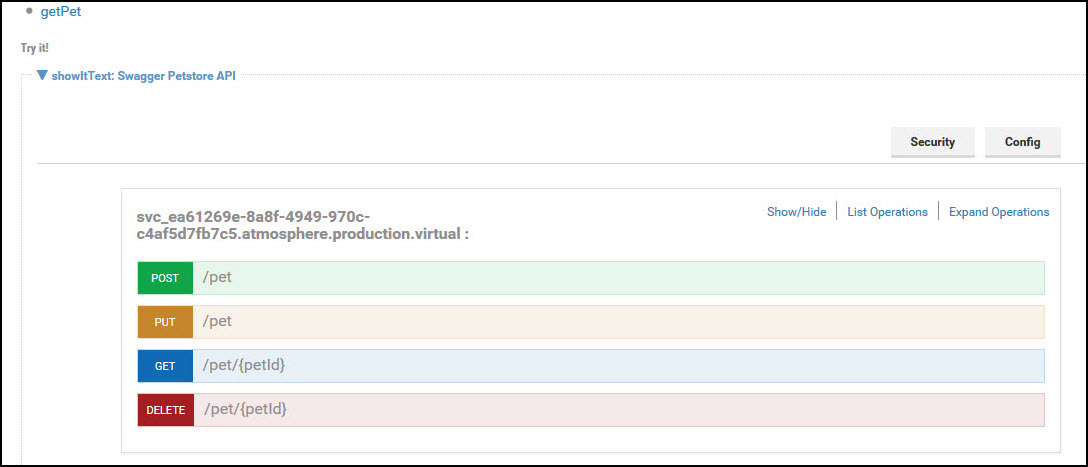
Note: The file is quite long, so the sample files below use only two operations. You can expand for multiple operations as needed. This example is based on a scenario where a platform API is set up to reference the Swagger Petstore API, and the sample files below reference two operations from that API, getPetById and addPet. The section for each operation is named profile_{operationname}. You can find these API definitions at http://petstore.swagger.io (external link).
Config.js file for inline Test Client in Simple Dev Theme
Note: Simple Dev theme is deprecated in version 2020.2.0, and will be removed in a future release.
window.MYAPP = {
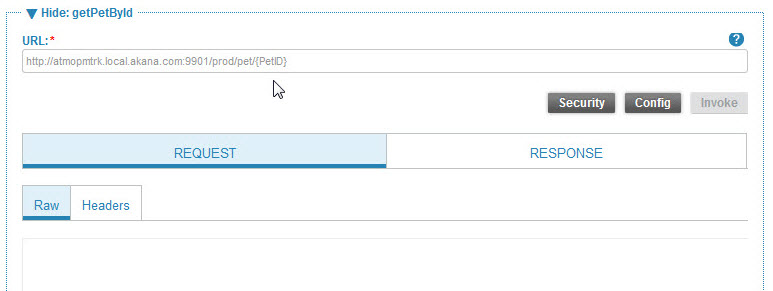
"profile_getPetById" : {
"general" : {
"showItText" : "Click here to try getting a pet with the Pet ID",
"hideItText" : "Click here to close",
"summary" : "Get pet by ID"
},
"target" : {
"apiVersion" : {
"defaultValue" : "ae85330c-6562-4abc-86fd-1ea42f6d3f22.acmepaymentscorp"
},
"environment" : {
"display" : false,
"defaultValue" : "Live"
},
"operation" : {
"display" : false,
"defaultValue" : "getPetById"
},
"headers" : {
"display" : false,
"Content-Type" : "None",
"Accept" : "application/json",
"items" : [{
"name" : "header1",
"value" : "value1"
}]
},
"parameters" : {
"display" : false,
"items" : [{
"name" : "petId",
"value" : "1434747602017",
"nameIsChangeable" : false,
"type" : "path"
}, {
"name" : "name1",
"value" : "value1",
"nameIsChangeable" : true,
"type" : "query"
}]
}
}
},
"profile_addPet" : {
"general" : {
"showItText" : "Click here to try adding a pet",
"hideItText" : "Click here to close",
"summary" : "Add a pet to the petstore"
},
"target" : {
"apiVersion" : {
"defaultValue" : "ae85330c-6562-4abc-86fd-1ea42f6d3f22.acmepaymentscorp"
},
"environment" : {
"display" : false,
"defaultValue" : "Live"
},
"operation" : {
"display" : false,
"defaultValue" : "addPet"
},
"headers" : {
"display" : true,
"Content-Type" : "application/json",
"Accept" : "application/json",
"items" : []
},
"parameters" : {
"display" : true,
"items" : [{
"name" : "petId",
"value" : "1",
"nameIsChangeable" : false,
"type" : "path"
}, {
"name" : "name",
"value" : "fluffy puppy",
"nameIsChangeable" : false,
"type" : "form"
}, {
"name" : "status",
"value" : "available",
"nameIsChangeable" : false,
"type" : "form"
}]
}
}
}
};
Config.js file for inline Test Client in Hermosa Theme
Note: This example includes line numbers, for easy reference to different sections of the file. The line numbers are not part of the actual file.
01)  window.MYAPP = {
01)   "profile_getPetById" : {
02)     "general" : {
03)       "showItText" : "Show: getPetById",
04)       "hideItText" : "Hide: getPetById",
05)       "summary" : "Get pet by ID"
06)     },
07)     "target" : {
08)       "environment" : {
09)         "display" : false,
10)         "defaultValue" : "Live"
11)       },
12)       "operation" : {
13)         "display" : false,
14)         "defaultValue" : "getPetById"
15)       },
16)       "headers" : {
17)         "display" : false,
18)
19)         "Content-Type" : "None",
20)         "Accept" : "application/json",
21)
22)         "items" : [{
23)           "name" : "header1",
24)           "value" : "value1"
25)         }]
26)       },
27)       "parameters" : {
28)         "display" : false,
29)         "items" : [{
30)           "name" : "petId",
31)           "value" : "1434747602017",
32)           "nameIsChangeable" : false,
33)           "type" : "path"
34)         }, {
35)           "name" : "name1",
36)           "value" : "value1",
37)           "nameIsChangeable" : true,
38)           "type" : "query"
39)         }]
40)       }
41)     }
42)   },
43)
44)   "profile_addPet" : {
45)     "general" : {
46)       "showItText" : "(Show) Adds a Pet",
47)       "hideItText" : "(Hide) Add a Pet",
48)       "summary" : "Adds a pet to the petstore"
49)     },
50)     "target" : {
51)       "environment" : {
52)         "display" : false,
53)         "defaultValue" : "Live"
54)       },
55)       "operation" : {
56)         "display" : false,
57)         "defaultValue" : "addPet"
58)       },
59)       "headers" : {
60)         "display" : true,
61)
62)         "Content-Type" : "application/json",
63)         "Accept" : "application/json",
64)
65)         "items" : []
66)       },
67)       "parameters" : {
68)         "display" : true,
69)         "items" : [{
70)           "name" : "petId",
71)           "value" : "1",
72)           "nameIsChangeable" : false,
73)           "type" : "path"
74)         }, {
75)           "name" : "name",
76)           "value" : "Armadillo",
77)           "nameIsChangeable" : false,
78)           "type" : "form"
79)         }, {
80)           "name" : "status",
81)           "value" : "available",
82)           "nameIsChangeable" : false,
83)           "type" : "form"
84)         }]
85)       }
86)     }
87)   }
88) };
Customizing the config.js file
The above is your starter file. Within this file, you'll need to set up the specific values applicable to your API on the platform. The core values that you set up for the inline Test Client feature are explained below. The first two are key, because without them the feature will not work. The others are cosmetic, controlling the text your users will see when viewing the feature.
- Line 02, profile name: Choose a profile name that's intuitive. For example, you could use {profile_operationname}.
- Line 04, showItText: Displayed inline in the API documentation when the user first views the documentation, before the user clicks. Modify as needed.
- Line 05, hideItText: Displayed when the user clicks the link to try out the inline Test Client feature. Modify as needed.
- Line 06, summary: Displayed in both views. A short description of your API.
- Simple Dev only: Line 10, APIVersion: use the correct APIVersionID for your API.
- API-specific values: update API-specific values, such as environment, headers, and parameters, as needed.
The examples below show where the text that you add will display to your users:
Default display before user clicks Show It. ShowitText and summary are visible.

Display when user clicks the Show It link. ShowitText and summary are visible, plus the inline Test Client.
Remember that you also need to reference the config.js file in your documentation file or file in order to view the above results. See How do I set up my authored API doc file to show inline Test Client? below.
How do I set up the config.js file to include body content in the inline Test Client example?
If you have an API that passes body content, such as a POST or PUT operation, you might want to include sample body content in your API documentation example in inline Test Client.
You can do this by adding a parameter with name body, in the parameters section of the config.js file.
The example below shows a snippet of a config.js file showing how you can define default body content in your API documentation example, in inline Test Client. This fits into the parameters section of the file (line 67 for the second operation in Config.js file for inline Test Client in Hermosa Theme, which is a POST operation).
{
  "parameters":{
    "display":true,
    "items":[
      {
        "name":"body",
        "value":"This is the sample body content for the API documentation example",
        "nameIsChangeable":false,
        "type":"entity"
      }
    ]
  }
}
How do I set up the config.js file to predefine the list of apps available for testing in inline Test Client?
In your API documentation, in your inline Test Client, you might want to limit the list of apps that users can test against your API. By providing one or more apps that users can test against, you can help ensure that customers have a good testing experience with your API; you might also want to do this for security reasons.
You can hard-code a list of one or more apps, in the config.js file. When you do this, when the user clicks the Security button in the inline Test Client in your API documentation, the user can only test with an app that's on the list.
You must make sure that:
- The AppID values you provide are valid.
- Each of the apps you add to the list has a valid contract with your API.
To hard-code a list of apps available for testing in inline Test Client
- Open up the config.js file. For instructions on locating or creating this file, see How do I set up the config.js file to show inline Test Client in my authored API doc?
- For the first <soa:testclient> include tag in your API documentation, for which you want to predefine the apps list, find the connectedAppsList section of the file, or add one if there isn't one already existing, using the example below.
- Add in the array of AppID values, as shown in the example below.
It doesn't matter where this appears in the connectedAppsList section of the file.
Note: If you're not sure where to get the AppID values, see To get the AppID in the Community Manager developer portal below.
- Validate the JSON to make sure your change is well-formed.
- Repeat steps 2 through 4 for every <soa:testclient> include tag defined in your API documentation file. For example, if you have one tag for each operation in your API, you'll need to add the connectedAppsList element for each operation.
- Save the file, import it into your API documentation, and test.
The example below shows how you should construct the list, and where it should go in the file:
{
  ...
  "connectedAppsList":[
    {
      "label":"Config 1 - 124434324332234",
      "value":"7LBMrITq7oijeSdIElEIw8gh.open"
    },
    {
      "label":"Config 2 - 124434324332234",
      "value":"9UwkGGycG2d9NKCPCkuEs3Al.open"
    },
    {
      "label":"Config 3 - 124434324332234",
      "value":"7LBMrITq7oijeSdIElEIw8gh.open"
    }
  ],
  ...
}
For an example of a complete config.js file, see config.js.
To get the AppID in the Community Manager developer portal
If you're not sure where to get the AppID values, go to the App Details page in the Community Manager developer portal. The URL will be something like this:
{hostname:port}/acmepaymentscorp/#/app/3c1a1bce-b0b7-4665-9d43-144a94fff6ca.acmepaymentscorp/details
In the above, 3c1a1bce-b0b7-4665-9d43-144a94fff6ca.acmepaymentscorp is the AppID. Save out the value and use it in the config.js file.
How do I set up the config.js file to automatically populate security policy values in inline Test Client?
When testing an API in Test Client, certain policies that might be attached to the API require the user to provide certain values. For example:
- If the API uses the Atmosphere Application Security Policy, users must provide Token Location and Token Algorithm. See Test Client security settings: AtmosphereApplicationSecurityPolicy.
- If the API uses the OAuth security policy, users must choose OAuth Version, Grant Type, and Authentication Method. See Test Client security settings: OAuth policy.
In your API documentation, you can set up the inline Test Client to provide values for one or more of these policies that are attached to the API, by adding content to the config.js file.
To set up inline Test Client with security policy values
- Open up the config.js file. For instructions on locating or creating this file, see How do I set up the config.js file to show inline Test Client in my authored API doc?
- Find the securityPolicies section of the file, or add one if there isn't one. Use the example below as a guide.
- Validate the JSON to make sure your change is well-formed.
- Save the file, import it into your API documentation, and test.
The example below shows this section of the file, with values configured for the AtmosphereApplicationSecurityPolicy and OAuth policies:
{
  ...
  "securityPolicies" : {
    "AtmosphereApplicationSecurityPolicy" : {
      "tokenAlgorithm" : "HmacSHA1",
      "tokenLocation" : "Header"
    },
    "OAuth" : {
      "oAuthVersion": "OAuth 2.0",
      "grantType": "authorization_code",
      "authMethod": "SharedSecret"
    }
  },
  ...
}
For an example of a complete config.js file, see config.js.
How do I set up my authored API doc file to show inline Test Client?
Note: These instructions are valid for all themes.
Once you have the config.js file set up with the correct values for your specific API, as explained in How do I set up the config.js file to show inline Test Client in my authored API doc? above, you'll need to modify your API documentation HTML files to correctly reference config.js to implement this functionality. In each file where you want to implement inline functionality, do these two things:
- Add specific <script> tags in the <head> tag to reference config.js and any other needed files, as shown in the example below, so that the feature will work.
- Add the special tag, soa:testclient, inline in the body of the authored API documentation file.
1: Adding <script> tags in the head of your API doc file
In the <head> tag, reference the tag_lib.min.js file. For details, see How do I reference the tag_lib.min.js file? An example is shown below.
<html lang="en" xmlns:soa="http://soa.com">
  <head>
    <meta http-equiv="Content-Type" content="text/html; charset=UTF-8"/>
    <meta http-equiv="X-UA-Compatible" content="IE=edge"/>
<!-- The css files below are needed for the inline testing feature to be displayed correctly -->
    <link rel="stylesheet" type="text/css" href="/resources/style/reset.css"/>
    <link rel="stylesheet" type="text/css" href="/resources/style/base.css"/>
    <!--[if lte IE 9]>
    <link rel="stylesheet" href="/resources/style/ie.css">
    <![endif]-->
<!-- The script files below are needed for the inline testing feature to work correctly -->
    <script language="javascript" src="config.js" type="text/javascript"></script>
    <script language="javascript" src="/ui/apps/atmosphere/123/resources/console/SOA/console/common/tag_lib/dist/tag_lib.min.js"type="text/javascript"></script>
Note: when you reference reset.css, as in the above example, you must also define styles in your custom css. For more information, see What are reset.css and base.css and why would I use them?
2: Including the soa:testclient tag in the body of the API doc file
In the part of the document where you want the generated documentation to appear, add something along the lines of the below, making sure you have the correct operation name in place of addPet below:
<div>
  <soa:testclient config="{MYAPP.profile_addPet}">
  </soa:testclient>
</div>
Once each file is updated as needed, get all the files uploaded, as explained in Where do I upload API documentation for Simple Dev? (Site Admin help).
How do I view/test that inline Test Client is working in my authored API doc content?
Video content: Learn how to use Akana to review documentation and test an API by using Test Client within the context of the API documentation.
Once you have your files set up, you can upload the files and test to make sure everything is correct, and that Test Client is now displayed inline in your authored API content.
The procedures below include all the steps you'll need to take to view the final product.
The process for Hermosa Theme and the process for Simple Dev theme are slightly different.
To test that Test Client is displayed inline in authored API content, in Simple Dev Theme
Note: Simple Dev theme is deprecated in version 2020.2.0, and will be removed in a future release.
- If you don't already know it, get the API Version ID for your API (in Hermosa Theme, API's Details page, last part of the URL before /details).
- Set up the config.js file for Simple Dev implementation, including the API Version ID from Step 1 and all properties for your API operations. See Config.js file for inline Test Client in Simple Dev Theme.
- Set up an authored HTML content file with:
- The necessary <script> tags in the <head> tag of the file, including the reference to your config.js file. See Adding <script> tags in the head of your API doc file.
- The doc tag that causes Test Client to be displayed inline. See Including the soa:testclient tag in the body of the API doc file.
- Get the Site Admin to do the following:
- Go to More > Admin >File Manager. Choose Content, click the File Manager button, and create a documentation folder.
- Navigate into the documentation folder.
- Upload the config.js file and the authored HTML documentation file, along with your CSS file or any other files you might want.
- Log into Simple Dev theme and click Documentation.
- Scroll to the location of the doc tag and click the heading. Test Client is generated and displayed inline. Users can then specify values and test the operation in the context of the documentation. Depending on how the API is set up, users might need to choose an app and specify other settings such as OAuth version.
To test that Test Client is displayed inline in authored API content, in Hermosa Theme
- Set up the config.js file for Hermosa Theme implementation. See Config.js file for inline Test Client in Hermosa Theme.
- Set up an authored HTML content file with:
- The necessary <script> tags in the <head> tag of the file, including the reference to your config.js file. See Adding <script> tags in the head of your API doc file.
- The doc tag that causes the generated doc to be displayed inline. See Including the soa:testclient tag in the body of the API doc file.
- Create an empty file named default.swg. When you add it to the documentation TOC in Hermosa Theme, this allows users to click directly to the generated documentation even when authored documentation is in the documentation TOC.
- In Hermosa Theme, go to your API > Documentation page.
- In File Manager, upload the following files:
- The config.js file from Step 1.
- The content file from Step 2.
- The default.swg file from Step 3.
- Optionally, any supporting files you might want, such as your CSS file or any other files.
- In File Manager, for your content file:
- Check the Show in TOC check box
- Choose a display name (Set Display Name icon).
- In File Manager, for your default.swg file:
- Check the Show in TOC check box
- Choose a display name (Set Display Name icon).
- On the left menu bar, click the menu item for your authored documentation file. Scroll to the location of the doc tag and click the heading. The documentation is generated and displayed inline.
How do edit the config.js file for the inline Test Client feature?
To get the inline Test Client working correctly inline in your authored API documentation, you'll need to edit many of the values in the config.js file to match the values set up for your API. This includes such things as operation name, path, Content-Type (request header), Accept header (response header), and other values.
It's best to work with one operation first, and when you have that working, model the rest on that. The example given in How do I set up the config.js file to show inline Test Client in my authored API doc? has two operations.
The values at the top of the file determine how the inline Test Client feature is displayed, but the rest of the file content determines whether the inline Test Client actually works as expected.
How do I link to the API-specific Test Client for my API, so developers can click through from my API documentation in Simple Dev theme?
Platform app developers have access to the Test Client tool, which allows them to test out different APIs. Test Client includes a drop-down list, where app developers can choose from a list of available APIs that the current app has a contract with.
In Simple Developer theme, an API-specific version of the new Test Client testing tool is available, to facilitate testing of an individual API from the API page of the Community Manager developer portal. The API Admin can also use this to include an API-specific link to Test Client within the API documentation. When using Test Client in the context of a specific API, developers can invoke APIs that support anonymous access, use the credentials for one of their apps, or use a custom app identity.
The API-specific version of Test Client is not part of the standard user interface, but you can construct the URL and include it in your API documentation. App developers reading your API documentation can click through and test out your API. This API-specific version of Test Client does not give access to all the app developer's APIs, just the one that's in the URL.
The URL is:
{protocol}//{hostname}/#!apis/{APIID}/versions/{APIVersionID}/testclient
For example:
http://acmepaymentscorp.com/acmepaymentscorp/#!apis/12770263-e036-4222-b8eb-87d33676d3ad.acmepaymentscorp/
versions/9e3846ee-bbbf-4982-82ca-5a2411ec619b.acmepaymentscorp/testclient
To construct the URL for your specific API, follow the instructions below. You can then link to this page from your platform API documentation. For information on including links in platform API documentation, see How do I code links in Simple Dev?
To construct the URL for an API-specific version of Test Client
- Go to the URL for your implementation of Simple Developer theme and log in.
- At the Welcome page, copy the URL up to #!, omitting the welcome from the end of the URL. It will look something like the below:
http://acmepaymentscorp.com/acmepay/
- Get the APIID and APIVersionID for your API. For example, you could:
- Go to the URL for your implementation of Hermosa Theme and log in.
- Go to the Details page for your API and copy the URL. It will look something like the below:
http://acmepaymentscorp.com/#/api/21bfe816-5260-4444-ae77-bd2c047174f8.acmepaymentscorp/versions/
7ba40d5f-3c22-4b8f-ac9d-317cbee4b83f.acmepaymentscorp/details
- In the above, the first ID, after /api/, is the APIID, then /details/, and then the APIVersionID. Copy that whole portion of the URL, beginning with the APIID and ending with the APIVersionID, to use in constructing the URL for your API-specific Test Client.
- Join together the part of the URL from Step 2, and the part from Step 3, and add /testclient at the end.
- Test the URL to make sure you have it right.
To reference the URL for an API-specific version of Test Client in your API documentation
Once you have the URL, you can reference it with a direct inline link from your API documentation. To have the Test Client display in a separate browser tab, use the Target attribute _blank, as shown below.
<p>To test your app with our API, try out the
<a href="{protocol}//{hostname}/{Tenantname}/#!apis/{APIID}/versions/{APIVersionID}/testclient" target="_blank">
Test Client testing tool</a>.</p>
To upload your file to the API documentation folder in Simple Dev theme, see Where do I upload API documentation for Simple Dev?
Does inline Test Client support policies assigned at the operation level?
Valid in Version: 2020.2.0 and later
Policies assigned at the operation level work when testing an operation with inline Test Client embedded in authored API documentation, just as they do when testing in Test Client in the context of an app or API.
For information on Test Client support of policies attached to an individual operation, rather than to the entire API service, see Does Test Client support policies assigned at the operation level?
Generated API Documentation:
What is the generated API documentation feature and how does it work?
When you set up your API definition, either in the platform or by referencing an existing service in the API Gateway, the platform automatically generates API documentation based on your API definition.
Within the context of the platform in Hermosa Theme, you and your users can test your API, in the context of an app (or anonymously if the API supports anonymous access).
This generated API documentation testing functionality is essentially the same as the Test Client feature, but Test Client is available inline, in the context of your API.
Some of the things you and your users can do with the generated API documentation:
- Test each operation.
- Test with different variables, including app context, token location, OAuth version, grant type (for OAuth 2.0), and authentication method.
You can use this feature to test and monitor the usability of your API; your developer audience can use it to discover the great capabilities of your API.
How do I add generated API doc to the documentation Table of Contents?
In Hermosa Theme, after you've set up your API definition, you can view generated API documentation immediately: from your API's Details page, click Documentation on the left menu.
By default, if you haven't uploaded any authored API documentation, the generated API documentation is displayed.
However, If you upload authored documentation and add one of the files to the Documentation table of contents so that users will see that content (see How do I add a file to the API documentation table of contents? and subsequent topics), the generated API documentation is no longer displayed, by default.
In this scenario, you'll need to take a couple of extra steps to make sure that both authored and generated API documentation is visible to your users. You'll need to:
- Create an empty file named default.swg and upload it to your documents folder (API > Documentation > File Manager).
- In File Manager, check Show in TOC and set a display name for the file: for example, Generated.
Now, both sets of documentation are accessible to your users on the Documentation Table of Contents.
For detailed instruction for working with File Manager, refer to Using File Manager.
Combined Authored and Generated API Documentation:
How do I include generated API doc inline in my authored API doc?
If you upload authored HTML API documentation, the authored documentation is shown to users by default, in both themes. If you want to offer both types of documentation to your users, you'll need to take a couple of extra steps to make the generated API documentation available to your users.
To set this up, you'll need to:
- Create a config.js file (a different filename is fine too as long as you reference the correct filename). For instructions on creating this file, refer to How do I set up the config.js file to show generated API doc inline in my authored API doc? below. For Simple Dev, this file must include the correct API Version ID for your API; in Hermosa Theme, it's not necessary to include the API Version ID since you upload the API documentation in the context of a specific API.
- In your authored documentation content file, do two things:
- Reference config.js (or whatever filename you used) in the <head> tag.
- For inline API doc in Swagger 2.0 format: Include the <soa:generatedoc config="{MYAPP.tag1}"> tag in the body of the file.
- For inline API doc in OAS 3.0 format: Include the <soa:generateopenapidoc config="{MYAPP.tag1}"> tag in the body of the file.
For information on how to set these files up, refer to the topics below.
To make generated API documentation available along with authored HTML API documentation (Hermosa Theme)
- Upload the API documentation, if you didn't do so already. See Using File Manager.
- In File Manager, add the main documentation index page to the documentation TOC so that users can click into it.
- In File Manager, upload an empty file named default.swg and add it to the documentation TOC. This allows users to click directly to the generated documentation even when authored documentation is in the documentation TOC.
- Upload the config.js file.
How do I set up the config.js file to show generated API doc inline in my authored API doc?
Note: these instructions include procedures for all themes.
If you want readers of your API documentation to be able to see the generated doc for your API, inline within your authored documentation, you'll need to set up a config.js file, upload it to the platform with your documentation files, and reference it within the <head> section of any authored file in which you want to display generated API doc inline in the file.
Then, you can use special tags in your authored documentation file, and the generated API documentation will appear at runtime, inline in the authored HTML file.
As a starting point, create a file called config.js and paste the content as shown below.
Note that the file content is a little different depending on the theme you are using:
- Hermosa Theme: since API documentation is already in the context of a specific API, the APIVersionID is not needed.
- Simple Dev: Since API documentation is stored in a general location for all APIs, you must include the valid APIVersionID in the config.js file.
Config.js file for inline generated API doc in Simple Dev Theme
Note: Simple Dev theme is deprecated in version 2020.2.0, and will be removed in a future release.
01 window.MYAPP = {
02 "tag1" : {
03 "general" : {
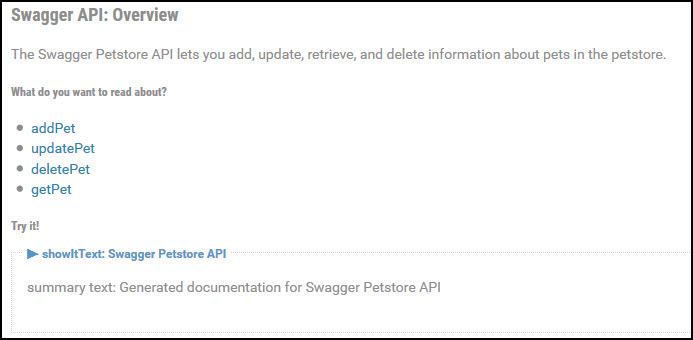
04 "showItText" : "Swagger Petstore API",
05 "hideItText" : "Swagger Petstore API",
06 "summary" : "summary text: Generated documentation for Swagger Petstore API"
07 },
08 "target" : {
09 "apiVersion" : {
10 "defaultValue" : "ea61269e-8a8f-4949-970c-c4af5d7fb7c5.acmepaymentscorp"
11 }
12 }
13 }
14 };
Config.js file for inline generated API doc in Hermosa Theme
01  window.MYAPP = {
02    "tag1" : {
03      "general" : {
04        "showItText" : "Swagger Petstore API",
05        "hideItText" : "Swagger Petstore API",
06        "summary" : "summary text: Generated documentation for Swagger Petstore API"
07      },
08    }
09  };
Information general to both versions
The above is your starter file. Within this file, you'll need to set up the specific values applicable to your API on the platform. The values that you set up are listed and explained below. The first two are key, because without them the feature will not work. The others are cosmetic, controlling the text your users will see when viewing the feature.
- Line 10, apiVersion: (Simple Dev only) paste the API Version ID for the specific API. If you're not sure of the ID, go to the API's Details page in Hermosa Theme. The API Version ID is after /versions/ in the URL. The URL is constructed like this: {protocol}://{hostname}/{tenantid}/#/APIID/versions/{APIVersionID}/details.
- Line 04, showItText: Displayed by default when user first views the documentation.
- Line 05, hideItText: Displayed when user clicks the link to try out the inline generated documentation feature.
- Line 06, summary: Displayed in both views. A short description of your API.
The examples below show where the text that you add will display to your users:
Default display before user clicks Show It. ShowitText and summary are visible.
Display when user clicks the Show It link. ShowitText and summary are visible, plus the inline testing feature.
Remember that you also need to reference the config.js file in your documentation file or file in order to view the above results. See How do I reference the config.js file to include inline generated doc in my authored API doc content? below.
When your documentation files are ready, including any authored API documentation and the accompanying config.js file, you'll need to upload the files.
For Simple Dev:
Note: Simple Dev theme is deprecated in version 2020.2.0, and will be removed in a future release.
Get the Site Admin to upload it in Hermosa Theme: More > Admin >File Manager. In the Content section, click File Manager.
From here, there are two approaches to uploading the content:
- ZIP file: Zip all the documentation files into one zip file named documentation.zip, and upload it from the Content folder. The documentation folder is created automatically, and the files are placed in that folder.
- Individual file uploads: Create a documentation folder if there isn't one (exact name and case as given here). Change directory into the documentation folder, and from there, upload the files individually.
As soon as the files are uploaded in Hermosa Theme, they are immediately visible in Simple Dev theme. Just log in and click the Documentation page to view the API documentation with inline testing capability.
For more information, see Where do I upload API documentation for Simple Dev? (Site Admin help).
For Hermosa Theme:
Go to API > Documentation and use the File Manager to upload the files.
How do I reference the config.js file to show generated API doc inline in my authored API doc content?
Note: These instructions are valid for all themes.
Once you have the config.js file set up with the correct API version and other values for your API, you'll need to modify your API documentation HTML files to correctly reference config.js to implement this functionality. In each file where you want to implement inline functionality, do these two things:
- Add specific <script> tags in the <head> tag to reference config.js and any other needed files, as shown in the example below, so that the feature will work.
- Add the special tag, inline in the body of the authored API documentation file:
- For inline generated Swagger 2.0 API documentation within authored API documentation: soa:generatedoc
- For inline generated OAS 3.0 API documentation within authored API documentation: soa:generateopenapidoc
1: Adding <script> tags in the head of your API doc file
In the <head> tag, add the lines of code shown below.
<html lang="en" xmlns:soa="http://soa.com">
  <head>
    <meta http-equiv="Content-Type" content="text/html; charset=UTF-8"/>
    <meta http-equiv="X-UA-Compatible" content="IE=edge"/>
<!-- The css files below are needed for the inline testing feature to be displayed correctly -->
    <link rel="stylesheet" type="text/css" href="/resources/style/reset.css"/>
    <link rel="stylesheet" type="text/css" href="/resources/style/base.css"/>
    <!--[if lte IE 9]>
    <link rel="stylesheet" href="/resources/style/ie.css">
    <![endif]-->
<!-- The script files below are needed for the inline testing feature to work correctly -->
    <script language="javascript" src="config.js" type="text/javascript"></script>
    <script language="javascript" src="/ui/apps/atmosphere/123/resources/console/SOA/console/common/tag_lib/dist/tag_lib.min.js"type="text/javascript"></script>
Note: when you reference reset.css, as in the above example, you must also define styles in your custom css. For more information, see What are reset.css and base.css and why would I use them?
2: Including the generatedoc or generateopenapidoc tag in the body of the API doc file
In the part of the document where you want the generated documentation to appear, add something along the lines of the examples below:
For Swagger 2.0:
<h5>Try it!</h5>
  <div>
    <soa:generatedoc config="{MYAPP.tag1}">
    </soa:generatedoc>
  </div>
For OAS 3.0:
<h5>Try it!</h5>
  <div>
    <soa:generateopenapidoc config="{MYAPP.tag1}">
    </soa:generateopenapidoc>
  </div>
Once each file is updated, get all the files uploaded, as explained in Where do I upload API documentation for Simple Dev? (Site Admin help).
How do I view/test that the generated API doc is showing up inline in my authored API doc content?
Once you have your files set up, you can upload the files and test to make sure everything is set up correctly and the generated API documentation is now displayed inline in your authored API content.
The procedures below include all the steps you'll need to take to view the final product.
The process for Hermosa Theme and the process for Simple Dev theme are slightly different.
To test that the generated API doc is displayed inline in authored API content, in Simple Dev Theme
Note: Simple Dev theme is deprecated in version 2020.2.0, and will be removed in a future release.
- If you don't already know it, get the API Version ID for your API (Hermosa Theme, API Details page, last part of the URL before /details).
- Set up the config.js file:
- For Simple Dev implementation, include the API Version ID from Step 1. See Config.js file for inline generated API doc in Simple Dev Theme.
- Set up an authored HTML content file with:
- The necessary <script> tags in the <head> tag of the file, including the reference to your config.js file. See Adding <script> tags in the head of your API doc file.
- The doc tag that causes the generated doc to be displayed inline. See Including the generatedoc or generateopenapidoc tag in the body of the API doc file.
- Get the Site Admin to do the following:
- Go to More > Admin >File Manager. In the Content section, click File Manager and create a documentation folder.
- Navigate into the documentation folder.
- Upload the config.js file and the authored HTML documentation file, along with your CSS file or any other files you might want.
- Log into Simple Dev theme and click Documentation.
- Scroll to the location of the doc tag and click the heading. The documentation is generated and displayed inline.
To test that the generated API doc is displayed inline in authored API content, in Hermosa Theme
- Set up the config.js file for Hermosa Theme implementation. See Config.js file for inline generated API doc in Hermosa Theme.
- Set up an authored HTML content file with:
- The necessary <script> tags in the <head> tag of the file, including the reference to your config.js file. See Adding <script> tags in the head of your API doc file.
- The doc tag that causes the generated doc to be displayed inline. See Including the generatedoc or generateopenapidoc tag in the body of the API doc file.
- Create an empty file named default.swg. When you add it to the documentation TOC in Hermosa Theme, this allows users to click directly to the generated documentation even when authored documentation is in the documentation TOC.
- In Hermosa Theme, go to your API > Documentation page.
- In File Manager, upload the following files:
- The config.js file from Step 1.
- The content file from Step 2.
- The default.swg file from Step 3.
- Optionally, any supporting files you might want, such as your CSS file or any other files.
- In File Manager, for your content file:
- Check the Show in TOC check box
- Choose a display name (Set Display Name icon).
- In File Manager, for your default.swg file:
- Check the Show in TOC check box
- Choose a display name (Set Display Name icon).
- On the left menu bar, click the menu item for your authored documentation file. Scroll to the location of the doc tag and click the heading. The documentation is generated and displayed inline.


