OAuth Support
Configure an API with OAuth.
Table of Contents
- What is OAuth?
- What OAuth versions are supported?
- How do I configure OAuth Details for my API?
- How do I configure my API to work with more than one OAuth Provider?
- Should I choose an OAuth Provider or a Third-Party Provider?
- What grant types does OAuth support?
- How does OAuth 2-Legged and 3-Legged Authorization work?
- How are tokens generated and used in OAuth?
- What is a Refresh Token?
- What is an access token?
- How does Resource Owner Authentication Page Login Branding work?
- What is the OAuth Authorization Server and how does it work?
- What are the OAuth 2.0 endpoints and how do they work?
- What are the OAuth 1.0a Endpoints?
- What is an Authorization Server Client Authentication Policy?
- How does Scope Mapping work?
- How does the proxy API send OAuth-related information to my API?
What is OAuth?
OAuth is an open standard security protocol for authorization that allows users to share private resources stored on one site with another site without having to share credentials.
OAuth can potentially extend the userbase of your APIs by providing a flexible, familiar way for app users to authenticate and grant permission for the app to access their resources. It makes it very easy for the audience of your API, app developers, to manage the process whereby their own users—app consumers—authenticate themselves and then authorize your app to access their resources. If you have multiple APIs on the platform, and each API has granted access to multiple apps, you then have a broadened developer community, in addition to the substantial number of users that are using the apps.
An OAuth provider set up on the platform might reference an external identity provider, such as Google or Facebook, for user authentication. The OAuth Provider determines which identity provider is used. There is always one identity provider per OAuth Provider.
In most cases, to establish access permission, the user is redirected to the identity provider. The identity provider authenticates the user via credentials such as username and password. Then, the user must give explicit permission for the app to access the user's resources. In the case of two-legged OAuth flows, the last step is not needed.
OAuth 2.0 defines the following roles of users and applications:
- Resource Owner—The person or application that owns the data that is to be shared. For example, a user on Facebook could be a resource owner. The resource they own is their data. The resource owner is typically a person, but could also be an application.
- Resource Server—The server hosting the resource owner's data. For example, Facebook is a resource server.
- Client Application—The app requesting access to the resources stored on the resource server. The resources are owned by the resource owner. For example, a client app could be a game requesting access to a user's Facebook account.
- Authorization Server—The OAuth service provider's server, which verifies that the resource owner has authenticated and has authorized the client app to access specific resources, and then issues a code to the client app. The Authorization Server and the Resource Server might be the same server, but might be different.
OAuth in the context of an API in the platform includes the following:
- Client Application—The app that wants to access the resource owner's data, which the API can provide access to. For example, the client app directs the user to the OAuth Provider with a request for the user to authorize access to resource information. The user must authenticate with credentials (for example, username or email address, password).
- OAuth Provider—An application that keeps track of which user has given authorization to which app, and has the ability to issue tokens to represent authorizations. A single OAuth Provider supports multiple APIs.
- Resource Owner—User of an API and app, with resources, such as a bank account, online photo account, or Google or Facebook account, that the app wants to access to provide goods or services to the resource owner.
- API—Works closely with OAuth Provider to trust tokens issued by the provider to allow the client app to access the resource owner's resource available via the API.
What OAuth versions are supported?
The platform supports the following OAuth versions:
- 1.0a
- 2.0
How do I configure OAuth Details for my API?
If you want your API to support OAuth, you must associate it with an OAuth Provider set up on the platform. You can do this from the API Details page, via the OAuth Details option, in the API OAuth Settings wizard. Choose from available OAuth Provider domains; each one is preconfigured with authentication domain, supported grant and access token types, and resources definitions / permissions (API operations that applications can map to and can get authorization from). The configuration settings available to you might vary according to the provider you choose.
If there are multiple options, choose the OAuth Provider configuration that represents the most appropriate OAuth use case for the intended usage of your API, and then configure resource mapping to map specific operations within your API to establish authorization permissions.
Multiple OAuth Providers
You can set up your API to use multiple OAuth Providers. The provider used for messages to your API depends on the scopes you set up for each OAuth Provider.
To configure API OAuth Details
- Choose your API and then, from the left menu, click Details.
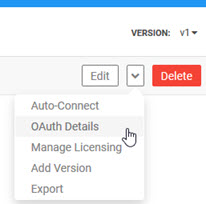
- On the API Details page, from the drop-down to the right of the page, choose OAuth Details, as shown below.
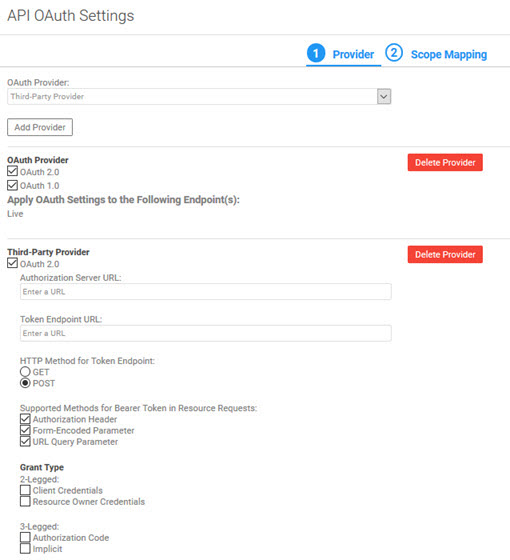
The API OAuth Wizard launches at Tab 1, the Provider page.
- In the OAuth Provider field, choose from the drop-down list of available options. Possible selections, depending on platform configuration:
- Third-Party Provider: choose this option to use an external OAuth Provider.
- Akana provider: choose this option if you want to choose an Akana OAuth Provider hosted on a different tenant (different implementation of the platform).
- Any other options are configured by the Site Admin and should be self-evident.
- Click Add Provider.
- Specify the settings for the provider. Options are different based on these two factors:
- Third-Party Provider: all fields are available, and you must provide any information needed to use the third-party OAuth Provider.
- Any other: only the fields that are valid for the provider you selected are displayed. Out of the options available, provide values for the features you want to use.
For details about the full set of fields, see OAuth Provider: Field Values below.
- If you're setting up another OAuth Provider, click Add Provider again and specify values for the additional provider. The example below shows a two-provider scenario.
- When done, click Next to go to Tab 2, Scope Mapping, to set up the scopes for your provider or providers.
- Choose one of the scope mapping options, and then, if applicable, set up scopes for the API or for each operation:
- API does not support scopes—Scopes are ignored.
- API-Wide Scope Mapping—In the additional table, configure one or more scopes that will apply to all operations. Click Edit to choose from available scopes, as shown below, and then click Finish.
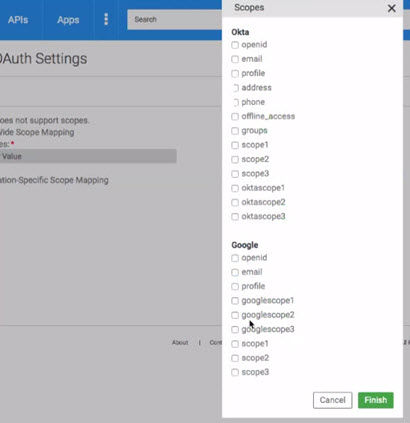
- Operation-Specific Scope Mapping—Specify scopes individually for each operation. Click Select to choose from available scopes, and then click Finish.
- In the API OAuth Settings wizard, click Finish.
OAuth Provider: Field Values
The list below includes all possible options when adding an OAuth Provider. Some of these fields, or values, might not be present, depending on the configuration of the OAuth Provider you're setting up. From the fields available, specify the values relevant for your API OAuth configuration. Unless you choose Third-Party Provider, most of the values are pre-filled.
OAuth 2.0 field values
If you want to use OAuth 2.0, check the box and provide the values below. For more information, see What are the OAuth 2.0 endpoints and how do they work?
- Authorization Server URL
- The API's OAuth 2.0 authorization endpoint URL, used to interact with the resource owner to obtain an authorization grant, if applicable.
- Token Endpoint URL
- The API's OAuth Resource Server endpoint, used by the client to obtain an OAuth 2.0 Access Token by presenting its authorization grant or refresh token, if applicable.
- HTTP Method for Token Endpoint
- The HTTP method used to retrieve the OAuth 2.0 Access Token from the API's OAuth 2.0 token endpoint URL, if applicable. Valid values: GET or POST.
- Supported Methods for Bearer Token in Resource Request
- An array of one or more supported methods applicable to Bearer Token in Resource requests for this API, if any. Could be one or more of the following:
- Authorization Header
- Form-Encoded Parameter
- URL Query Parameter
- Grant Type, 2-Legged
- Choose one or more 2-legged grant types you want your API to support: Client Credentials or Resource Owner Credentials.
- For more information, see What grant types does OAuth support?
- Grant Type, 3-Legged
- Choose one or more 3-legged grant types you want your API to support: Authorization Code or Implicit.
- For more information, see What grant types does OAuth support?
- Authorization Server for Client Policy
- Indicates the client authentication policy to use. Choose from:
- Client Authentication Policy
- Basic Authentication
- HTTPS 2-Way Authentication
- Form-Based Authentication
- Token Parameter Transmission Method
- Indicates how the token is transmitted in the message. Choose one or more: Header, POST content, or Query String.
- Authorization Endpoint Extension Parameters
- If your OAuth provider requires any additional parameters to be sent to the authorization endpoint, beyond the OAuth specification, enter the parameter names here. When the API is being tested, Test Client displays fields for these parameters, so that developers can provide values for them.
- Token Endpoint Extension Parameters
- If your OAuth Provider requires any additional parameters to be sent to the token endpoint, beyond the OAuth specification, enter the parameter names here. When the API is being tested, Test Client displays fields for these parameters, so that developers can provide values for them.
- Request URL Option for OAuth Token
- Choose Target URL or Proxy URL.
- OAuth Provider Uses Platform App Identities
- Used only with third-party OAuth provider: indicates that the OAuth implementation uses the platform app identity values (App ID and Shared Secret) for authentication of the app.
- If this field is set to Yes, the Test Client in the user interface prefills the app identity values when the app developer is testing the app with the API. If it's set to false, the Test Client leaves the fields blank for the app developer to enter authentication values provided by the API owner.
- Apply OAuth Settings to the Following Endpoint(s)
- If there is only one endpoint available, it is automatically selected. If you have more than one endpoint available (Sandbox and Live), you can choose to apply OAuth settings to only one, or to both.
OAuth 1.0a field values
If you want to use OAuth 1.0a, check the box and provide the values below. For more information, see What are the OAuth 1.0a Endpoints?
Note: You can use both versions, 2.0 and 1.0a, with your API.
- Request Token Endpoint URL
- The API's OAuth 1.0a request token endpoint URL, if applicable, used to obtain an unauthorized Request Token.
- Authorization Server URL
- The API's OAuth 1.0a authorization token endpoint URL, if applicable, used to obtain the consumer's authorization for access to the resource.
- Access Token Endpoint URL
- The API's OAuth 1.0a access token endpoint URL, if applicable, used to exchange the user-authorized Request Token for an Access Token.
- HTTP Method for Token Endpoint
- The HTTP method used to retrieve the API's OAuth 1.0a access token, if applicable. Valid values: GET or POST.
How do I configure my API to work with more than one OAuth Provider?
In some cases, you might want one API to support multiple OAuth providers; typically, in some scenario where you have multiple user groups. For example:
- An API has two audiences: internal clients, registered with a specific OAuth Provider that can only be accessed by internal clients, and external clients registered with a different OAuth provider (or providers) accessed over the internet.
- An API has two groups of users, each of which authenticates against a different user store. Internal users authenticate against an LDAP or Active Directory-based store, which is not accessible for external users; external users authenticate with an external identity provider such as PingFederate or Okta.
Setup for any subsequent OAuth Provider is the same as for the first one. The drop-down list is adjusted so that any OAuth Provider you already set up isn't on the selection list.
In Tab 2, when choosing scopes, you can specify scopes for each provider.
At runtime, when the message comes in, the platform uses the scopes specified in the OAuth token to match the message with the provider.
The basic setup is the same as for a single OAuth Provider; see To configure API OAuth Details above.
Note: Although you can set up multiple OAuth Providers, only one of them can be a Third-Party Provider. For more information about setting up a third-party OAuth Provider, see below.
Should I choose an OAuth Provider or a Third-Party Provider?
If you choose an OAuth Provider defined by the platform, the values that are required for the OAuth Provider to work are already set up.
If you want to choose an OAuth provider that isn't already supported by the platform, you can do that in your API's OAuth Details page by choosing the Third-Party option. In this scenario, you'll have to provide all the information needed for the OAuth Provider to work.
Additional details:
- Whatever provider you choose, the settings are applicable to messages to your API that go via the proxy set up on the platform.
- OAuth Provider—For any OAuth Provider available on the drop-down list in the API OAuth Details wizard, Pre-defined providers are filtered to contain OAuth versions, grants, policies, and resource mapping information that relate to specific OAuth use cases. Tokens issued by this OAuth Provider could be validated by all agents from Akana.
Note: OAuth providers are set up by the Site Admin in Administration / Domains / OAuth Provider. If the OAuth provider you need is not on the drop-down list, contact your Site Admin.
- Third-Party Provider—Choose this option if the physical endpoint will be authorizing the OAuth requests. The app still needs to send the OAuth token as part of the request, but the platform passes the token through to the physical endpoint. This allows the platform to support the API in the Test Client so that apps can test against it. Provide all the information needed based on the OAuth version and security configuration your API supports.
Note: With a third-party provider, you cannot set up scopes. The scopes must be configured in the setup for the OAuth Provider domain.
To get there: APIs > My APIs > choose API > Details. From the drop-down on the right, OAuth Details, OAuth Provider field.
What grant types does OAuth support?
The API platform supports all OAuth grant types, as detailed below. However, the OAuth Provider that your API references is preconfigured by the Site Admin. Depending on the configuration of the specific OAuth Provider, it might support only a subset of OAuth grant types. When you choose the OAuth Provider you'll see which options are supported.
Note: The platform supports all four grant types for OAuth 2.0, and Authentication Code only for OAuth 1.0a.
OAuth defines the following grant types:
2-Legged
The following grant types are used in the 2-Legged OAuth scenario.
| Grant Type | Description |
|---|---|
| Client Credentials | The client presents its own credentials to the OAuth Authorization Server in order to obtain an access token. This access token is either associated with the client’s own resources, and not a particular resource owner, or is associated with a resource owner for whom the client is otherwise authorized to act. |
| Resource Owner Password Credentials | The client collects the resource owner’s password and exchanges it at the OAuth AS for an access token, and often a refresh token (see below). This grant type is suitable in cases where the RO has a trust relationship with the client, such as its computer operation system or a highly privileged application since the client must discard the password after using it to obtain the access token. |
3-Legged
The following grant types are used in the 3-Legged OAuth scenario.
| Grant Type | Description |
|---|---|
| Authorization Code | An authorization code is returned to the client through a browser redirect after the resource owner gives consent to the OAuth Authorization Server. The client then exchanges the authorization code for an access token. Resource owner credentials are never exposed to the client. |
| Implicit |
An access token is returned to the client through a browser redirect in response to the resource owner authorization request. This grant type is suitable for clients that do not support keeping client credentials confidential (for use in authenticating with the OAuth Authentication Server) such as client applications implemented in a browser using a scripting language like JavaScript. |
How does OAuth 2-Legged and 3-Legged Authorization Work?
The number of legs used to describe an OAuth request typically refers to the number of parties involved.
- In the simple OAuth flow (a client, a server, and a resource owner), the flow is considered 3-Legged.
- When the client is also the resource owner (that is, acting on behalf of itself), it is 2-Legged.
3-Legged OAuth:
In 3-Legged OAuth a resource owner wants to give a client access to a server without sharing their credentials (for example, username or email address, password). For example, a user (resource owner) wants to give a third-party application (client) access to his Twitter account (server).
This scenario works as follows:
- Client signs up to the server and obtains client credentials (consumer key and secret).
- User wants to give the client access to his protected resources on the server.
- Client retrieves the temporary credentials (the request token) from the server.
- Client redirects the resource owner to the server.
- Resource owner grants the client access to his protected resources on the server.
- Server redirects the user back to the client.
- Client uses the temporary credentials to retrieve the token credentials (the access token) from the server.
- Client uses the token credentials to access the protected resources on the server.
2-Legged OAuth:
2-Legged OAuth describes a typical client-server scenario without any user involvement. For example, a local Twitter client application accessing your Twitter account.
This 2-legged OAuth scenario consists of the first and last steps of 3-legged OAuth:
- Client has signed up to the server and got his client credentials (consumer key and secret).
- Client uses his client credentials (and empty token credentials) to access the protected resources on the server.
How are tokens generated and used in OAuth?
OAuth tokens are generated by the platform. When a Site Administrator or API Provider defines an OAuth Provider, they select the supported OAuth grant types, whether the Authorization Server supports Refresh Tokens, and what type of access token is supported. The type of token issued is based on the configuration of the OAuth Provider that is assigned to the API.
- Tokens are used so that an app's private credentials do not have to be shared with an API.
- Instead of OAuth sending the password, it provides a token so the API does not need to see the app password.
- OAuth validates the user, not the app. The API can see the user's password, but the app cannot.
For details on access token support for OAuth 2.0 and OAuth 1.0a, see What is an access token?
What is a Refresh Token?
In some cases, an OAuth Access Token might be renewable. If the Access Token is renewable, a Refresh Token is issued. The app can use the Refresh Token to extend the duration of the grant.
Some general information about refresh tokens:
- A refresh token is issued as a string and represents the authorization granted to the client by the resource owner.
- The token denotes an identifier used to retrieve the authorization information.
- The refresh token is issued to the client by the Authorization Server and is used to obtain a new access token when the current access token becomes invalid or expires, or to obtain additional access tokens with identical or narrower scope.
- Issuing a refresh token is optional at the discretion of the Authorization Server. If the Authorization Server issues a refresh token, it is included when issuing an access token.
- Unlike access tokens, refresh tokens are intended for use only with Authorization Servers and are never sent to resource servers.
Navigation: More > Admin >Domains > Configure OAuth Provider > Grant Types > Issue Refresh Tokens
What is an access token?
An access token is issued as a string that represents an access authorization issued to the client. It is used by the client to access protected resources hosted by the resource server. Access tokens are issued to clients by an Authorization Server with the approval of the resource owner. Each access token includes an expiration attribute that indicates how long the token is valid.
Note: An access token timeout is typically 15 days (or 1296000 seconds).
OAuth 2.0:
There are two types of access tokens:
- Bearer Token—This access token type is a security token with the property that any party in possession of the token (a "bearer") can use the token in any way that any other party in possession of it can. Using a bearer token does not require a bearer to prove possession of cryptographic key material (proof-of-possession).
- Message Authentication Code (MAC)—This access token type is a security code that is typed in by the user of a computer to access accounts or portals. This code is attached to the message or request sent by the user. Message Authentication Codes (MACs) attached to the message must be recognized by the receiving system in order to grant the user access. MACs are commonly used in electronic funds transfers (EFTs) to maintain information integrity.
As part of the OAuth Provider Domain configuration process, the Add Domain Wizard requires that you select what kind of token should be issued (Bearer or Mac).
OAuth 1.0a:
A token shared secret is issued one time only.
Navigation: More > Admin >Domains > Configure OAuth Provider > Grant Types > Access Token Type
For information about the OAuth token endpoint URL when an API is hosted on the platform, see What are the OAuth endpoints for the platform?
How does Resource Owner Authentication Page Login Branding work?
When a user logs into your application using the OAuth Provider configuration, they must see a Resource Owner Authentication page (login page) that is custom branded to your organization. If you use the Akana OAuth/OIDC Provider domain, the Branding page is used to configure this page. For an External OAuth Provider Domain, the configuration is done on the external provider's site.
The Akana OAuth/OIDC Provider domain offers two branding options:
- Integrate with Existing Identity Provider—You can link to a Resource Owner Authentication page provided directly by an identity provider such as Facebook or Google. To do this, specify the Authorization Server URL on the Branding page of the Akana OAuth/OIDC Provider domain configuration.
- Integrate with Platform Identity Provider—The platform allows you to integrate with backend identity systems and configure a custom Resource Owner Authentication page. You can customize the login with a unique logo that represents your organization, footer text (for example, copyright information), and the URL you want to offer to Resource Owners and applications to access this OAuth provider capabilities.
Navigation: More > Admin >Domains > add or modify Akana OAuth/OIDC Provider domain > Branding tab.
For more information on the settings on the OAuth Provider domain branding page, see What are the settings on the Akana OAuth/OIDC Provider Branding page and what options should I choose?
What is the OAuth Authorization Server and how does it work?
In OAuth, the Authorization Server gets the user's authorization for the app to have access to the user's resources. Then, the Authorization Server issues the grant to the app.
There are two steps that the user participates in, in sequence: authentication and authorization. The user must first authenticate, usually with credentials such as a username and password. When authentication is complete, the user must then authorize the specific access to the user's resources, which the app is requesting.
In some cases these steps might flow together. For example, if Google is being used for authentication and the user is already logged in to Google, the login is recognized and the authentication step is skipped. The user then sees only the authorization page.
In other cases, the user might log in and then see the authorization page.
In both scenarios, authentication is completed or verified and then the Authorization Server requests, and collects, the resource owner's authorization and as a result issues a grant to the app.
On the platform, as part of setting up the OAuth domain, the Site Admin must specify the Authorization Server URL. This is the URL that the browser for the Resource Owner (app user) will be accessing for the OAuth grant. It is the URL at which the OAuth Provider accesses the requests, for both Authorization Endpoint and Token Endpoint.
The URL must be accessible to all the apps and end users that might use APIs that are referencing the OAuth domain. The Authorization Endpoint and Token Endpoint for OAuth 10.a and OAuth 2.0 will use different paths according to the specific OAuth version. Firewalls and DNS servers must be set up for this URL so that end users and apps can access the URL.
For information about the OAuth endpoints when an API is hosted on the platform, see What are the OAuth endpoints for the platform? (Business Admin help documentation).
What are the OAuth 2.0 endpoints and how do they work?
OAuth 2.0 defines an Authorization, Token, and Redirection endpoints. They are typically a URI on a web server.
API Administrators who are defining OAuth Providers using the Add OAuth Wizard (via More > Admin >Domains) or are configuring OAuth for a specific API using the API OAuth Wizard (via APIs > My APIs > choose API > Details) will specify an Authorization URL, Token Endpoint URL, and Redirection URI if they are using OAuth 2.0.
This section provides a brief overview of how an Authorization Server works in respect to each endpoint:
OAuth 2.0 Endpoints:
- Authorization Endpoint is the endpoint on the Authorization Server where the resource owner provides credentials, such as username and password, in and grants authorization to the client app to access the resources or a specified subset of the resources.
- Token Endpoint is the endpoint on the Authorization Server where the client application exchanges the authorization code, client ID, and client secret and receives in exchange an access token which allows the app to access the approved resources.
- Redirection Endpoint (Client Redirection URI) is the endpoint in the client application where the resource owner is redirected to, after having granted authorization at the authorization endpoint.
Authorization Server Workflow:
- When a client application wants access to the resources of a resource owner, hosted on a resource server, the client application must first obtain an authorization grant.
- Before a client application can request access to resources on a resource server, the client application must first register with the Authorization Server associated with the resource server. After the registration is complete, the registration remains valid, unless the client app registration is revoked.
- At registration the client application is assigned a client ID and a client secret (password) by the Authorization Server. The client ID and secret is unique to the client application on that Authorization Server. If a client application registers with multiple Authorization Servers (for example, Facebook, Twitter, or Google), each Authorization Server will issue its own unique client ID to the client application.
- Whenever the client application requests access to resources stored on that same resource server, the client application needs to authenticate itself by sending along the client ID and the client secret to the Authorization Server.
- During the registration the client also registers a redirection URI. This redirection URI is used when a resource owner grants authorization to the client application. When a resource owner has successfully authorized the client application via the Authorization Server, the resource owner is redirected back to the client application, to the redirect URI.
For information about the OAuth endpoints when an API is hosted on the platform, see What are the OAuth endpoints for the platform? (Business Admin help documentation).
What are the OAuth 1.0a Endpoints?
OAuth 1.0a supports the following endpoints:
- Request Token Endpoint URL —A Request Token is used by the consumer to ask the user to authorize access to the protected resources. The Request Token Endpoint URL is used to obtain an unauthorized Request Token.
- User Authorization URL—The consumer cannot use the Request Token until it has been authorized by the user. The User Authorization URL is used to obtain user authorization for Consumer access.
- Access Token Endpoint URL—An access token is a value used by the consumer to gain access to the protected resources on behalf of the user, instead of using the user's service provider credentials. The Access Token Endpoint URL is used to exchange the user-authorized Request Token for an access token.
For more information on these endpoint types, refer to the OAuth Core 1.0, Revision A specification (http://oauth.net/core/1.0a/)
For information about the OAuth endpoints when an API is hosted on the platform, see What are the OAuth endpoints for the platform? (Business Admin help documentation).
What is an Authorization Server Client Authentication Policy?
If you are using the Akana Network Director as the Authentication Server specified in your OAuth configuration, the platform provides a series of client authentication policies that can be used to authenticate the client's credentials:
- Basic Authentication—Basic authentication requires that users provide a valid user name and password to access content. All major browsers support this authentication method and it works across firewalls and proxy servers. The disadvantage of Basic authentication is that it transmits passwords across the network using weak encryption. You should use Basic authentication only when you know that the connection between the client and the server is secure.
- HTTPs 2-Way Authentication—Two-way authentication requires that both the client and server authenticate each other with certificates.
- Form-Based Authentication—Form-based authentication mode lets you manage client registration and authentication at the application level, instead of relying on the authentication mechanisms provided by the operating system. It works well for sites or applications on public web servers that receive many requests.
How does Scope Mapping work?
Operations in an API act on data objects called scopes. Scopes are permissions that OAuth can read to get access to specified operations from one site to another. The platform uses grant resources for authorization of an API. The authorization could be fine-grained (at the object level), or could be for additional services.
Although the approach for organizing API Scopes varies from API to API, the scopes are typically organized as follows:
- Scopes are grouped in a catalog in organized into a "Scope Hierarchy" similar to the diagram below.
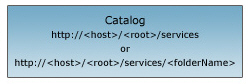
- The scope represents a catalog of folders and services published on the host.
- The root node is the initial entry point to the host.
- Each scope in the catalog includes a "Scope URL" as well as the root node.
- Each scope can also be referenced by a symbol {id} that represents the integer ID of the resource.
Scopes are defined in a hierarchy of permissions that represent the list of actions to be performed. For example, if you have a credit card service API, you may have scopes like Charge Account, Deposit, Cash Advance, or Get Statement, in addition to account management services like Add Card, Report Fraud Transaction, etc. Scopes are generally added to the hierarchy based on a logical sequence. For example, if your credit card service API has the ability to deposit, you might make Deposit a sub-scope under Withdraw.
Scopes are defined by the Site Admin or Business Admin.
How does the proxy API send OAuth-related information to my API?
When you set up your API on the platform, using the platform as a proxy, your API is the Target API and the platform is the Proxy API.
When an app sends a request to the proxy API, if the API is using the platform as a proxy API and is using the OAuth policy, custom headers are added in the outbound request from the proxy API, which is the target API's inbound message. These outbound request headers include key information such as:
- Resource owner identity
- Grant properties
- Possibly, other information about the grant
It's important for API developers to know about these properties so that they can implement the API to work with any authorization restrictions (grant properties) set up by the resource owner for the application under the grant.
For example, the API developer could use the headers to validate that the proxy has authenticated the user, and to get the UserID of the consumer (end user) making the call.
An example of what these custom headers might look like, in the inbound message to the target API, is shown below.
OAuth_ClientID: acmepayments-7zQLGrDd2163LSKqOOkJ2QAf
OAuth_Scope: Wall
OAuth_Properties: Prop1=Prop1Value
OAuth_TokenType: MAC
OAuth_version: 2.0
OAuth_ResourceOwnerDomain: MyOpenIDConnectProvider
OAuth_ResourceOwnerUserInfo: first_name=Jane,title=Ms,sub=jmead,$EMAIL="jane.mead@acmepaymentscorp.com",
$LASTNAME=Mead,email="jane.mead@acmepaymentscorp.com",family_name=Mead,mobile=99999999999
OAuth_ResourceOwnerUID: https://www.google.com/accounts/o8/id?id=AItOawkXDyU8_9K2CEYmXxhZshHC080Eq7FIHXY
OAuth_Signature_Method: HMACSHA256
For details about the headers, what they mean, and valid values, see the table below.
| Header | Description/Values |
|---|---|
| OAuth_ClientID | The OAuth client ID for the client sending the request. |
| OAuth_Scope | One or more specific scopes assigned to the grant; these are scopes that the resource owner is granting access to. Scopes are defined by the resource server and approved by the resource owner. Separate multiple scopes by spaces. Example: Wall Calendar |
| OAuth_Properties | Name/value pairs for OAuth grant properties that the end-user has selected. Multiple grant properties are separated by commas. |
| OAuth_TokenType | The OAuth token type: MAC or Bearer. |
| OAuth_version | The OAuth version being used: 1.0a or 2.0. |
| OAuth_ResourceOwnerDomain | The domain that the OAuth resource owner belongs to. This domain is selected as the Resource Owner (End User) domain when configuring the OAuth Provider in the platform. |
| OAuth_ResourceOwnerUserInfo | Details of the Resource Owner User Attributes. |
| OAuth_ResourceOwnerUID | The resource owner's unique ID, given by the resource owner domain. |
| OAuth_Signature_Method |
The signature method used in the request message for signing the OAuth token, indicating the strength of the security used in the request message. This applies only for OAuth 1.0a tokens and OAuth 2.0 MAC token. Example: HMACSHA256. We support the following OAuth signature methods:
|


