Add or Modify an API using API Designer
Add or modify API design on the API Platform.
Table of Contents
- What is the API Designer?
- How do I access the API Designer?
- What are the sections on the API Designer Edit page?
- How do I design an API from scratch?
- How do I get around in API Designer?
- What HTTP verbs does the API Designer support?
- What headers does the API Designer support?
- How do I set up headers in API Designer?
- What media types does the API Designer support?
- What are default media types and how do I set them up?
- How do I set up media types in API Designer?
- What types of parameters can I define for an API operation?
- How do I add or edit a parameter for an API operation?
- How do I define my API response?
- How do I edit an API design?
- How do I use API Designer to produce generated API doc?
- How do I view the Swagger representation of my API in API Designer?
Resources (Operations):
- What information can I set up for an operation in API Designer?
- How do I add a resource in API Designer?
- How do I modify an operation in API Designer?
- How do I delete an operation in API Designer?
Model Objects:
- What is a model object?
- How do I define a model object?
- How do I define a model object using Schema Designer?
- How do I define a model object by writing or pasting Swagger JSON?
- How do I define a model object as a request or response parameter?
- How do I assign a model object definition to an operation?
- How do I modify a model object definition in API Designer?
- How do I delete a model object definition in API Designer?
Tags:
- What is a Swagger tag?
- How do I add a tag to my API Swagger definition in the API Designer?
- How do I assign tags to an operation in the API Designer?
What is the API Designer?
Once you've created your API, you can view or modify the API details using the API Designer. This tool provides a comprehensive, intuitive interface for adding or modifying your API.
In the API Platform, find your API and then click Details to view the API Designer, as shown below (Hermosa Theme).
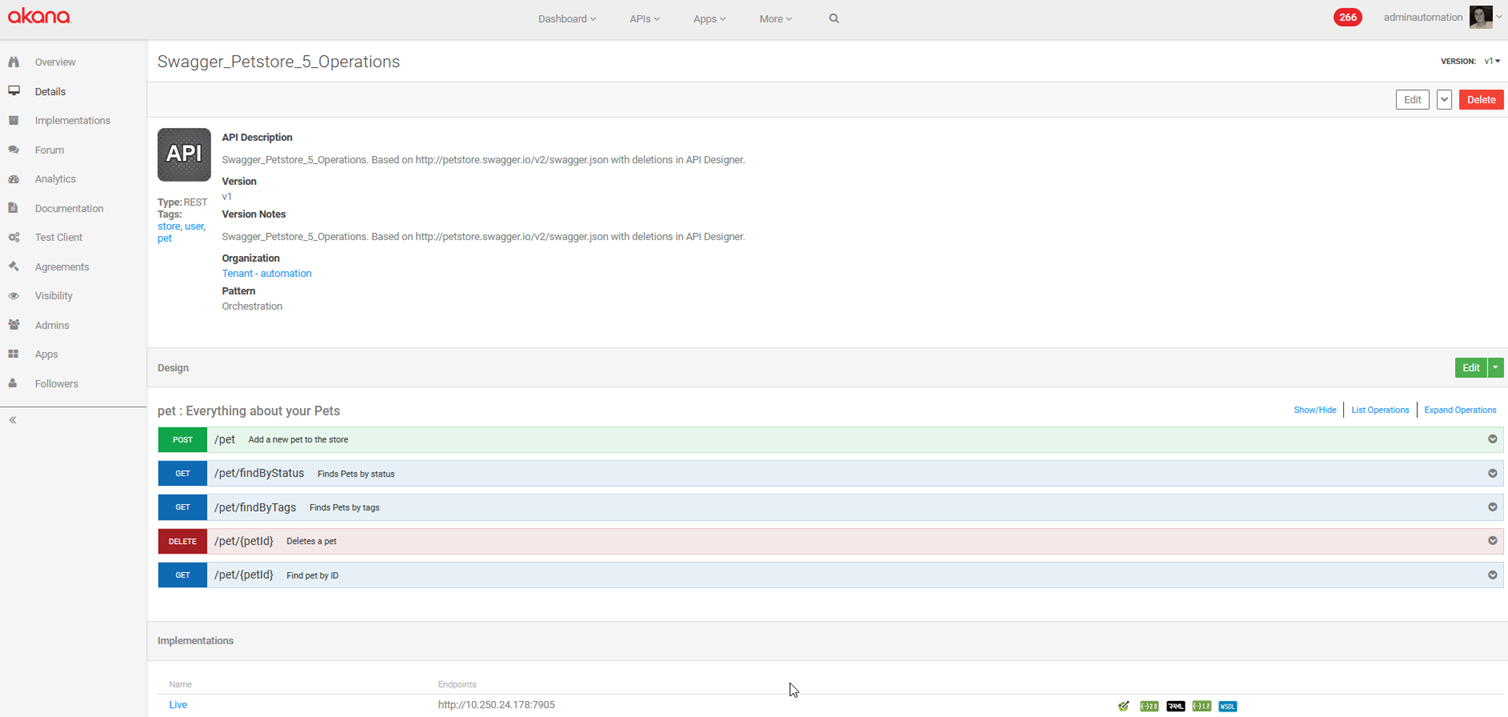
On the API Details page you can do the following:
In the top section:
- Click Edit to modify basic data about the API, such as name and description: see To edit basic data about an API or API version.
- Click the drop-down arrow and choose:
- Auto-Connect: see What is auto-connect?
- OAuth Details: see How do I configure OAuth Details for my API?
- Manage Licensing: see How do I determine what licenses will be available for my API?
- Add Version: see How do I add an API version?
- Export: see How do I export an API?
- Click Delete to delete the current API version: see How do I delete an API?
In the Design section:
- Click Edit to access the API Designer where you can modify the API definition: see What are the sections on the API Designer Edit page?
- Use the Show/Hide, List Operations, Expand Operations links to manage the view.
- Click the drop-down arrow to the right of an operation and choose Edit Live Process or Edit Sandbox Process to access the Process Editor, where you can assign a custom process to the operation: see Using the Process Editor with your API.
How do I access the API Designer?
The Designer for your API is available from the left menu bar, via the API's Details page.
The Details page shows the summary view. To add, change, or delete values as part of the API design, you'll need to go into Edit mode.
Any information that was already added as part of the API definition is displayed in the following structure:
- Top pane, tabs:
- Editor: View and edit the API design
- Swagger: View the API design in Swagger 2.0 format.
- Resources section: Operations associated with the API. See Resources (Operations).
- Models section: Model object definitions associated with the operations. See Model Objects.
- Tags: Tags for your API. See Tags.
- Settings: Default media types. See What are default media types and how do I set them up?
To access the API Designer for editing an API
- Log in to the Akana API Platform and go to the overview page for your API.
- From the left menu bar, choose Details. The summary of the API design is displayed on the Details page.
- In the Design section, click Edit to go into the API Designer.
What are the sections on the API Designer Edit page?
When you click Edit in the Design section of the API Details page, you're in the API Designer. Here, you can craft your API. Here you can:
- Import an API description document.
- Add, modify, or delete resources (operations, methods).
- For each resource, specify:
- Path
- HTTP verb (HTTP POST, PUT, GET, and DELETE; in addition, you can also use OPTIONS, HEAD, and PATCH)
- OperationID (for example, getPet)
- Summary (for example, Returns information about a pet)
- Description
- Parameters
- Responses
- Media types
- Process associated with the resource (valid in version: 2020.2.0)
- Add, modify, or delete model objects referenced in request or response messages. For each model object, specify:
- Name
- Model object definition
- Define Swagger tags for the API, that you can then assign to each operation. See What is a Swagger tag?
As you add and modify information, operations and model object definitions are displayed in a summary format for easy review.
Below is a summary of the sections of the API Designer, with examples and links to additional information about that section.
The sections are:
Resources section
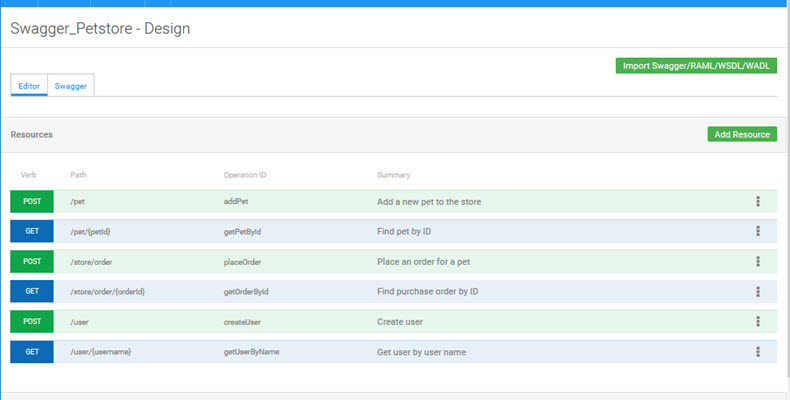
Here, you can add, modify, and delete API operations and all details associated with them; for example, parameters and response codes.
See How do I add a resource in API Designer?
For each resource, you can define:
- Request model object, including schema and sample.
- Response model object, including schema and sample.
Note: If you create an API from an imported Swagger document that includes root-level definitions for API responses, during import the responses are placed in every operation that references them. Even in the Swagger representation, in the Swagger tab of the API Designer, the responses are displayed inline for each operation that references them. For more information, see How does the platform support Swagger responses defined at the root level?

For more information about defining responses at the root level in OpenAPI 3.0 or Swagger, refer to the applicable section of the specification:
- OpenAPI 3.0: Responses Definitions Object.
- Swagger 2.0: Describing Responses.
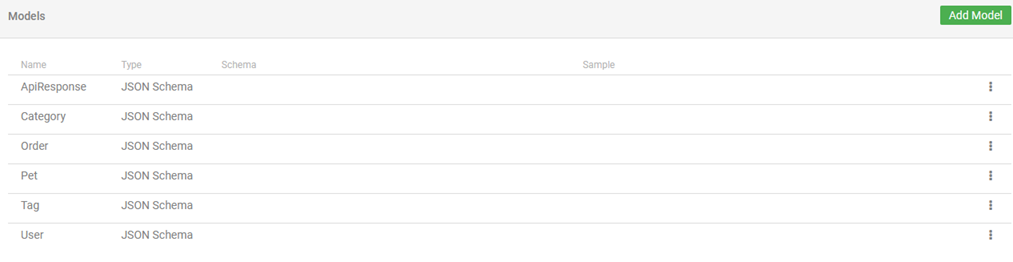
Models section
In the Models section, you can add, modify, and delete model objects that can be associated with one or more operations (resources) in your API.
In version 2020.2.1 and later: In the initial view, the list of models is summarized. You can expand one or more models to see the details and edit if needed. In earlier versions, models are always shown in the expanded view.
Models section, initial (summary) view:
Models section, expanded view:
To view the details of a specific model object, click the vertical ellipsis menu (kebab menu) to the right, as shown below. In this example, the first model object is already expanded.
Version 2019.1.2 and later: The Sample column shows an example of the model object, if an example has been defined for the API.

For details and procedures, see Model Objects.
Tags section
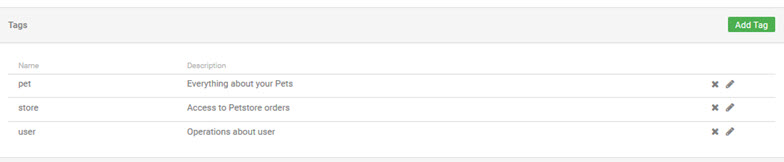
Here, you can add, modify, and delete tags—text labels that you can then assign to operations in your API to group them in the generated API documentation.
Settings section
Here, you can define default media types for all operations in your API.
See What are default media types and how do I set them up?
How do I design an API from scratch?
If you're designing the API from scratch in the platform, it's best to first gather the information about the API definition. However, you can start the API definition and save it at any point.
To complete the design task, you'll need information such as:
Vital:
- Resource (operation) definitions, including HTTP verb and URL.
- Request and response media types
Ideal (for generated API documentation and full-featured Test Client):
- Parameters
- Request headers
- Responses
- Model object definitions that are sent in the request and response
For instructions, see How do I add an API by designing from scratch?
Note: If you have an API description document, you can use that rather than designing from scratch. The platform reads in the information and displays it; you can then review and modify if needed.
How do I get around in API Designer?
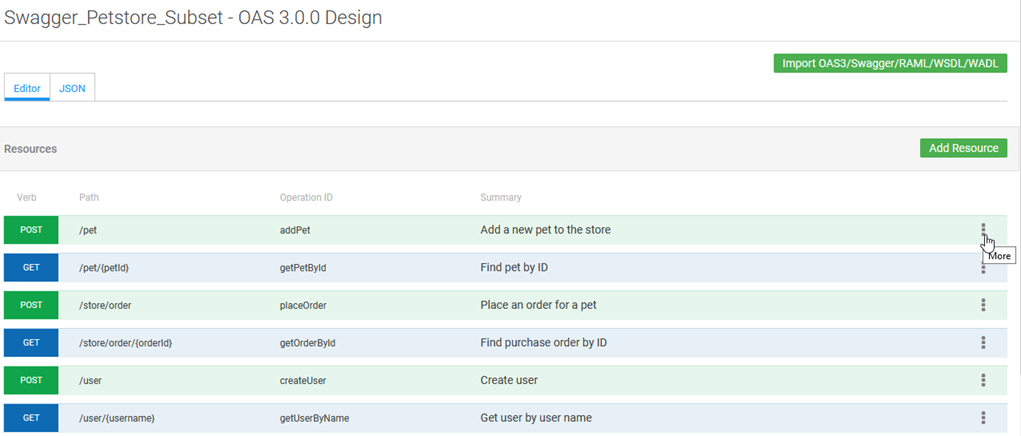
In the API Designer Edit window, from the Resources summary view, you can click in the bar for each operation, on the right, to add or modify details about a specific operation, as shown below.
API Designer summary view
API Designer expanded view
When you click the vertical ellipsis menu (kebab menu) to the right, the panel expands to provide a detailed view of the operation, along with Add, Edit, and Delete capabilities for various values, as shown below.
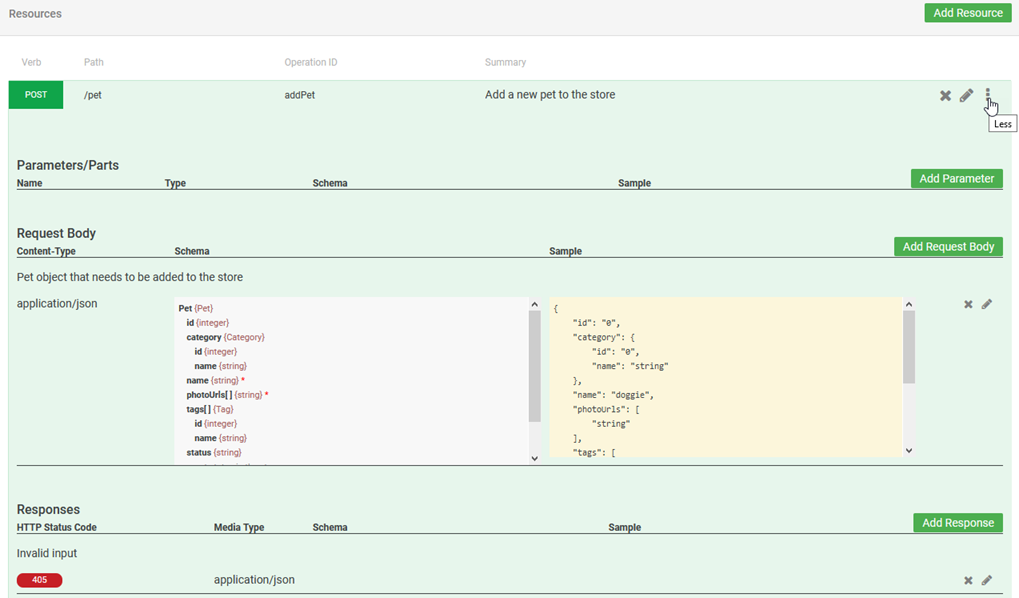
The expanded view allows you to:
- Delete the operation (X icon).
- Edit metadata about the operation: path, HTTP verb, operation ID, summary, and description.
- Collapse the view (vertical ellipsis menu).
- Add, edit, or delete parameters, including parameter name, description type, and data type (includes custom headers).
- Add, edit, or delete request and response model objects and request/response examples.
- Add, edit, or delete response information, such as HTTP code, description, data type, and/or model object definitions (Responses section).
- Specify one or more media types for the request and response headers, including custom headers if needed (Settings section).
What HTTP verbs does the API Designer support?
As well as HTTP POST, PUT, GET, and DELETE for add, modify, read, and delete activities, the API Designer supports the following additional HTTP verbs:
- OPTIONS (see Using the CORS Policy for Policy Manager-specific usage scenarios for the CORS Policy).
- HEAD
- PATCH
The API Designer provides maximum flexibility in supporting a wide selection of HTTP verbs, even those that are used less frequently.
What headers does the API Designer support?
The API Designer supports Content-Type and Accept headers for request and response media types.
In addition, you can:
- Specify a default header for the entire API. You can then use the API Default check box rather than specifying media types for each operation.
- Define a custom header by adding a parameter and specifying that it is a header parameter.
For details, see below.
How do I set up headers in API Designer?
How you set up headers depends on what header you're using:
- To define one or more Content-Type or Accept headers, with standard or custom values: Set values for a specific operation in the Media Types section. See How do I set up media types in API Designer?
- To set up a custom header: For a specific operation, in the Parameters/Parts section, define a parameter as a header: see How do I add or edit a parameter for an API operation?
What media types does the API Designer support?
The API Designer supports all media types that might be needed for request and response headers.
In the image below, the first two sections show API Default selected and API Default cleared but Any selected. Of course, the UI only offers choices for request and response. The two sections on the right show how the options change when you select or clear options.
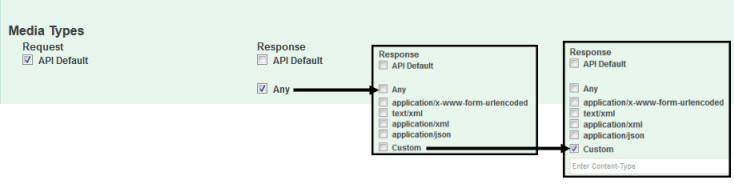
You can:
- Use the default media type or types for the API, as specified at the bottom of the API Designer's Edit page. You can use this shortcut to streamline setup of media types.
- Specify commonly-used media types: check one or more check boxes for media types such as application/json and application/xml.
- Add one or more custom media types: check the Custom box and define the value. To add multiple custom media types, use a comma separator.
- Allow any media types: To set the header value to */*, check the Any box.
Note: You might receive an error message when attempting to upload content, "File media type is not permitted for security reasons [[application/json]]" indicating that the file media type is different. In this case, you must change the file to a proper file type and then attempt to upload the file as needed. For more information about file types, see File Manager.
What are default media types and how do I set them up?
The Akana API platform allows you to specify a default media type for requests, and one for responses.
When you specify default media types for an API, the default is applied to each operation, unless you change it.
Particularly when you are designing an API from scratch, and when there are many operations, specifying default media types can save you quite a bit of time in specifying media types for each operation.
Essentially, you should define the most common scenario as the default. Then, you'll only need to remove the default, specifying one or more specific media types, for those operations that are exceptions to the most common scenario.
To set up default media types for an API
- Log in to the Akana API Platform and go to the overview page for your API.
- From the left menu bar, choose Details. The summary of the API design is displayed on the Details page.
- In the Design section, click Edit to go into the API Designer.
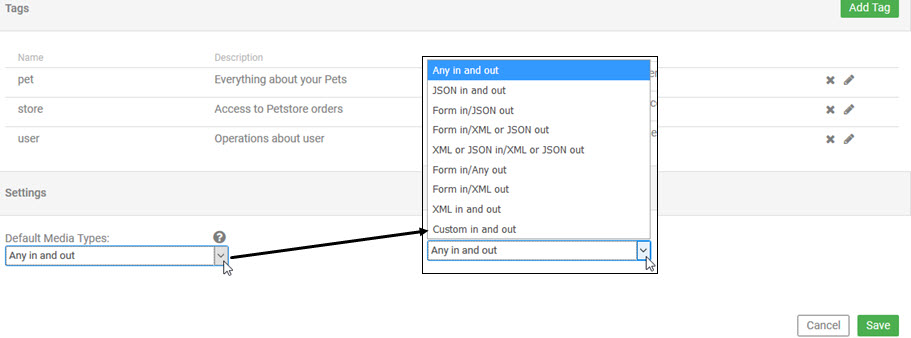
- At the bottom of the page, in the Settings section, click the Default Media Types drop-down, as shown below, and specify default values for request and response.
- Click Save.
How do I set up media types in API Designer?
In API Designer, you set up the request and response media types as part of the definition of each operation.
If you provide an API description document, the information is read in from the API description file. You can then modify if needed.
To add or modify media types for an API operation
- Log in to the Akana API Platform and go to the overview page for your API.
- From the left menu bar, choose Details. The summary of the API design is displayed on the Details page.
- In the Design section, click Edit to go into the API Designer.
- On the Resources list, find the operation. On the right, expand the view. Expanded view is shown in API Designer Expanded View above.
- In the Media Types section, add or modify as needed:
- Check or clear the API Default check box, for request and/or response
- To allow any media type, choose Any
- Check or clear check boxes for specific media types.
- To add a custom media type, click Custom and fill in the media type name and value. To add multiple custom media types, use a comma separator.
- Click Save.
- Before you exit the API Designer, remember to click Save. If you don't save in the API Designer Edit window, the changes are not saved.
What types of parameters can I define for an API operation?
In API Designer, you can define all types of parameters:
- Path
- Query
- Header
- Body
- Form data
How do I add or edit a parameter for an API operation?
You can define parameters from scratch or add, modify, or delete parameters that were added from scratch or were part of an API description document.
To add or edit parameters for an API operation
- Log in to the Akana API Platform and go to the overview page for your API.
- From the left menu bar, choose Details. The summary of the API design is displayed on the Details page.
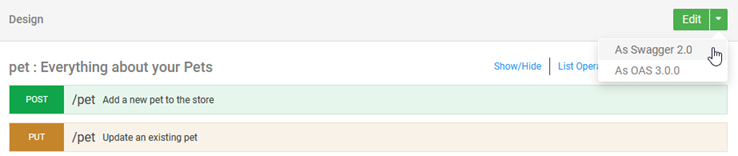
- In the Design section, click Edit to go into the API Designer. You can choose to edit as Swagger 2.0 or OAS 3.0, as shown below.
- On the Resources list, find the operation. On the right, click the arrow to expand the view as shown in API Designer Expanded View. Any existing parameters are displayed. An example is shown below.
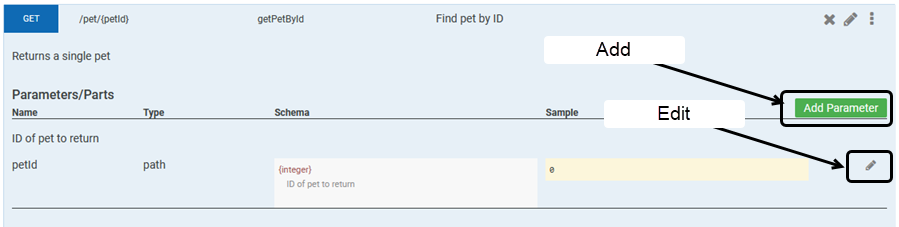
- Add or modify parameters as needed:
- To add a new parameter, click Add Parameter. In the Add Parameter dialog, add or change values as needed and click Finish. For information on field values, see Add/Edit Parameter Dialog: Field Values below.
- To modify an existing parameter, find the parameter and click Edit (pencil icon). In the Edit Parameter dialog, add or change values as needed and click Finish. For information on field values, see Add/Edit Parameter Dialog: Field Values below.
- Click Finish.
- Before you exit the API Designer, remember to click Save. If you don't save in the API Designer Edit window, the changes are not saved.
Add/Edit Parameter Dialog: Field Values
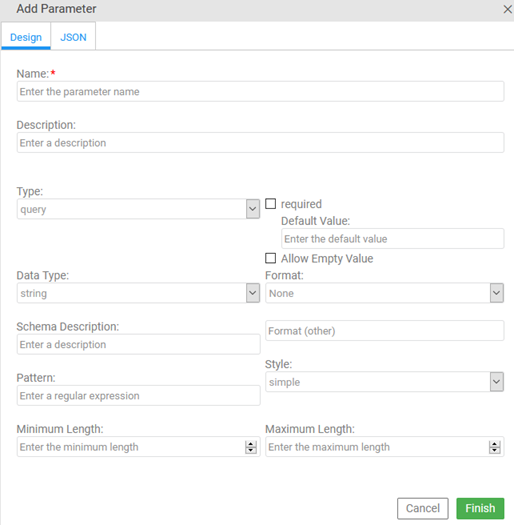
The Add Parameter/ Edit Parameter dialog provides the following:
- Design/Source tab
- Design tab allows you to enter values; Source tab allows you to preview the parameter format represented as Swagger 2.0.
- Name
- A short name for the parameter.
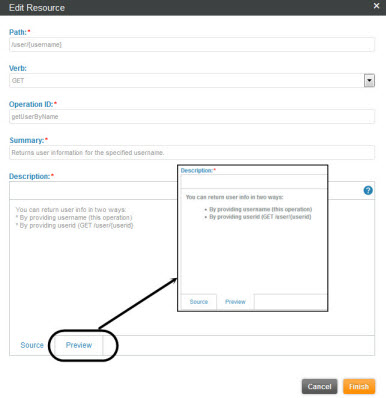
- Description
- A short description for the parameter. You can use Markdown for formatting on this field; click the Preview tab to view the Markdown as it will be displayed to users.
- Type
- Choose the parameter type. Valid values: path, query, header, body, or formData.
- Required
- Check the box if the parameter is required.
- Default Value
- If desired, specify a default value for the parameter.
- Allow Empty Value
- If the parameter can be included with no value provided, check the box.
- Data Type/Schema
- Specify the data type for the parameter. The list of available data types depends on the parameter type:
- string: Valid for all parameter types.
- number: Valid for all parameter types.
- integer: Valid for all parameter types.
- boolean: Valid for all parameter types.
- array: Valid for Query, Header, and Form Data parameter types only. If you choose Array, specify the format (csv, ssv, tsv, pipes, or multi).
- file: Valid for Form Data parameter type only.
Add New: If the parameter type is Body, you can also choose Add New to add a new model object definition, which you can then use for the data type. For more information on adding a new model object, see How do I define a model object as a request or response parameter?
If you choose an existing model object, the schema is displayed. Version 2019.1.2: the sample is displayed if a sample is defined.
- Format
- Choose a format from the drop-down list, or leave as None for no format constraints. Valid values depend on the data type, as follows:
- string: byte, binary, date, date-time, password
- number: float, double
- integer: int32, int64
- array: string, number, integer, boolean
- Pattern
- An optional regular expression pattern that you can specify to define valid parameter values. For example, the following regular expression could be used to help define a header parameter representing an Authorization header that expects a Basic Authentication input: ^Basic\s(?:[A-Za-z0-9+\/] {4})*(?:[A-Za-z0-9+\/]{2}==|[A-Za-z0-9+\/]{3}=|[A-Za-z0-9+\/]{4} . This example excludes Basic <token> strings where the token does not begin with Basic or does not match the expected characters or number of characters.
- Note: This field is effective at runtime only if there is a Message Validation policy attached to the API. For information about attaching policies to your API implementation, see Managing Policies for an API Implementation.
- Style
- The valid style value for the parameter, per the OAS 3.0 specification. For example, a style value of simple is valid for path or header parameters. Other sample values: pipeDelimited, matrix. For information about valid style values, refer to https://swagger.io/docs/specification/serialization/.
- Minimum Length/Maximum Length
- String data type only: Specify the minimum and maximum length for the parameter.
- Minimum/Maximum
- Number and Integer data types only: Specify the minimum and maximum values for the parameter.
- Minimum Items/Maximum Items
- Array data type only: specify the minimum/maximum number of items that can be in the array. Then specify, for the array, the data type, format, and minimum/maximum values.
How do I define my API response?
In the API Designer, you can define valid responses for your API, including defining any information returned in a successful response and any error scenarios. This information becomes part of the API documentation displayed to your users.
In the API Designer Edit window, find the operation and expand it to view the details.
In the Responses section, click Add Response, as shown below.

You can also modify (pencil icon) or delete (X icon) an existing response.
In the Add Response / Edit Response dialog box you can specify, or modify, the following:
- HTTP Status Code: Choose from a list of valid HTTP codes; for example, 200.
- Media Types: Choose from the list of valid media types; for example, application/json, text/plain, image/jpeg.
- Description: Add descriptive information about the response.
- Data Type: Choose an existing value from the drop-down list. The list includes:
- Basic data types such as string, number, and boolean.
- Basic data types such as string, number, and boolean.
- array: if you choose array you'll also need to define the data type for the array.
- Model objects that are available for selection. If you choose an existing model object, the schema is displayed. Version 2019.1.2: the sample is displayed if a sample is defined.
You can also:
- On the Data Type field, click Add New to define a new model object. For more information, see How do I define a model object?
- Click the Swagger tab to view the Swagger 2.0 representation of the response.
When done, click Finish.
How do I edit an API design?
There are two ways to edit the technical details of your API design:
- By hand, by editing one or more values
- By uploading a revised API description document
Note: When you modify the API design, any existing API implementations are automatically updated with the design changes.
To edit API design by hand
- Log in to the Akana API Platform and go to the overview page for your API.
- From the left menu bar, choose Details.
- In the Design section, click Edit to go into the API Designer.
- Modify API details as needed. You can add, modify, or delete the following for each operation:
- Operation metadata: Click Edit (pencil icon). Here you can specify the path, HTTP verb, and a unique ID for the operation, and you can add a summary and longer description. The Description field supports Markdown, so you can add formatting. For help with Markdown, if needed, click the help icon on the field.
- Operation details: Click the Expand icon (...) to view the operation details. Add, change, or delete parameters; add, change, or delete response HTTP codes and descriptions; modify request and response media types as needed.
- Click Finish to save changes and close the API Designer.
To edit API design by uploading a revised API description document
- Log in to the Akana API Platform and go to the overview page for your API.
- From the left menu bar, choose Details.
- In the Design section, click Edit to go into the API Designer.
- At the top right, click Import Swagger/RAML/WSDL/WADL.
- At the Import page, there are two ways you can provide the updated API description document:
- URL: Provide the full URL, including protocol. If the URL requires authentication, provide your username and password.
- File: Browse to the location of the file and upload. If the file includes multiple services, you'll be shown a list of options for the service to import; choose the one you want.
- Click Save. The API design is updated and displayed.
How do I use API Designer to produce generated API doc?
As you build out the details of your API in the API Designer, or modify the design from an imported API description document, you can view the generated API doc at any point. In API Designer, in edit mode, just click the Swagger tab at the top of the page to view the Swagger description document for the API.
To view the generated API documentation as your users will see it, click Cancel or Finish to exit from the API Designer to the API Overview page. Then, on the left menu bar, click Documentation. The API documentation is generated dynamically from the API design.
How do I view the Swagger representation of my API in API Designer?
You can create your API by uploading a Swagger, RAML, WSDL, or WADL API description document, update it at any time by uploading a new description document, or create/edit your API via the API Designer user interface.
In any of these scenarios, you can view the Swagger 2.0 representation of your API in the API Designer window at any point, as shown below.
If you make changes in the Designer window at any point, the Swagger representation is updated immediately. The changes are not saved until you complete your editing task and click Save in the Designer window; however, in the meantime, you can check your API definition by reviewing the Swagger representation.
You can also copy the Swagger JSON at any point if you want to save out the API design.
To view the Swagger representation of an API in API Designer
- Log in to the Akana API Platform and go to the overview page for your API.
- From the left menu bar, choose Details. The summary of the API design is displayed in the Details page.
- Click Edit. The API details are displayed and can be edited in the API Designer.
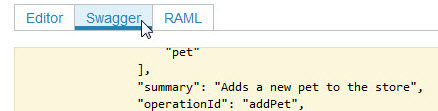
- At the top of the window, click the Swagger tab to view the Swagger 2.0 JSON file.
Resources (Operations):
What information can I set up for an operation in API Designer?
For each operation, you can set up two basic types of information:
- Metadata about the operation, such as name and description.
- Technical details associated with the operation, such as parameters, responses, and media types.
When you click Add Resource to add one or more operations, you first set up the basic definition:
- Path
- One or more HTTP verbs
Once the basic definition is saved you can add details:
To add metadata, click the pencil icon and add or change:
- Path
- HTTP verb
- Operation ID (a unique ID for the operation, user-defined)
- A brief summary
- A longer description, if desired.
To add technical details associated with the operation, click the More icon (...) to view operation details, and enter:
- One or more parameters, including:
- Name
- Description
- Type
- Whether required / if not required, a default value, used if the user doesn't specify a value
- Whether empty values are allowed
- Data type
- Format
- Minimum length
- Maximum length
- One or more response types, including:
- HTTP code
- Description
- Data Type: string, number, boolean, integer, or array; for array, a data type. You can also add a custom scheme; choose Add New. See How do I define a model object?
- Request and response media types, including custom media types if needed.
When you're satisfied with the API design, add or review implementations. From the API Details page, on the left menu bar, click Implementations.
How do I add a resource in API Designer?
You can design your API from scratch, adding details about each operation manually.
You can also import an API description document; in this case, operations are added automatically in API Designer. You can still add additional operations as needed, or import an updated API description document at any time.
To add a resource to an API version in API Designer
- Log in to the Akana API Platform and go to the overview page for your API.
- From the left menu bar, choose Details. The summary of the API design is displayed on the Details page.
- In the Design section, click Edit to go into the API Designer.
- Click Add Resource.
- In the Add Resource dialog, add basic information about the operation:
- Path
- Verb: one or more HTTP verbs for the path. If you check more than one verb, multiple operations are added.
- Click Finish. The operation is displayed on the summary list.
- Optional: to add more detailed information about the operation, click Edit and add or change one or more of the values. See How do I modify an operation in API Designer? below.
- Before you exit the API Designer, remember to click Save. If you don't save in the API Designer Edit window, the changes are not saved.
How do I modify an operation in API Designer?
You can modify an operation at any point. API documentation is generated based on the latest API design, so the documentation is updated automatically.
Follow the steps below.
To modify an operation in API Designer
- Log in to the Akana API Platform and go to the overview page for your API.
- From the left menu bar, choose Details. The summary of the API design is displayed on the Details page.
- In the Design section, click Edit to go into the API Designer.
- Find the operation on the list, click to expand to the operation details, and then click Edit (pencil icon).
- Change one or more of the following values, as needed:
- Path
- Verb
- Operation ID: for example, getPet. Displays in the summary table.
- Summary: A short description. For example: returns information about a specific pet. Displays in the summary table and the API doc.
- Description: A longer description of what the operation does. Displays at the top of the operation summary and also in the API doc. You can use Markdown in this field, as shown below.
- Click Finish.
- Before you exit the API Designer, remember to click Save. If you don't save in the API Designer Edit window, the changes are not saved.
How do I delete an operation in API Designer?
You can delete an operation at any point. When you delete an operation, any activities relating to the operation, such as process configuration or OAuth scope mapping, are deleted. This action is not reversible.
To delete an operation in API Designer
- Log in to the Akana API Platform and go to the overview page for your API.
- From the left menu bar, choose Details. The summary of the API design is displayed on the Details page.
- In the Design section, click Edit to go into the API Designer.
- Find the operation on the list and click Delete (X icon).
- At the confirmation message, click OK. The operation is deleted.
- Before you exit the API Designer, remember to click Save. If you don't save in the API Designer Edit window, the changes are not saved.
Model Objects:
What is a model object?
Your API probably includes one or more model objects that might be used in the request messages for POST or PUT operations and in the responses for GET operations. For example, an API associated with movie information might have a JSON model object called Movie that includes information such as release date, principal actors, director, producer, and title. In the Swagger Petstore API, Pet is a model object that includes values such as ID, Name, and Status.
API Designer lets you add a model object definition in the form of a schema that includes, within the standard JSON format, the parameter names and additional information such as data types and possible values. The API Platform uses the information you set up to generate accurate, detailed API documentation that will help app developers to use your API. You can also include examples.
Model object definitions must be constructed based on the Swagger version 2.0 JSON specification at http://petstore.swagger.io/v2/swagger.json.
Once you've added model object definitions for your API, the platform's generated documentation for your API includes all the information users will need to construct request messages, and understand response messages, for your API.
For information about adding model objects for your API, see How do I define a model object? below.
How do I define a model object?
For general information about model objects, see What is a model object? above.
When you add a complete definition of each model object that's part of your API, constructing the definition per the Swagger 2.0 JSON specification (http://petstore.swagger.io/v2/swagger.json), the platform uses this information to generate accurate, interactive API documentation to help users understand how your API works.
Before you start defining model objects on the platform, it's a good idea to make a list of all the model objects that your API uses in request and response messages. If there are nested model objects, list those separately, and include them earlier on the list. When you define a model object, it's best to make sure that any nested objects have already been defined, so that you can reference them.
There are two ways to add a model object in the Community Manager developer portal user interface:
- Using the Schema Designer wizard that helps guide you through defining the parameters and their data types, and helps make sure your JSON is valid. See How do I define a model object using Schema Designer? below. For a video overview, see Define model objects using Schema Designer.
- By constructing or pasting the model object definitions in raw JSON and then saving. See How do I define a model object by writing or pasting Swagger JSON? below.
How do I define a model object using Schema Designer?
The Community Manager developer portal API Designer includes Schema Designer, a schema editor that helps you construct JSON model objects for your API.
You can also view a short video overview of using the Schema Designer: see Define model objects using Schema Designer.
To access the Schema Designer
- Log in to the Akana API Platform and go to the overview page for your API.
- From the left menu bar, choose Details. The summary of the API design is displayed on the Details page.
- Click Edit to go into the API Designer.
- In the Models section, click one of the following:
- To add a new model object: click Add Model. The Add Model overlay appears.
- To edit an existing model object: find the model object on the list, and click Edit (pencil icon). The Edit Model overlay appears.
To use the Schema Designer
Once you're in the Schema Designer, you can use the wizard to help you construct model objects. There are two fields:
- Name: a unique name. Keep it short.
- Schema Design/Raw view:
- In Raw view, you can write or paste the JSON Swagger design. See How do I define a model object by writing or pasting Swagger JSON?
- In Design view, use the wizard to help you construct model objects. See below.
Example #1: Designer window for the top-level model object
An example of the schema design user interface is shown below. This example is the top-level designer window for the model object.

When you add a model object, you can specify:
- Title: make sure capitalization is correct and is used consistently throughout your Swagger document, particularly if model objects are nested (one model object referenced by another).
- Description: A brief description of the model object. Keep it very short.
- Type: can be Object, Array, String, Number, Integer, or Boolean. Defaults to Object. Depending on the type you choose, additional options become available. For details, see Step 3 below.
Example #2: Designer window for an individual property
An example of the schema design user interface is shown below. This example shows the additional fields available depending on the Type specification.
As you add each property, you can specify the same values as for the top-level model object plus:
- ID: The name of the property.
- Required: You can specify that the property is required anywhere the model object is used in the API.
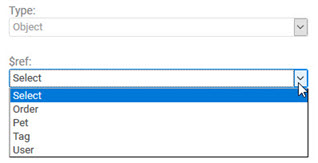
- $ref: valid if the Type value is Object. A drop-down list of valid objects defined for the API, so that you can specify which model object is referenced in the current one.
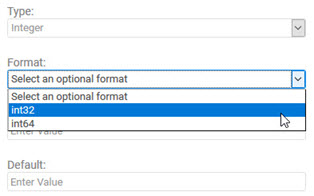
- Format: If Type is String, Number, Integer, or Boolean, you can choose from additional values that are valid for the specified format. For example, if Type is Integer, Format can be int32 or int64. For full details, see below.
- Enum: a comma-separated series of enumerated values valid for the property.
- Default: a default value for the property.
To add a new property to a model object in Schema Designer
- In the API Designer Edit window, click Add Model.
- In the Name field, provide a name for the model object.
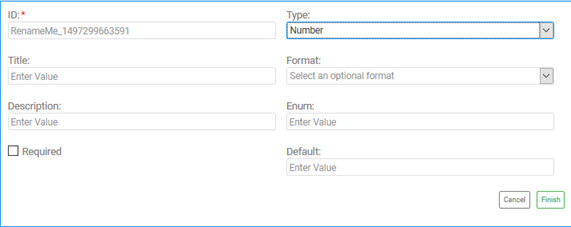
- Hover over the Design tab to view the buttons, and then click Add Property. Default property content is added, including a RenameMe_xxx default property name.
- Click in the default property name. An overlay appears, where you can add the values for the new property:
- ID (required)
- Title (optional)
- Description (optional)
- Type (defaults to Object)
- Provide additional values as needed. Additional fields vary according to the data type value in the Type field:
- Object: $ref: choose from the drop-down list of valid model objects. An example is shown below.
- Array: When you choose Array, there are no additional options until you click Finish. Array code is then added to your JSON, and you can click in to further define the array.

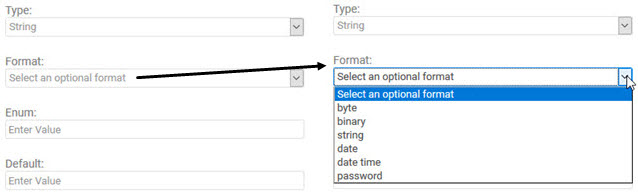
- String: When you choose String, you can specify a format of byte, binary, string, date, date time, or password.
- Number: When you choose Number, you can specify float or double, as shown below.

- Integer: When you choose Integer, you can specify int32 or int64, as shown below.
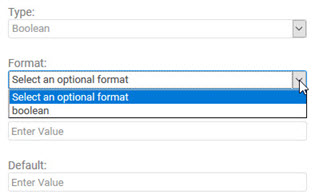
- Boolean: When you choose Boolean, there are no additional options. You can specify boolean in the Format field, or leave it empty.
- Object: $ref: choose from the drop-down list of valid model objects. An example is shown below.
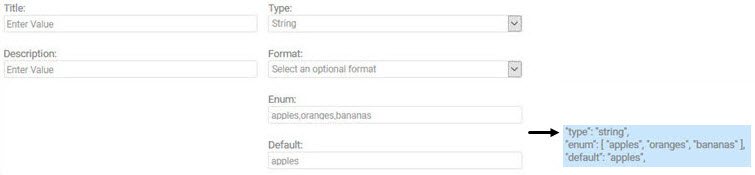
- For types of String, Number, Integer, or Boolean, you can specify enumerated values and a default value. In the example below, a property of type String has three possible values and a default value.
- Click Finish to save the property definition in the Schema Designer window.
- When done adding properties, in the Add Model/Edit Model window, click Finish.
- Before you exit the API Designer, remember to click Save. If you don't save in the API Designer Edit window, the changes are not saved.
Note: You can also review the JSON at any point, in the Raw tab.
How do I define a model object by writing or pasting Swagger JSON?
If you prefer not to use the Schema Designer to construct model objects, you can just write or paste the JSON in the API Designer, when adding or editing model objects.
To put the model object together, you'll need to start with the model object definition and add information such as data types and lists of enumerated values, if applicable, in the format specified by Swagger.
For some examples of model object definitions, review the Swagger version 2.0 JSON specification at http://petstore.swagger.io/v2/swagger.json; look at the Definitions section of the file.
An example from this file, for the Pet model object, is shown below, in both collapsed and expanded views.
Below, a collapsed view of the definitions section of the Swagger API description document where you can find the model object definitions:
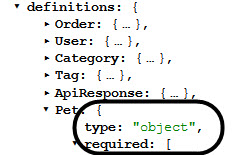
Below is the JSON for the Pet object. This example shows the exact definition for this model object.
{
  "type":"object",
  "required":[
    "name",
    "photoUrls"
  ],
  "properties":{
    "id":{
      "type":"integer",
      "format":"int64"
    },
    "category":{
      "$ref":"#/definitions/Category"
    },
    "name":{
      "type":"string",
      "example":"doggie"
    },
    "photoUrls":{
      "type":"array",
      "xml":{
        "name":"photoUrl",
        "wrapped":true
      },
      "items":{
        "type":"string"
      }
    },
    "tags":{
      "type":"array",
      "xml":{
        "name":"tag",
        "wrapped":true
      },
      "items":{
        "$ref":"#/definitions/Tag"
      }
    },
    "status":{
      "type":"string",
      "description":"pet status in the store",
      "enum":[
        "available",
        "pending",
        "sold"
      ]
    }
  }
}
If you're not sure you have the right section of JSON, run it through a JSON validator. In addition, when you paste it in the user interface, the UI validates the JSON before saving.
Some notes about the above:
- The definition for Pet, above, references two nested model object definitions:
- Category (line 13): $ref":"#/definitions/Category
- Tag (line 36): $ref":"#/definitions/Tag
- The definition for Name includes an example, which will be included in the generated documentation (line 17).
- The definition for ID includes Type and Format (lines 9–10).
- The definition for status includes three enumerated values (lines 42–46).
Using the above example as a guide, construct the definitions for your own model objects. The Swagger JSON specification also includes other examples.
Note: If your model object definition refers to other model objects, add the referenced objects first. Build from the bottom so that each model object does not reference any elements that haven't yet been defined. In the example above, the definition for Pet references two other model objects, Category and Tag, so it's a good idea to define those first.
How do I define a model object as a request or response parameter?
You can define your model objects as explained in How do I define a model object using Schema Designer? and How do I define a model object by writing or pasting Swagger JSON? above. However, you can also define them on the fly:
- Within the definition for a specific operation, in the Parameters section: in the Add/Edit Parameter window, in the Data Type field, choose Add New.
- Within the definition for a specific operation, in the Models section: in the Add/Edit Response window, in the Data Type field, choose Add New.
To add a model object as a request parameter for a specific operation
- Go to the API Designer, the specific operation, and the specific parameter. For help, see To add or modify parameters for an API operation.
- In the Add Parameter or Edit Parameter dialog, in the Type field, choose Body.
- In the Data Type field, choose Add New.
- In the Add Model box, provide the name.
- Click the tab for Design or Raw:
- Design: Use the Schema Designer to define the model object. For detailed instructions, see How do I define a model object using Schema Designer?
- Raw: Paste the model object definition. Make sure it is valid JSON. The platform validates the JSON before saving. See How do I define a model object by writing or pasting Swagger JSON?
- Click Finish to return to the Add Parameter / Edit Parameter dialog box. The new model object definition is saved and will be available for future use by all operations, and displayed in the Definitions section of the API Designer window.
- Click Finish to save the parameter.
To add a model object in the response for a specific operation
- Go to the API Designer, the specific operation, and the specific parameter. For help, see To add or modify parameters for an API operation.
- In the Add Response or Edit Response dialog, in the Data Type field, choose Add New.
- In the Add Model box, provide the name.
- Click the tab for Design or Raw:
- Design: Use the Schema Designer to define the model object. For detailed instructions, see How do I define a model object using Schema Designer?
- Raw: Paste the model object definition. Make sure it is valid JSON. The platform validates the JSON before saving. See How do I define a model object by writing or pasting Swagger JSON?
- Click Finish to return to the Add Response / Edit Response dialog box. The new model object definition is saved and will be available for future use by all operations, and displayed in the Definitions section of the API Designer window.
- Click Finish to save the response.
How do I assign a model object definition to an operation?
Once you've added your model object definitions, you're ready to assign them to resources (operations).
Model objects might be sent in a request message—common for POST, PUT, or PATCH operations—or returned in the response message—common for GET operations as well as POST and PUT.
Part of defining an operation is defining both these things:
- Request: When defining a parameter, if the parameter type is Body you can specify a model object definition to be sent in the body of the request. See Add/Edit Parameter Dialog: Field Values
- Response: When defining a response, you can specify a model object to be returned in the response message. See How do I define my API response?
How do I modify a model object definition in API Designer?
When model objects have been defined for your API, you can modify or delete them at any point.
When you make any changes to the API design, including model objects, and save the changes, the generated API documentation reflects the changes the next time the documentation is accessed.
There are two ways you can make changes, both in the API Designer Edit window:
- Upload a new API description document: see To edit API design by uploading a revised API description document.
- Edit a model object: see below.
To edit a model object in the API Designer
- Log in to the Akana API Platform and go to the overview page for your API.
- From the left menu bar, choose Details. The summary of the API design is displayed on the Details page.
- In the Design section, click Edit to access the API Designer.
- In the Models section, find the model object that you want to edit and vertical ellipsis menu (kebab menu) to expand the view.
- Click the Edit icon (pencil).
- In the Edit Model box, provide the name.
- Click the tab for Design or Raw:
- Design: Use the Schema Designer to define the model object. For detailed instructions, see How do I define a model object using Schema Designer?
- Raw: Paste the model object definition. Make sure it is valid JSON. The platform validates the JSON before saving. See How do I define a model object by writing or pasting Swagger JSON?
- Click Finish.
- Before you exit the API Designer, remember to click Save. If you don't save in the API Designer Edit window, the changes are not saved.
How do I delete a model object definition in API Designer?
When model objects definitions have been added for your API, you can modify or delete them at any point.
If you're deleting a model object definition, make sure it isn't referenced by other model objects.
To delete a model object definition in the API Designer
- Log in to the Akana API Platform and go to the overview page for your API.
- From the left menu bar, choose Details. The summary of the API design is displayed on the Details page.
- Click Edit. Existing model object definitions are displayed in the Definitions section at the bottom of the page.
- Find the model object you want to delete.
- On the right, click the Delete icon (X).
- At the confirmation message, click OK. The object is deleted.
- Before you exit the API Designer, remember to click Save. If you don't save in the API Designer Edit window, the changes are not saved.
Tags:
What is a Swagger tag?
In Swagger, a tag is a text label that you can assign to one or more operations in your API. Swagger tags allow a logical grouping of the API operations; in the API Designer, and in the generated documentation for the API, each operation that has a specific tag assigned is displayed below the tag in the API summary view.
If you import a Swagger API description document, either when creating your API or later, the Swagger document might already include one or more tags. An example of how Swagger tags affect the display of the API operations in API Designer is shown below. In this example, there are three tags: pet, store, and user. The tag name and description are displayed, and all operations that have that tag assigned to them are grouped below the tag.
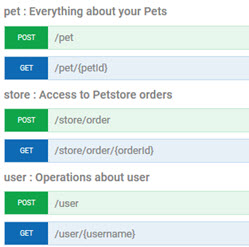
In this example, each operation has only one tag; however, you can assign more than one tag to an operation. As an example, if an operation has two tags, it will appear twice in the API Designer list, and in the generated API documentation; once for each tag.
For general information about how Swagger tags work, refer to the applicable section of the Swagger specification: http://swagger.io/docs/specification/grouping-operations-with-tags/.
How do I add a tag to my API Swagger definition in the API Designer?
Whether you import an API description document or you're designing your API from scratch, you can define new Swagger tags in the API Designer. If you imported a document, your API definition might already include one or more tags. You can add more, or you can modify or delete existing tags.
Once you've defined the tags, you can assign them to individual operations (resources) in your API.
To define a Swagger tag in API Designer
- Log in to the Akana API Platform and go to the overview page for your API.
- From the left menu bar, choose Details. The summary of the API design is displayed on the Details page.
- In the Design section, click Edit to go into the API Designer.
For a summary of the sections in the API Designer, and an example of the Tags section, see What are the sections on the API Designer Edit page?
- In the Tags section, click Add Tag.
- In the Add Tag overlay, enter a name, and optionally add a brief description. An example is shown below.
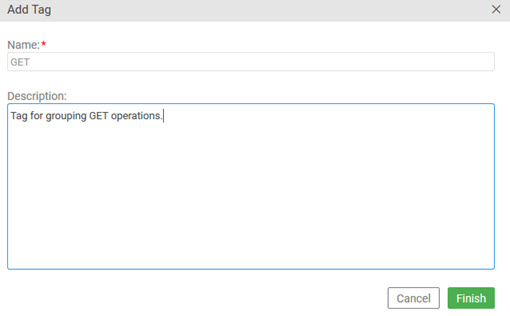
- Click Finish to save the new tag and return to the API Designer Edit window.
- Before you exit the API Designer, remember to click Save. If you don't save in the API Designer Edit window, the changes are not saved.
How do I assign tags to an operation in the API Designer?
Once you've defined tags in the API Designer, or if you've imported a Swagger description document that already includes tags, you can assign one or more Swagger tags to individual operations (resources) in your API.
To assign one or more Swagger tags to a resource
Note: You must define the tags before assigning them. See To define a Swagger tag in API Designer.
- Log in to the Akana API Platform and go to the overview page for your API.
- From the left menu bar, choose Details. The summary of the API design is displayed on the Details page.
- In the Design section, click Edit to go into the API Designer.
For a summary of the sections in the API Designer, and an example of the Tags section, see What are the sections on the API Designer Edit page?
- On the Resources list, find the operation. On the right, click the arrow to see the expanded view, as shown in API Designer Expanded View.
- On the right, click the Edit (pencil) icon.
- In the Edit Resource overlay, in the Tags field, assign one or more tags, using a comma separator, as shown below. You can also modify or remove existing tags.
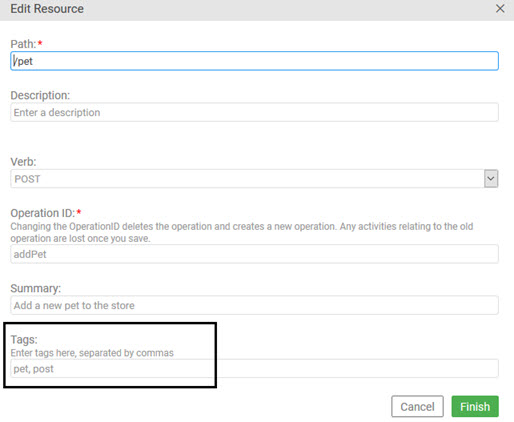
- Click Finish to save the changes and return to the API Designer Edit window.
- Before you exit the API Designer, remember to click Save. If you don't save in the API Designer Edit window, the changes are not saved.


