Business Admins
Manage Business Administrators for the platform.
Table of Contents
- What are the components of the Business Admins page?
- How do I invite someone to be a Business Administrator?
- How do I invite a non-member to be a Business Administrator?
- How do I cancel a Business Administrator invitation?
- How do I respond to a Business Administrator invitation?
- How do I assign users and groups to a Business Administrator?
- How do I assign LDAP domain users and groups to a Business Administrator?
- How do I assign SAML Web SSO domain users and groups to a Business Administrator?
- How do I remove a Business Administrator who is assigned to the platform deployment?
What are the components of the Business Admins page?
In the Business Admins page, authorized Site Admins or Business Admins can invite others to join the Business Admin team.
Invite Business Administrators
The Invite More function allows you to send invitations to individuals that you would like grant Business Administration privileges to.
- Existing Business Administrators are displayed in a summary listing.
- When you invite someone, the platform sends out a request email.
- The invitee also receives an invitation request on their Action Dashboard page.
- If the invitee is not a platform member, they must sign up using the same email address that the invitation is addressed to. They can then accept the invitation via their Action Dashboard page.
- The request email includes a link so that the user can click through to sign up for the platform if he/she us not already a member.
- While an invitation is still pending, a Resend Email button is available so you can remind the invitee.
- At any point after a member has been invited, a Remove button is available so that you can remove the invitee or team member.
View Business Administrators
When a Business Admin invitation is submitted, a new entry is added to the list with the username, email address, and an initial invitation status of Pending.
Manage Administrators
A Business Admin can remove another Business Admin from the team.
How do I invite someone to be a Business Administrator?
The More > Admin > Business Admins page includes a business administrator invitation function that allows Business Administrators or Site Administrators to send out invitations to individuals that they would like to grant business administration privileges for the current platform deployment.
To invite someone to the business admin team
- Log in as a Business Admin and go to the Admin section.
- In the left menu bar, click Business Admins. The Business Administrator list is displayed.
- Click Invite More. The Invite Administrators page displays.
- In the Email text box, enter the email address of individuals you would like to invite to your development team. Separate each email address with a comma.
- In the Add a Brief Message text box, specify the invitation text you would like to send to your invitees.
- Click Invite. The invitation email is sent to the invitee.
- After the email invitation is sent, the platform will post an administrator invitation to the member's Action Dashboard. The invited platform member can then log into the platform to accept or decline the Business Administrator invitation.
How do I invite a non-member to be a Business Administrator?
If you have already received a Business Administrator invitation and are not currently a platform member, you must sign up to the platform using the email address that the invitation was issued to in order to accept the invitation. Currently only platform members can be invited to be Business Administrators. See Basics for more information.
How do I cancel a Business Administrator invitation?
Once an invitation is sent to an individual you would like to be a Business Administrator, the invitation itself cannot be revoked. A platform member can choose to accept or decline the invitation. If they choose to accept the invitation, you can remove the Business Administrator from the Business Admins page by clicking Remove. See How do I remove a Business Administrator who is assigned to the platform deployment?
How do I respond to a Business Administrator invitation?
If you receive an invitation via email to be a Business Administrator for the platform deployment you can accept or reject the invitation.
For instructions, see How do I respond to an invitation on my Action Dashboard?
Note: When you first accept the invitation, you might need to refresh the page to see the Admin menu.
How do I assign users and groups to a Business Administrator?
Valid in Version: 2022.1.3 and later
The More > Admin > Business Admins > Add Users/Groups page allows you to search and assign users and groups to the Business Administrator role.
To assign users and groups
- Log in as a Business Admin and go to the Admin section.
- In the left menu bar, click Business Admins. The Business Administrator list is displayed.
- Click Add Users/Groups. The Add Users/Groups page displays.
- Use the dropdown menu to select the domain, user, or group to assign to a role. In the text box, type the name of the user or group to search in the selected domain, and click Go. The name of the users or groups will be displayed in the Results list.
- Click to select the checkbox for the user or group name from the Results list to assign them a business admin role. Click Assign.
- The user or group name appears in the Selected Users/Groups list. Click Save.
- To remove a user or group, click to select the checkbox for the user or group name from the Selected Users/Groups list. Click Remove.
How do I assign LDAP domain users and groups to a Business Administrator?
Valid in Version: 2022.1.3 and later
To assign the external LDAP domain users and groups to a Business Administrator role, follow the instructions:
Prerequisites
Before you begin:
-
Configure an LDAP Directory or Active Directory Identity System. See, Configure Directory Server (Active Directory) Identity System.
-
Enable a domain login for users to log in to the platform. See, How do I enable a domain for login?
Configuration on Community Manager
To assign the users and groups
- Log in to the Community Manager developer portal.
- Go to the More tab, click Admin, and then click Business Admins.
- Click Add Users/Groups. The Add Users/Groups page displays.
- Use the dropdown menu to select LDAP domain and User or Group to assign them to a role. To assign:
User: Search for users in the selected domain and assign them to the Business Admin role. Click Go.
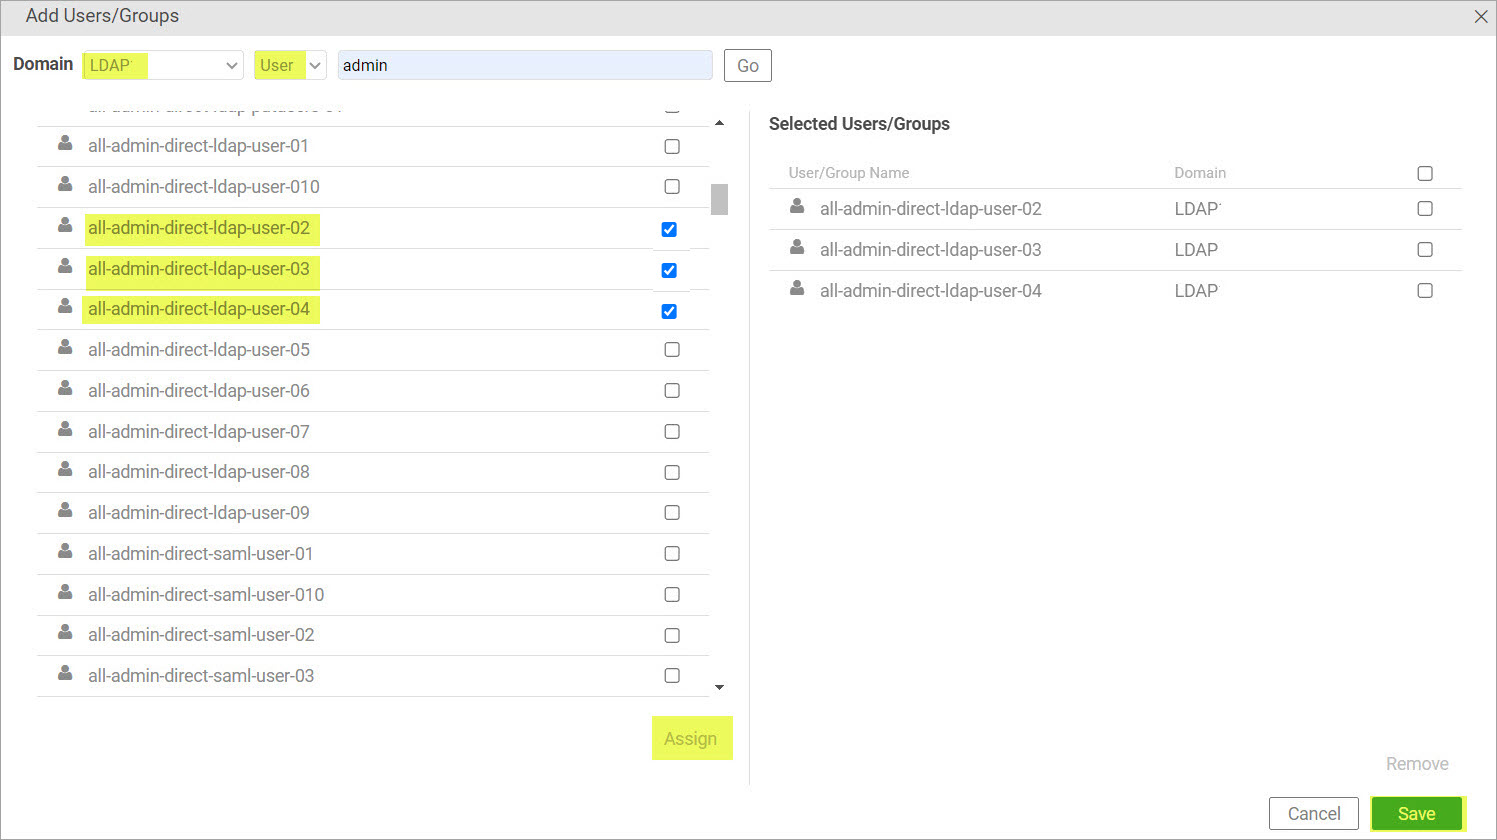
Group: Search for groups in the selected domain and assign them to the Business Admin role. Click Go.
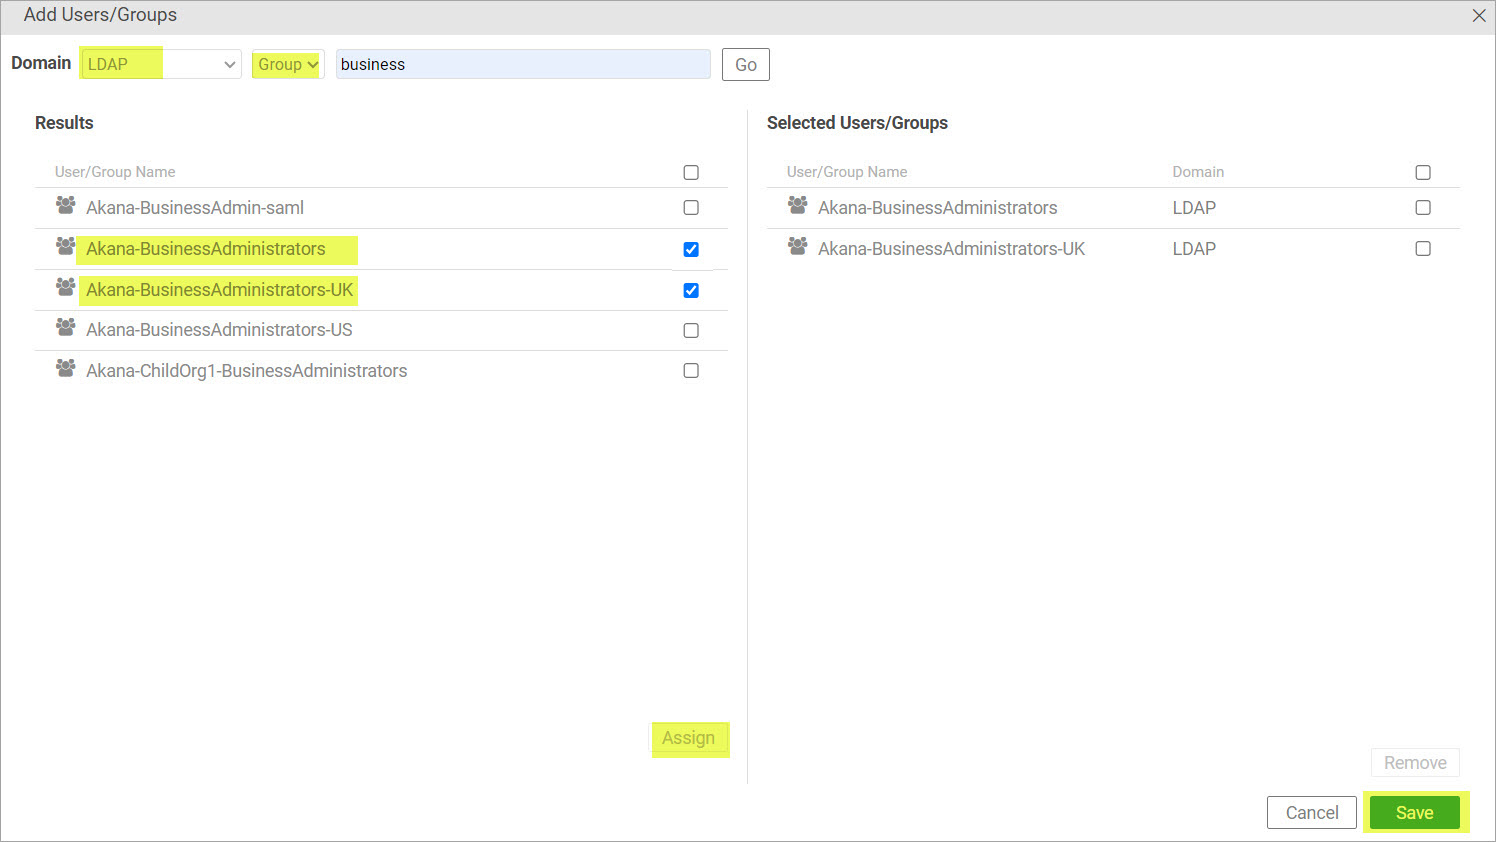
- Click to select the checkbox for the user or group name from the Results list to assign them a business admin role. Click Assign.
- The user or group name appears in the Selected Users/Groups list. Click Save.
How do I assign SAML Web SSO domain users and groups to a Business Administrator?
Valid in Version: 2022.1.3 and later
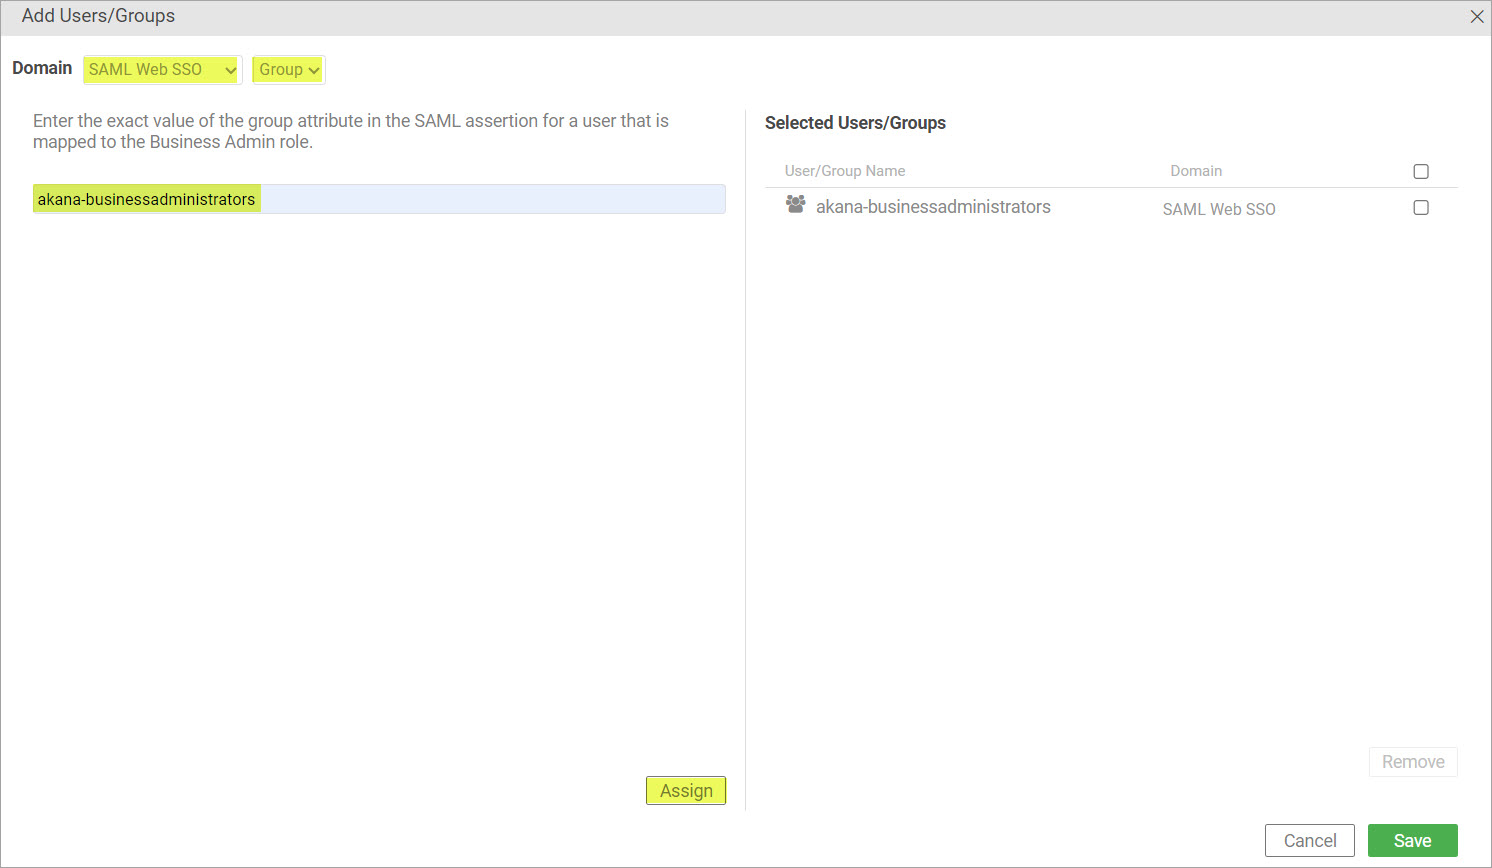
You can configure an attribute that contains all of the groups to obtain access permission. The following example shows string from the SAML assertion, the SAML attribute name is AkanaGroupMembership and SAML attribute value is akana-businessadministrators.
<saml:Attribute Name"AkanaGroupMembership" NameFormat"urn:oasis:names:tc:SAML:2.0:attrname-format:unspecified">
 <saml:AttributeValue xmlns:xs="http://www.w3.org/2001/XML_Schema" xmlns:xsi="http://www.w3.org/2001/XMLSchema-instance" xsi:type="xs:string">akana-businessadministrators</saml:AttributeValue>
To assign the external SAML Web SSO domain users and groups to a Business Administrator role, follow the instructions:
Prerequisites
Before you begin:
-
Configure the SAML Web SSO domain. See, Setting Up the SAML Web Browser SSO.
-
Configure the Identity Provider to send additional attributes for Group Memberships. The attribute mapping for groups must be done in Policy Manager to match the "Group Memberships" attribute name, which will be sent in the SAML Assertion response. See, Configure the SSO domain in Policy Manager.
-
Enable a domain login for users to log in to the platform. See, How do I enable a domain for login?
Configuration on Community Manager
To assign the users and groups
- Log in to the Community Manager developer portal.
- Go to the More tab, click Admin, and then click Business Admins.
- Click Add Users/Groups. The Add Users/Groups page displays.
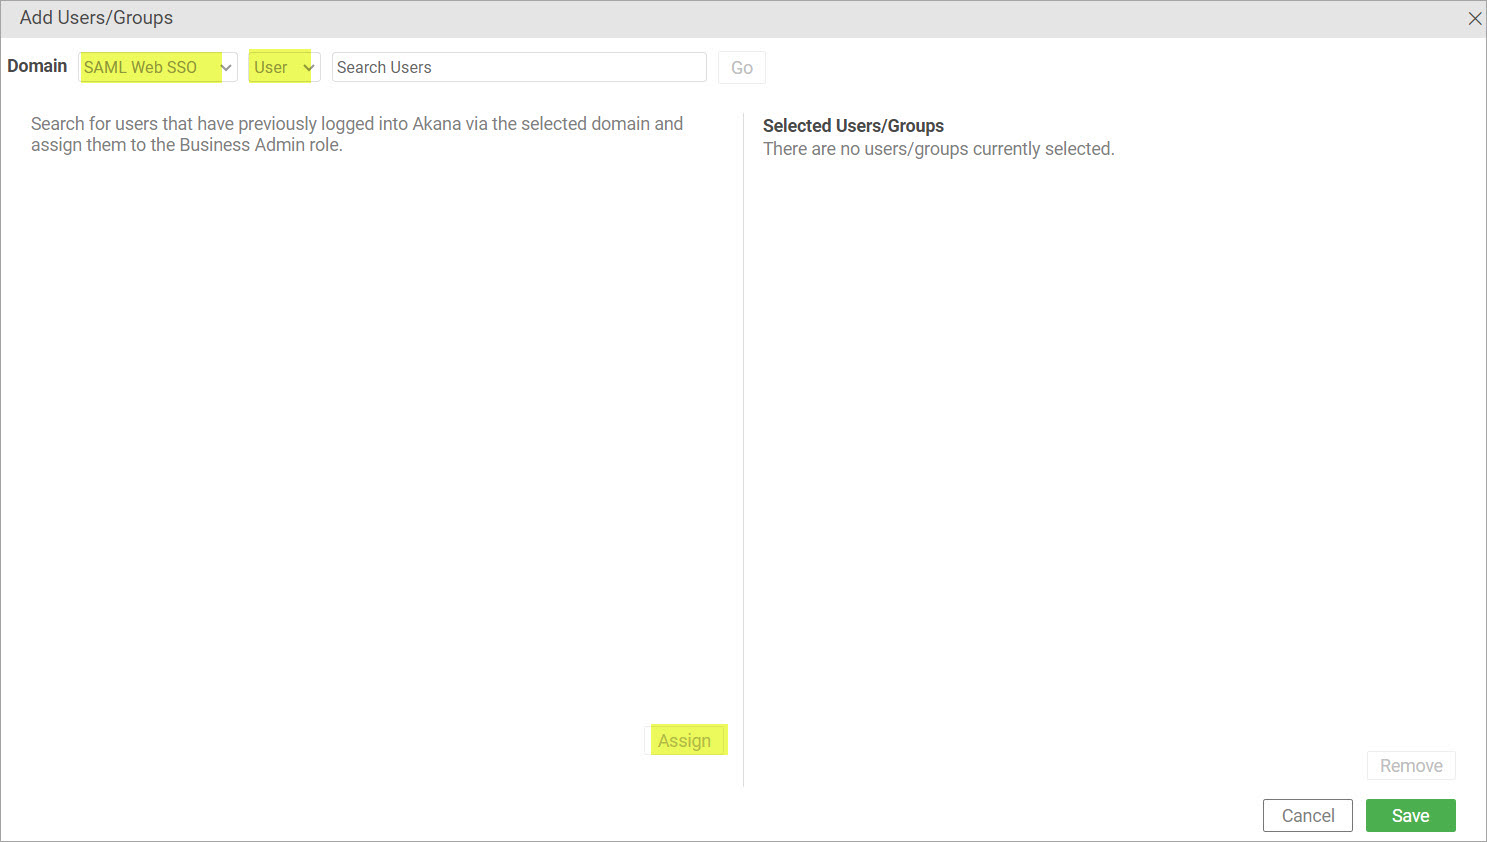
- Use the dropdown menu to select the SAML domain and User or Group to assign them to a role. To assign:
- User: Search for users that have previously logged into Akana via the selected domain and assign them to the Business Admin role.
- Group: Provide the exact value of the group attribute in the SAML assertion for a user that is mapped to the Business Admin role.
- User: Search for users that have previously logged into Akana via the selected domain and assign them to the Business Admin role.
- Click to select the checkbox for the users from the Results list to assign them a business admin role. Click Assign.
- The user or group name appears in the Selected Users/Groups list. Click Save.
How do I remove a Business Administrator who is assigned to the platform deployment?
Any Business Administrator can remove another Business Administrator from the platform deployment.
To remove a Business Administrator from the team
- Log in as a Business Admin and go to the Admin section.
- In the left menu bar, click Business Admins. The Business Administrator list is displayed.
- Find the Business Administrator on the list and click Remove.


