Managing the Model Library for a Business Organization
Manage the library of model objects associated with an organization on the API platform.
Table of Contents
Business Models
- What is a model?
- How do I manage models for my business organization on the platform?
- What version of JSON Schema does the platform support?
- How do I add a model for my organization?
- Treatment of inline references to other model objects in an uploaded model object schema
- How do I design a model in the JSON Schema Editor?
- What are the visibility settings for model objects on the API platform?
- How do I view models for an organization on the API platform?
- How do I modify a model associated with an organization on the API platform?
- How do I delete a model associated with an organization on the API platform?
- What roles can manage model objects for my business organization on the platform?
- What are the duties of the Model Designer?
- What are the duties of the Model Administrator?
- How do I request approval for a draft model?
- How do I approve or reject a draft model?
- How do I manage model versions?
- What states are valid for model versions, and who can approve or reject model versions?
- What is a model category?
Model Library: Overview
The Model Library feature allows the Business Admin to create and manage a shared repository of models for common data types (for example, customer, product, location) so that APIs and API consumers can work with consistent data definitions across all APIs. It supports JSON Schema Draft 4.
Some key features:
- You can define a model object from scratch, or you can upload a schema file. The schema can include multiple model objects within it, and you can choose which model objects to import.
- You can define categories for your model objects, to assist in organizing and searching. One default category, global, is provided.
- You can maintain multiple versions of any model object. To define a new version, clone or design from scratch.
- There is a built-in approval process for model object versions: design, then request approval, then approve/reject. Once approved, a model object is available to API developers for use when designing an API. If approval is rejected, the model object version goes back to Draft state.
- There are two new roles to support the model approval process:
- Model Designer, who can add, modify, or delete model objects at the business level.
- Model Administrator, who can approve or reject model objects.
- Different versions of one model object can be in different approval states, so that the previous version is in use while an updated version is in development.
- Before deleting a model object version, you must make sure that all references to it are deleted. If there are references, you won't be able to delete it. See Referencing model objects below.
Referencing model objects
A model object can be referenced by another model object and/or by one or more APIs in the business. The behavior is slightly different, as follows:
- If the Business Admin or Model Designer links from one model object to another in the Model Library, a reference is created.
Note: You must remove all references of this type to a model object version before deleting it.
- If the user references a model object in the context of an API, it becomes local to the API.
In this scenario, you can delete a model object version. The version still remains available for all APIs that are referencing it.
For more information on working with models, refer to the topics below.
Business Models
What is a model?
In the API Platform, a model is the schema for a model object that is available for selection when adding or modifying APIs in the entire business organization. When adding an API, a user can define models in the context of that API; however, models defined at the business level, in the Model Library, can be used across multiple APIs within the business. This helps ensure consistent data definitions across APIs.
A model can have multiple versions. If there are multiple versions, each one can have a different state. As with apps and APIs, when you create the first model you automatically create the first version also.
All activities relating to models, such as requesting approval, approving, and referencing a model, are for a specific model version.
How do I manage models for my business organization on the platform?
The API platform allows you to manage the models that are available for your business organization. You can:
- Add a model (by designing from scratch or by importing)
- Modify a model
- View models
- Delete an existing model
- Add a new version for a model
- Approve or reject a draft model
A model is available only for the organization in which it was created.
What version of JSON Schema does the platform support?
The platform supports JSON Schema Draft 4.
How do I add a model for my organization?
There are two ways to add a model:
- Design from scratch. See To add a model from scratch below.
- Import a model definition in a file. See To add a model by uploading a file below.
There are two steps to adding a model from scratch:
- Define the basic information about the model, such as name, description, and model type: see To add a model from scratch below.
- Define the details of the model object. See How do I design a model in the JSON Schema Editor? below.
To add a model from scratch
- In the developer portal, go to the Models list for the organization. All models associated with the organization are displayed.
- Click Add. The Create Model page is displayed, as shown below.
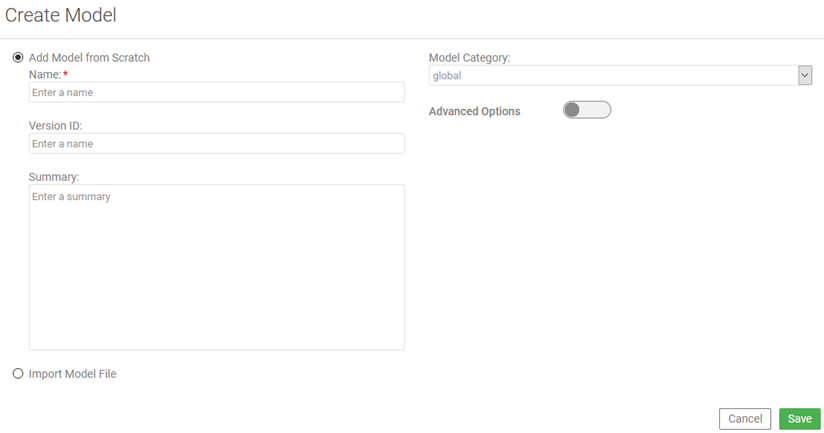
- For the default option, Add Model from Scratch, specify Name, a short and clear name to distinguish the model; for example, Finance. Used on the model summary page. This is the only required field.
Note: The model name must be unique for the model category (see Model Category field below). You can have more than one model with the same name in the Model Library if they are in different categories.
- Optional: provide the following additional values:
- Version ID: A short name for the model version; for example, v1.
- Summary: A short, plain-text field for internal display of a description of the model.
- Model Category: Choose from the drop-down list to assign the model to a predefined logical category; for example, Finance.
- Optional: on the right, click the Advanced Options swipe button (gray dot) and specify values for one or more of the following additional fields:
- Description: An informative description of the model. Supports Markdown.
- Version Description: A concise description of the model version. Text only.
- Visibility: default is Public. Change the visibility setting if needed. For valid values, see What are the visibility settings for model objects on the API platform? below.
- Click Save. The model is added to the list of models for the organization, and you are taken to the Edit Schema page to define the schema for the model, as shown in the example below.
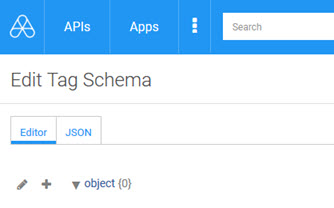
- Define the model by using the JSON Schema Editor (default view, shown above), or the JSON Editor (click the JSON tab). For detailed instructions, see JSON Schema Editor.
- When done, click Save.
To add a model by uploading a file
- In the Community Manager developer portal, go to the Models list for the organization. All models associated with the organization are displayed.
- Click Add.
- In the Create Model page, click Import Model File and choose your schema file. The platform reads the file and displays a list of models contained in it. An example is shown below.

- Choose one or more models from the schema file. Top-level objects are selected by default; clear any options you don't want. At least one model must be selected. For information about how the Community Manager developer portal processes your models based on your choices, see JSON Schema Editor and also see Treatment of inline references to other model objects in an uploaded model object schema below.
- Optionally, specify a Model Category: Choose from the drop-down list to assign the model to a predefined logical category; for example, Finance.
- Click Save. The model is added to the list of models for the organization.
Treatment of inline references to other model objects in an uploaded model object schema
When you import a model file that includes references to another model, in the Create Model page, it might include references to another model. An example is shown below (only applicable portions of the file are shown).
"...
  category": {
    "$ref": "#/definitions/Category"
...
  "definitions": {
    "Category": {
      "type": "object",
      "description": "Category",
      "properties": {
        "id": {
          "description": "id",
          "type": "integer",
          "format": "int64"
        },
        "name": {
          "description": "name",
          	"type": "string"
          }
      }
    },
...
In this scenario, the Community Manager developer portal offers you two options in the Create Model page:
- Preserve the references as part of the imported model object (inline references), as they are in the imported file. To do this, check only the top-level box and make sure the second-level boxes are cleared.
- Make the referenced model objects into separate model objects in your library. To do this, check the boxes for all model objects that should be created as separate models. The Community Manager portal creates separate model objects, and converts the top-level references in the main model object into links so that each separate model object is correctly referenced.
With the second option, the developer portal creates a link to the second-level model object, as shown in the example below.
Importing a model object with inline references to other model objects: example
Let's say you are importing this model object schema with inline references to two other model objects. This schema, for the Pet model object, includes inline references to Category and Tag model objects.
When importing in the Create Model page, if you check only the top-level box, the Community Manager portal creates one model object that references the other two within it.
If you check all boxes, the portal creates three model objects. In the top-level object, Pet, the references to the embedded model objects are replaced with links to the new separate model objects.
Before converting to separate object:
"$ref": "#/definitions/Tag"
After converting to separate object:
"$ref": "#/acmepaymentscorp/global/Tag"
Choose the second option if you want to be able to re-use model objects, and to be able to update in only one place if the model object changes.
How do I design a model in the JSON Schema Editor?
You might need to use the JSON Schema Editor in any of these scenarios:
- When you design a model from scratch, the initial process allows you to define the metadata for the model, but the model is created with an empty JSON schema. You'll then need to define the design of the model itself.
- When you import a model from a file, the platform reads the file and uploads the JSON schema. However, you might want to modify the uploaded schema definition.
- When you're updating a model or creating a new version, you might need to modify the model design.
In all these scenarios, you can add or edit plain JSON in the JSON Designer, or you can use the JSON Schema Editor. The Editor:
- Provides additional functionality such as hints.
- Allows you to add dependencies and validations to help ensure consistency and accuracy in your JSON Schema.
You can switch between the JSON Schema Editor view and the plain JSON view as needed.
The initial view in the JSON Schema Editor when creating a model from scratch is shown below.
For full instructions on using the JSON Schema Editor, see JSON Schema Editor (API Admin help).
To design a model
- First, add the model; see To add a model from scratch above.
- Go to the models list for the organization (Organizations > organization > Models).
- Find the model on the list and click the title to access the Overview page for the model.
- In the second section, Model Summary, click Edit. The JSON Schema Editor appears. Here, you can use all the features of the JSON Schema Editor to build the model you want. For full instructions, see JSON Schema Editor (API Admin help).
- When done, click Finish.
Some things you can do in the JSON Schema Editor:
- Import models that you've already defined.
- Use the contextual help (CTRL + spacebar) to guide you.
- Use the inline validation to guide you.
- Switch back and forth between the JSON Schema Editor and plain JSON view.
What are the visibility settings for model objects on the API platform?
When you're adding or editing a model object or model object version, the following visibility settings are available:
- Public: All users can see the model in search results, whether logged in or not.
- Private: The model is only visible to users with roles authorized to view models. This includes:
- API Developer (Read permission)
- API Owner (Read permission)
- API Admin (Read permission)
- Model Developer (full permission)
- Model Admin (Read permission)
- Business Admin (full permission)
- Registered Users: All users who are logged in can see the model object version in search results.
How do I view models for an organization on the API platform?
If you're a Business Admin, you have full rights to add, view, edit, or delete models that are set up for your organization.
In this section:
- To access the Models page for your business organization
- Using search on the Models list
- To view a model
To access the Models page for your business organization
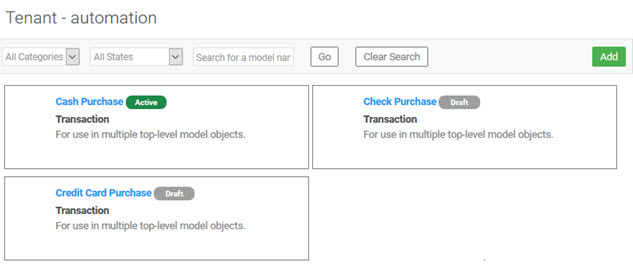
- In the Community Manager developer portal, go to the Models list for the organization. All models associated with the organization are displayed. An example is shown below.
- Optional: set search criteria to narrow down the search results, and then click Go. See Using search on the Models list.
Using search on the Models list
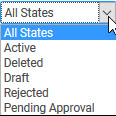
Search is available on the models list. You can:
- Search by a specific category or all categories. There is one default category, global. Additional categories are available if defined by the Business Admin; see Model Categories.
- Search by a specific state, or all states. For information on model object states, see What states are valid for model versions, and who can approve or reject model versions?
Note: Search results are based on the state of the Model itself.
- Search for a specific name.
To narrow down the search list, set search criteria and then click Go.
To reset the search, click Clear Search.
a couple of examples of search criteria are shown below.
| Search by category | Search by State |
|---|---|

|
|
To view a model
- In the Community Manager developer portal, go to the Models list for the organization. All models associated with the organization are displayed.
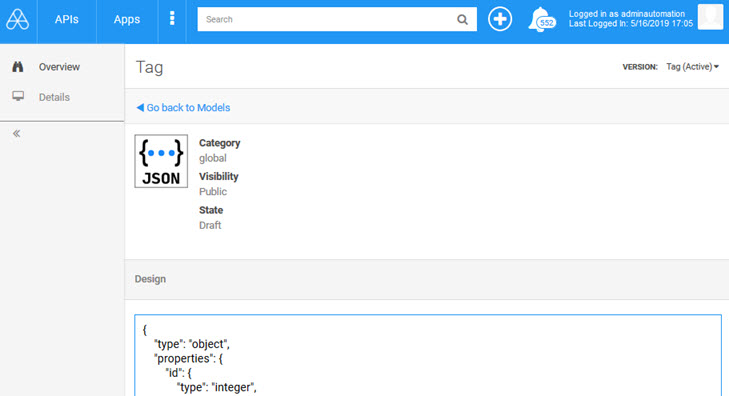
- Find the model you want, using the Search feature if needed, and click the title to go to the Overview page for the model. An example is shown below.
How do I modify a model associated with an organization on the API platform?
If you're a Business Admin, you have full rights to add, view, edit, or delete models that are set up for your organization.
To modify the metadata for a model
- In the Community Manager developer portal, go to the Models list.
- Find the model that you want to modify, and click the title to access the Overview page for the model.
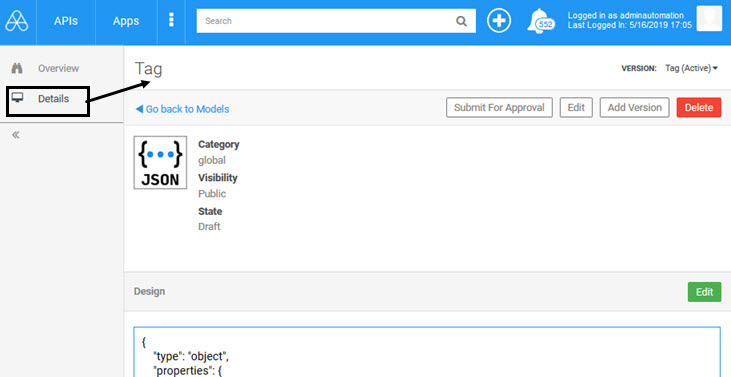
- On the left, click Details to access the Details page for the model. An example is shown below.
- In the top pane, click Edit.
- Modify any of the following:
- Summary: A short, plain-text field for internal display of a description of the model..
- Model Category: Choose from the drop-down list to assign the model to a predefined logical category; for example, Pets, Transactions.
- Optional: on the right, click the Advanced Options swipe button (gray dot) and specify values for one or more of the following additional fields:
- Description: An informative description of the model. Supports Markdown.
- Version Description: A concise description of the model version. Text only.
- Visibility: default is Public. Change the visibility setting if needed. For valid values, see What are the visibility settings for model objects on the API platform? below.
- Click Save. The model metadata is updated.
To modify the schema for a model
- In the Community Manager developer portal, go to the Models list.
- Find the model that you want to modify, and click the title to access the Overview page for the model.
- On the left, click Details to access the Details page for the model.
- In the bottom pane, where the schema is displayed, click Edit.
- In the Edit Schema page, make changes to the schema as needed, in either the JSON Schema Editor (default view) or the plain JSON (click the JSON tab).
For information about using the JSON Schema Editor, see How do I design a model in the JSON Schema Editor?
- When done, click Save.
Note: If there are any errors in the JSON, you'll need to fix them so that the JSON is valid before saving.
How do I delete a model associated with an organization on the API platform?
If you're a Business Admin, you have full rights to add, view, edit, or delete models that are set up for your organization.
To delete a model associated with a business organization
- In the Community Manager developer portal, go to the Models list.
- Find the model that you want to delete, and click the title to access the Overview page for the model.
- On the left menu, click Details.
- Conditional: if there is more than one existing version, choose from the Version drop-down at the top right.
- On the Details page for the model, on the right, click Delete.
- At the confirmation prompt, click OK. The model is deleted.
Note: There is a short delay before the Models List is updated.
What roles can manage model objects for my business organization on the platform?
The following roles can design model objects:
- The Business Administrator, who can manage all activities at the business level.
- The Model Designer, who can add, modify, or delete model objects and model versions at the business level.
The following roles can approve model objects:
- The Business Administrator, who can manage all activities at the business level.
- The Model Administrator, who can approve or reject model object version approval requests.
Note: The API Admin can create and manage model objects at the API level, for a specific API. However, model objects defined at the business level can be referenced by any API in the business, subject to additional factors such as having an Approved status and a visibility setting that the API Admin can see.
What are the duties of the Model Designer?
The Model Designer can:
- Add, modify, or delete a model
- Add, modify, or delete a model version
- Request approval for a model
For a workflow diagram, including actions and roles, see What is the default workflow for models? (Site Admin help).
What are the duties of the Model Administrator?
The Model Administrator manages requests for approval of a model object version, submitted by the Model Designer, with one of these two actions:
- Approves the request. The model object version becomes active and is available for selection when designing APIs and other model objects.
- Rejects the request. The model object version goes back to Draft state until the Model Designer resubmits for approval or deletes the model object.
For a workflow diagram, including actions and roles, see What is the default workflow for models? (Site Admin help).
How do I request approval for a draft model?
When you've finished designing a model object (see How do I add a model for my organization? above), you can request approval.
To request approval for a model object
- In the Community Manager developer portal, go to the Models list for the organization. All models associated with the organization are displayed.
- Find the model that you want to request approval for, and click the title to access the Overview page for the model.
- On the left menu, click Details.
- Conditional: if there is more than one existing version, choose from the Version drop-down at the top right.
- On the Details page for the model, on the right, click Submit for Approval.
- Optional: in the Comments box, enter a message for the Model Administrator.
- Click Confirm. The model object changes to a Pending Approval state.
How do I approve or reject a draft model?
If your role is to approve or reject draft model objects, either as Business Admin or as Model Administrator, you'll be able to approve in either of two places:
- All models: On the Details page for the model object version, via the Submit for Approval button.
- Models with model references: On the Details page for the model object, in the Model References section.
To approve or reject a model object approval request (all models)
- In the Community Manager developer portal, go to the Models list for the organization. All models associated with the organization are displayed.
- Find one or more models that you want to process an approval request for.
- Click the title to access the Overview page for the model.
- On the left menu, click Details.
- Conditional: if there is more than one existing version, choose from the Version drop-down at the top right.
- On the Details page for the model, on the right, click the drop-down and choose Approve or Reject, as shown below.
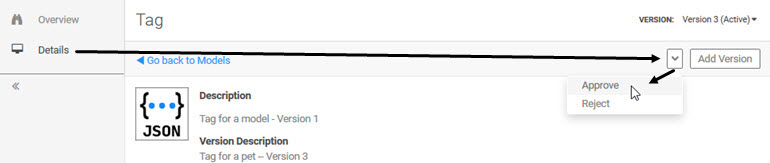
- Optional: in the Comments box, enter a message for the Model Designer.
- Click Confirm. The model object changes state:
- Approved—it changes to Active state.
- Rejected—it changes back to Draft state.
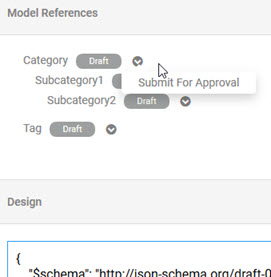
To approve or reject model references
If a model includes references to other models, you can approve or reject them on the Details page, in the Model References section.
- In the Community Manager developer portal, go to the Models list for the organization. All models associated with the organization are displayed.
- Find one or more models that you want to process an approval request for.
- Click the title to access the Overview page for the model.
- On the left menu, click Details.
- Conditional: if there is more than one existing version, choose from the Version drop-down at the top right.
- In the Model References section, approve or reject one or more model references. An example is shown below.
How do I manage model versions?
You can have multiple versions of a model, just as you can have multiple versions of an app or API. Each version is managed separately, and you can:
When an API Admin is referencing a model defined at the business level, the user interface lists the version as well as the model, so that the API Admin can choose the appropriate version of the model.
To go to the Models list
- In the Community Manager developer portal, go to the Organizations List (see To access the Organizations List).
- Find your organization on the list, and then click the title to view the Details page for the organization.
- On the left navigation bar, choose Models. All models associated with the organization are displayed.
To modify a model version
- In the Community Manager developer portal, go to the Models list for the organization. All models associated with the organization are displayed.
- Find the model that you want to modify, and click the title to access the Overview page for the model.
- On the left menu, click Details.
- Conditional: if there is more than one existing version, choose from the Version drop-down at the top right, as shown below.
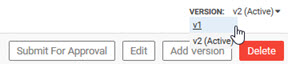
- On the Details page for the model, choose what you want to modify:
- To modify the metadata, click Edit in the top pane. You can update Summary, Model Category, or the advanced options. For details about these fields, see To add a model from scratch.
- To modify the schema, click Edit in the bottom pane. You are taken to the Edit Schema page where you can make changes to the schema as needed, in either the JSON Schema Editor (default view) or the plain JSON (click the JSON tab).
For information about using the JSON Schema Editor, see How do I design a model in the JSON Schema Editor?
- On the right, click Edit.
- At the confirmation prompt, click OK. The model is deleted.
Note: There is a short delay before the Models List is updated.
To add a new version for a model
- In the Community Manager developer portal, go to the Models list for the organization. All models associated with the organization are displayed.
- On the left menu, click Details.
- Optional: if you want to clone an existing version and there is more than one existing version, choose from the Version drop-down at the top right, as shown below.
- On the Details page for the model, on the right, click Add Version.
- In the Add Model Version page, choose one of the following:
- Clone Current Version—Specify the version ID for the new version.
- Add Model from Scratch—Specify the version ID for the new version. You can add the JSON schema after saving the model metadata.
- Optional: on the right, click the Advanced Options swipe button (gray dot) and modify one or more of the following additional fields:
- Version Description: A concise description of the model version. Text only.
- Visibility: default is Public. Change the visibility setting if needed. For valid values, see What are the visibility settings for model objects on the API platform? below.
- Click Save. The metadata for the model version is saved, and you are taken to the Edit Schema page where you can make changes to the schema as needed, in either the JSON Schema Editor (default view) or the plain JSON (click the JSON tab).
For information about using the JSON Schema Editor, see How do I design a model in the JSON Schema Editor?
- When done, click Save.
To delete a model version
- In the Community Manager developer portal, go to the Models list for the organization. All models associated with the organization are displayed.
- Find the model that you want to delete, and click the title to access the Overview page for the model.
- On the left menu, click Details.
- Conditional: if there is more than one existing version, choose from the Version drop-down at the top right.
- On the Details page for the model, on the right, click Delete.
- At the confirmation prompt, click OK. The model is deleted.
Note: There is a short delay before the Models List is updated.
What states are valid for model versions, and who can approve or reject model versions?
Models go through several lifecycle states. Only certain roles can perform certain actions. The states are:
- Draft
- Pending Approval
- Active
- Rejected
- Deleted
The sequence of action/states, and the permissions required to make changes to states, are summarized in the table below.
For a workflow diagram of the states and permissions associated with model objects, see What is the default workflow for models? (Site Admin help).
| Action | State required for action | State after action | Role required |
|---|---|---|---|
| Create a model | None, just valid permission | Draft | Model Designer |
|
Submit for approval |
One of the following:
|
Pending Approval |
Model Designer |
| Approve | Pending Approval | Active | Model Administrator |
| Reject | Pending Approval | Rejected/Draft | Model Administrator |
| Delete |
One of the following:
|
Deleted | Model Designer |
What is a model category?
A model category is a logical grouping that can be used for model objects. The model object category is defined by the Business Admin (More > Admin > Model Categories).
There is one default category, global, which cannot be changed. The Business Admin can add, modify, or delete any other model categories.
Each model can be assigned to a category. This allows logical grouping of model objects, and also facilitates search in a scenario where there are many models defined for a business. The search feature on the Models list allows searching by category.
You can have models of the same name if they are assigned to different categories. This allows
If you need additional model categories and cannot add them yourself, ask a Business Admin.


