Managing Lifecycle Coordinator
Learn how to set up, configure, and manage activities relating to the Lifecycle Coordinator feature, in the Dev Ops Theme.
Table of Contents
Overview:
- What is Lifecycle Coordinator?
- What options are available for the deployment architecture of my Lifecycle Coordinator topology?
Setup and Configuration:
- What features do I install and configure to use Lifecycle Coordinator?
- Who can set up the Lifecycle Coordinator user interface (UI)?
- Who can use the Lifecycle Coordinator UI?
- How do I set up Lifecycle Coordinator?
- How do I reset my password for the Lifecycle Coordinator user interface?
Managing Promotion Requests:
- What activities can I perform on the Promotion Requests page?
- How do I filter the list of promotion requests?
- How do I view promotion request details?
- What happens when I approve a promotion request?
- What happens when I reject a promotion request?
- What activities can I perform on the Lifecycle Coordination Admin (Requests) page?
- What are the valid statuses and lifecycle for a promotion request?
- Additional approval functionality available in Lifecycle Manager
Overview:
What is Lifecycle Coordinator?
Lifecycle Coordinator is a set of functions, with an associated user interface, that allows you to manage development and operational lifecycle of assets on the Community Manager developer portal, such as apps and APIs, in a defined sequence of separate tenants.
For example, let's say your team designs an API. The API is in the development environment. When it's ready, you want to move it to the staging environment where it will be tested. Perhaps it fails testing and some changes are made, and an updated version needs to be tested. Then, when testing is complete, you want to move it to a production environment.
In the context of Lifecycle Coordinator, each of these different development environments is represented in a separate platform tenant. The promotion sequence across these environments is defined as a promotion topology in Lifecycle Coordinator, with the separate environments defined as separate Community Manager tenants within this topology. In other words, Lifecycle Coordinator acts as a hub in a hub-and-spoke configuration, with each tenant representing a spoke in the configuration.
Once setup is complete, authorized users can promote assets between environments.
Within the Community Manager developer portal, promotion and approvals relating to the promotion hierarchy are managed in the Dev Ops theme.
What options are available for the deployment architecture of my Lifecycle Coordinator topology?
The deployment architecture is flexible. Tenants can be on the same machine or on different machines. For example, in a scenario where you have a topology of three tenants:
- On one container you could create Tenant 1, Tenant 2, and Tenant 3.
- You can have three different containers on three different machines, each with one tenant.
- You can have a hybrid structure where two or more tenants are on one machine, and another—for example, Production—can be on a different machine.
The Lifecycle Coordinator instance connecting these tenants can be:
- Deployed on a separate machine.
- Co-located on the same machine as one or more of the tenants.
Setup and Configuration:
What features do I install and configure to use Lifecycle Coordinator?
To use Lifecycle Coordinator, you'll need to have:
- A working instance of Lifecycle Coordinator. The promotion sequence is defined in this instance.
- An implementation of Community Manager, with at least two environments; each is a separate platform tenant. You'll promote assets (apps and APIs) between the tenants. A common scenario is to have a promotion sequence of three tenants—Development, Staging, and Production.
Once the promotion topology is configured in the Lifecycle Coordinator instance, authorized users in each tenant can promote assets (apps and APIs) to the next environment. The authorized Lifecycle Coordinator user can manage promotion requests within the Lifecycle Coordinator user interface.
Who can set up the Lifecycle Coordinator user interface (UI)?
The Site Admin sets up the Lifecycle Coordinator user interface.
Who can use the Lifecycle Coordinator UI?
There are two categories of user defined for the Lifecycle Coordinator UI:
- LC User: Sees all requests for the promotion sequence, and can approve or reject promotion requests.
- LC Administrator: Cannot approve or reject promotion requests, but can cancel requests. Users with the LC Administrator role see a separate page, Admin, which isn't available to the LC User. See What activities can I perform on the Lifecycle Coordination Admin (Requests) page?
The same user can have both roles.
These roles are assigned in Policy Manager: Workbench > Security. Assign the applicable role to the user. For instructions, see Assigning a role to a user (Policy Manager help).
How do I set up Lifecycle Coordinator?
The Site Admin sets up the Lifecycle Coordinator user interface by installing the Dev Ops theme.
To set up Lifecycle Coordinator
- Log in as a Site Admin, in the first tenant of the topology (or in the dummy tenant created as part of a standalone Lifecycle Coordinator instance), and go to the Admin section.
- Go to Site.
- At the bottom, in the Themes section, click Add Theme.
- In the Theme field, choose devops, as shown below.
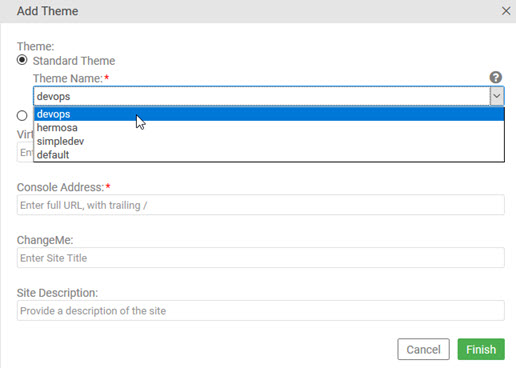
- Specify additional values for the Lifecycle Coordinator user interface (for help with field values, see How do I configure values for a theme?):
- One or more virtual hosts or vanity hostnames for the LC UI.
- The full console address for the theme, including trailing backslash.
- The site title.
- The site meta description.
- Click Finish.
- On the Site Settings page, click Save to confirm.
How do I reset my password for the Lifecycle Coordinator user interface?
Valid in Version: 2019.1.6 and later
Password reset for the Lifecycle Coordinator user interface (Dev Ops theme) works in exactly the same way as it does for the other Community Manager developer portal themes. At the Login page, click the Forgot Password link.
For detailed instructions, see What do I do if I forget my password?
Managing Promotion Requests:
What activities can I perform on the Promotion Requests page?
On the Promotion Requests page, the Lifecycle Coordinator user can:
- Filter the view of promotion requests: see How do I filter the list of promotion requests? below.
- Approve a promotion request: click the Approve button.
- Reject a promotion request: click the Reject button.
- View request details: click the request name (a link). See How do I view promotion request details? below.
To get to the Promotion Requests page
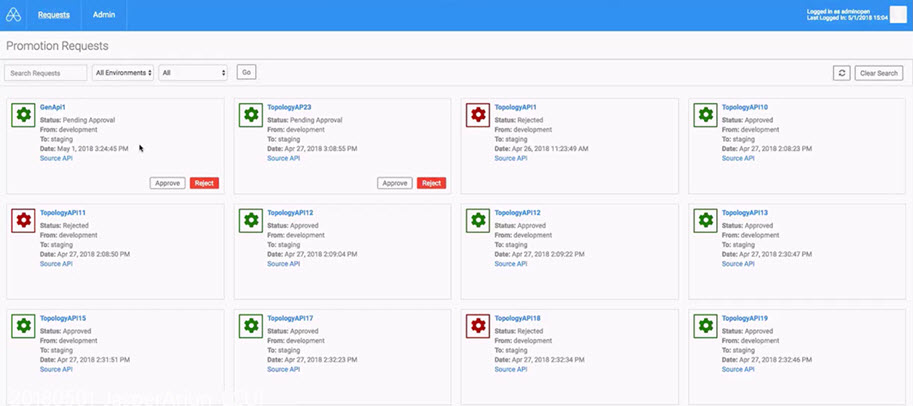
Log in to the Lifecycle Coordinator user interface. The URL is the Console Address value set up in the Dev Ops theme definition for the tenant associated with the Lifecycle Coordinator instance (see To set up Lifecycle Coordinator above).
Lifecycle Coordinator opens at the Promotion Requests page, as shown below.
How do I filter the list of promotion requests?
You might have a large number of promotion requests to approve or reject, and might want to prioritize. Or, you might need to find a specific promotion request.
The Promotion Requests page includes filtering options to help you tailor your view as needed, including:
Search string
Use the Search Requests field to search for promotion requests matching any string you enter, with or without additional filters.
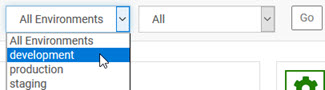
Environment drop-down list
Search by environment. The drop-down list includes all environments in your topology sequence. An example is shown below.
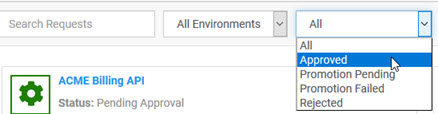
Filter drop-down list
Search by page status. The drop-down list includes all available statuses, as shown below.
How do I view promotion request details?
From the Promotion Requests page, you have a summary view of each request, and can approve or deny a request with one click. However, you might want to view additional information about a promotion request.
In a specific promotion request, click the title. The details page appears, as shown below.

From here, you can review additional information about the request, including history. You can also approve or reject the request from this page.
To return to the main Promotion Requests page, just click the Go back to Promotion Requests link.
What happens when I approve a promotion request?
When you approve a promotion request, the change takes effect immediately. The asset remains in the original environment, but is also promoted to the next environment in the sequence. You might need to refresh the browser to see the change.
What happens when I reject a promotion request?
When you reject a promotion request, the promotion status of the asset is displayed as Rejected. There are no further workflow actions with regard to that promotion request, such as Resubmit. The user who made the request, or another user, can initiate a new promotion request for the same asset at any time. At that point, the promotion status of the asset changes to Promotion Pending.
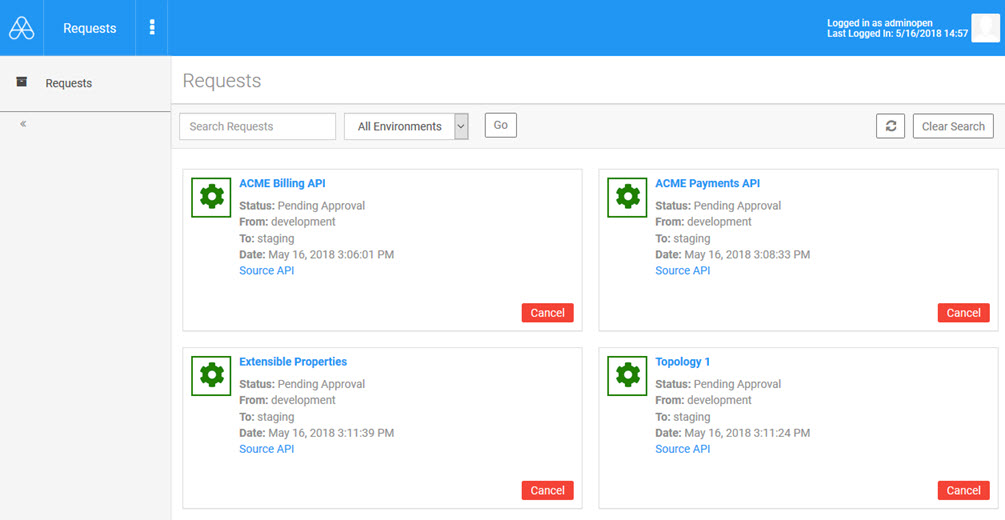
What activities can I perform on the Lifecycle Coordination Admin (Requests) page?
If you're a Lifecycle Coordinator Admin, you have an additional page available to you. On the Admin page you have the following additional capabilities:
- Cancel requests. If you also have the LC User role, you can approve or reject promotion requests, but you must use the Promotion Requests page. The Requests page is only for cancelling requests.
To get to the Admin (Requests) page
- Log in to the LC user interface. Lifecycle Coordinator opens at the Promotion Requests page. Click the drop-down in the top menu bar, as shown below.

- The Requests page is displayed.
What are the valid statuses and lifecycle for a promotion request?
Before a promotion request occurs, an asset has a lifecycle status of Not Promoted.
When a promotion request occurs, the lifecycle status changes to Promotion Pending.
If the request is approved, the status for the next environment changes to Approved.
If the request is rejected, the status for the next environment changes to Rejected.
If the request is cancelled, the status changes to Promotion Failed.
Within the Lifecycle Coordinator user interface, you can filter requests by the following statuses:
- All
- Approved
- Promotion Pending
- Promotion Failed
- Rejected
Additional approval functionality available in Lifecycle Manager
This document provides information about the approval functionality available in Lifecycle Coordinator. Some additional functionality is available in the full Lifecycle Manager product, including:
- Display or population of request properties.
- Comment-only approvers (an optional role that allows the user to comment on a request, to potentially provide information that might guide the approver in making an approve/reject decision).
For help with this or any other functionality relating to Lifecycle Coordinator, ask your Perforce/Akana Professional Services representative.


