Adding and Configuring Extensible Metadata for Apps, APIs, and Users
This document provides basic configuration information for using Repository Client, and information on step-by-step use cases for using Repository Client to configure and implement custom app, API, and user properties used by the extended properties and workflow feature on the API Platform.
Table of Contents
General Information/Getting Started:
- Akana API Platform support of extensible metadata -- Introduction
- What is the Repository Client?
- Extensible metadata types supported
- Configuring extensible metadata -- Overview
- Enable Feature
- Establish Admin Connection to Repository Client
- Create Configuration Project
Extensible Properties for Apps and APIs:
- Define New Metadata Elements
- Populate Defined Elements into API and/or App Types
- Upload the Configuration
Extensible Properties for Users:
- Lifecycle Repository Asset Structure
- User Creation Scenario 1: Site Admin User Creation
- User Creation Scenario 2: User Self-Signup
- Adding Extensible User Metadata
- Step 0: Create a library connection and download the Lifecycle Repository tenant library configuration
- Step 1: Declare a new metadata type in the GDT
- Step 2: Add the newly-declared metadata type to the User - Specified capture template
- Step 3: Configure the LPC to properly expose the new metadata element
- Step 4: Upload the configuration to the Lifecycle Repository tenant library
General Information/Getting Started:
Akana API Platform support of extensible metadata -- Introduction
The Akana API Platform supports extensible metadata for apps, APIs, and users.
This document provides two basic sets of instructions:
- Adding app and API metadata to a tenant configuration: see Extensible Properties for Apps and APIs.
- Adding user metadata to a tenant configuration: see Extensible Properties for Users.
Both use cases are examples of how extensible metadata can be used. There are many other scenarios.
What is the Repository Client?
The Repository Client is a standalone, Eclipse-based IDE, installed as a separate installation package available within the Lifecycle Manager installation download file. Repository Client is a standalone application that you can install locally, that allows you to connect to the Lifecycle Manager library. Lifecycle Manager installation is not required. Repository Client offers a graphical user interface that is easier to work with than raw XML configuration files. Repository Client is used to manage configuration files for Lifecycle Manager, Lifecycle Coordinator (Promotion feature), and Lifecycle Repository (Extensible Properties feature).
The Repository Client product allows you to specify predefined implementation details for an API, app, or user, based on values that users provide at runtime for custom properties added in the Community Manager developer portal.
When you create a resource in the Community Manager developer portal, such as an API, app, or user, it inherits default out-of-the-box settings. For example, for an API, anonymous access is enabled, a Live implementation is created, the context path is a unique URL based on the Community Manager developer portal URL, and there are no policies attached to the API.
By using the Repository Client product in conjunction with the Community Manager developer portal, you can collect values from the user at runtime and customize the API that's created for the user, based on those values. For example, for an API, you could set up a scenario where a custom property asks whether the API is sensitive or not, and if yes, the Community Manager developer portal creates the API with a default setting of Private.
Extensible metadata types supported
The following metadata types are supported in the Repository Client for defining classifiers for apps, APIs, and users in the Akana API Platform:
- Boolean
- Date
- Decimal
- String. A string value can be either of the following:
- Open String (values defined by the user)
- Enumerated String (values predefined)
Artifacts can be:
- Textual description
- File upload
- URL
Classifiers can include multi-level taxonomy (in legacy Lifecycle Manager terminology, compound classifiers). For example, in a billing system you might want the user to choose a country and then choose a state or province.
For more information, including illustrations of the UI elements and examples of how they are defined, see LaaS UI Elements.
For illustrations of specifying the metadata type when adding a new classifier, see Define New Metadata Element.
Configuring extensible metadata -- Overview
At a high level, the steps for adding and configuring extensible metadata are:
- Enable Feature
- Establish Admin Connection to Repository Client
- Create Configuration Project
- Define New Metadata Elements
- Populate Defined Elements into API and/or App Types
- Upload the Configuration
Enable Feature
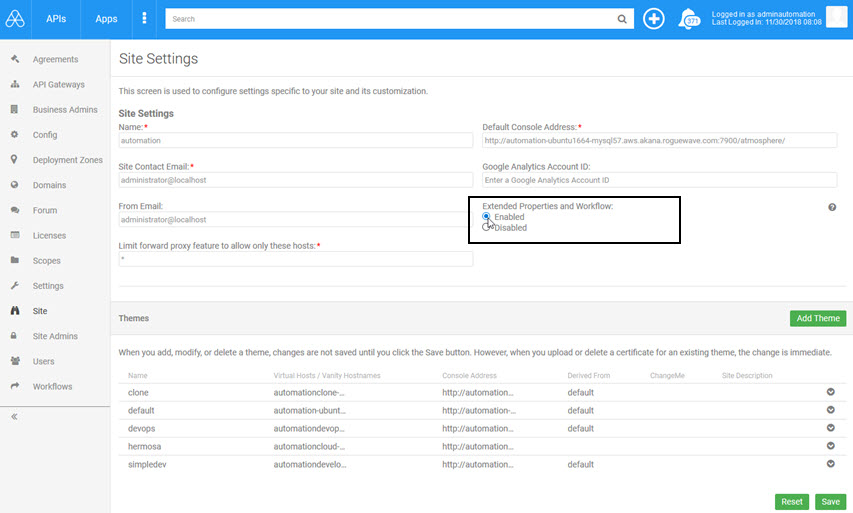
In the Community Manager developer portal, enable the Extended Properties and Workflow setting, as shown below.
Navigation: In the Community Manager developer portal, Admin > Site. For details, see How do I configure site settings? (Community Manager developer portal help).
Establish Admin Connection to Repository Client
To establish the admin connection to the Repository Client, complete the following steps, illustrated below:
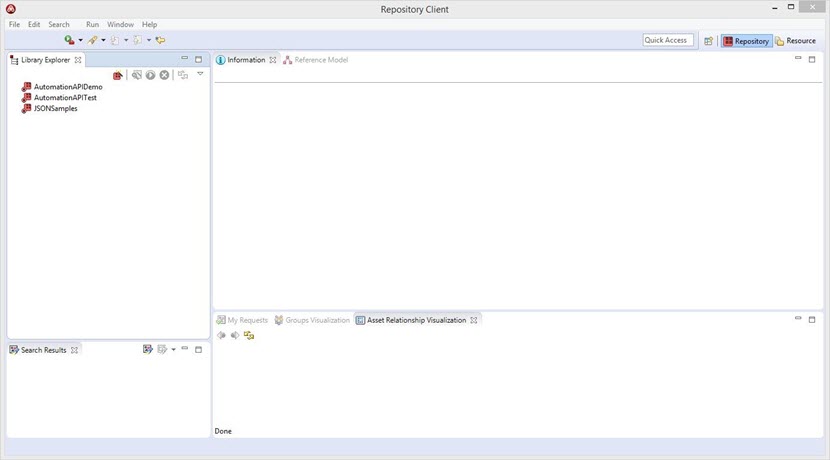
Start the Repository Client
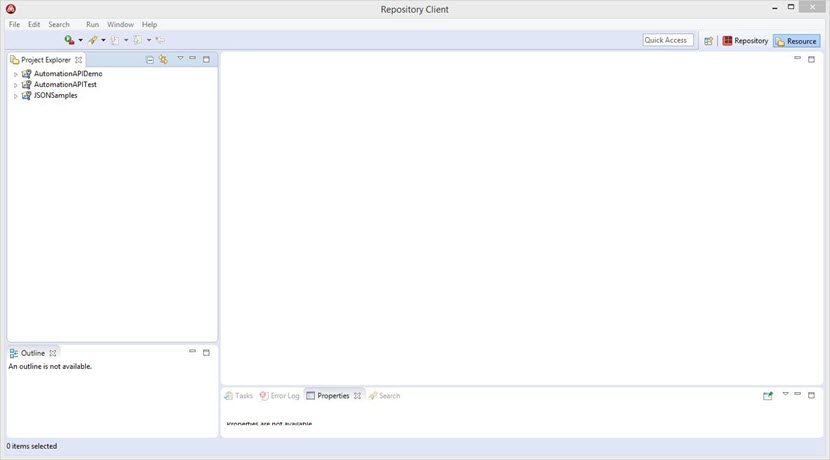
Start up the Repository Client user interface, shown below.
Note: If you don't have the Repository Client installed, contact your Akana representative.
Create New Connection
Follow the steps below.
To create a new connection in Repository Client
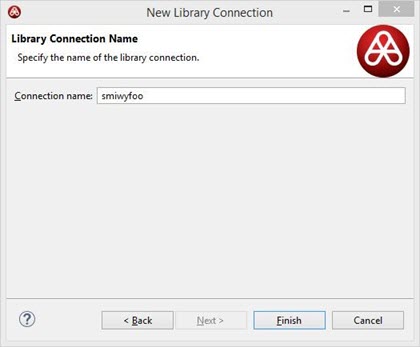
- In the Library Explorer view, left-click on the red Connection icon to launch the New Library Connection wizard.
- In the Library Name field, use your tenant name from the Community Manager developer portal, as shown below.
You can use the Site Admin credentials from any Community Manager developer portal tenant as the Lifecycle Repository Admin credentials for the library connection.

The Connection name field defaults to the library (tenant) name, as shown below. Click Finish.
The initial connection to the instance triggers certificate installation and restart.
When the connection is established, the Repository Client automatically opens the connection, as shown below.
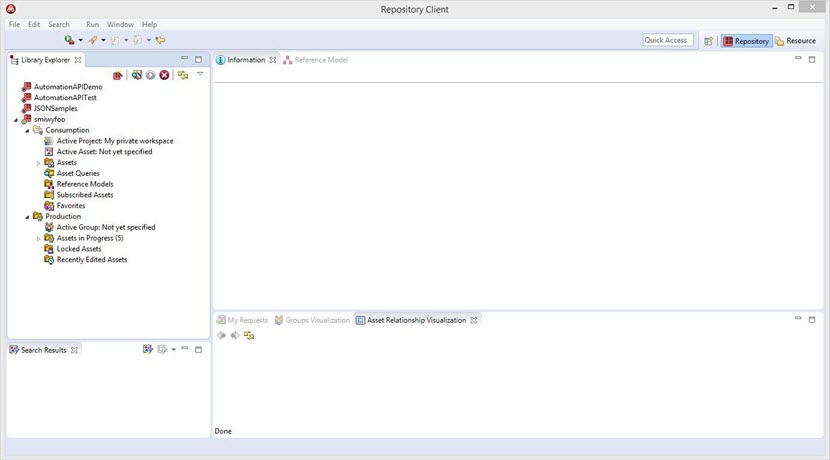
Note: It's not necessary to keep the connection open. To close it, in Library Explorer, right-click on the Connection name and choose Disconnect.
Create Configuration Project
To create the configuration project, complete the following steps, illustrated below:
Switch Repository Client to Resource Perspective
At the top right, click the Resource button, as shown below.
Create New Configuration Project
Follow the steps below.
To create a new configuration project in Repository Client
- Right-click in Project Explorer to launch the New Project wizard.
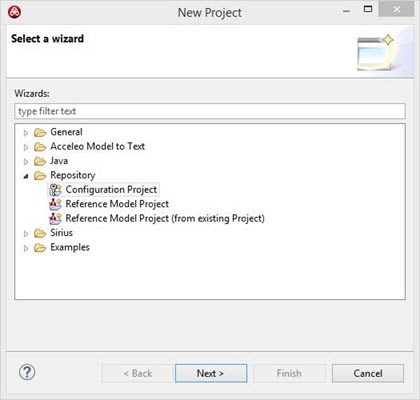
- Open the Repository folder, select Configuration Project, and then click Next.
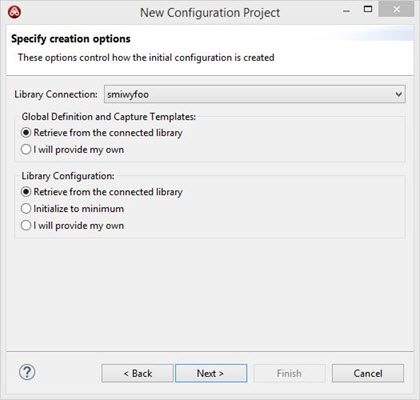
- Select the tenant library connection that you created in the earlier step, and make sure that the two Retrieve from the connected library options are selected, as shown below. Click Next.
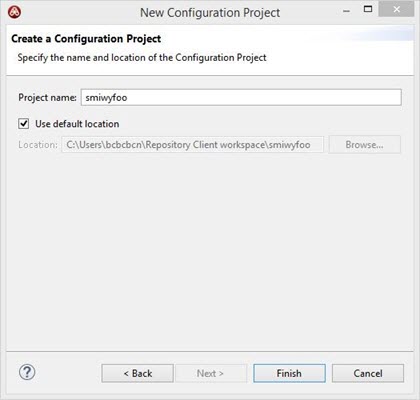
- The project name defaults to the tenant library connection name. Click Finish.
- The Configuration Project creation and population process runs.
When this process is complete, a new Configuration Project appears in the Project Explorer, and the Library Process Configuration (LPC) document editor opens in the editor view. An example is shown below.
Extensible Properties for Apps and APIs:
Define New Metadata Elements
To define metadata elements, complete the following steps, illustrated below:
Open GDT (Global Definition Template) Editor
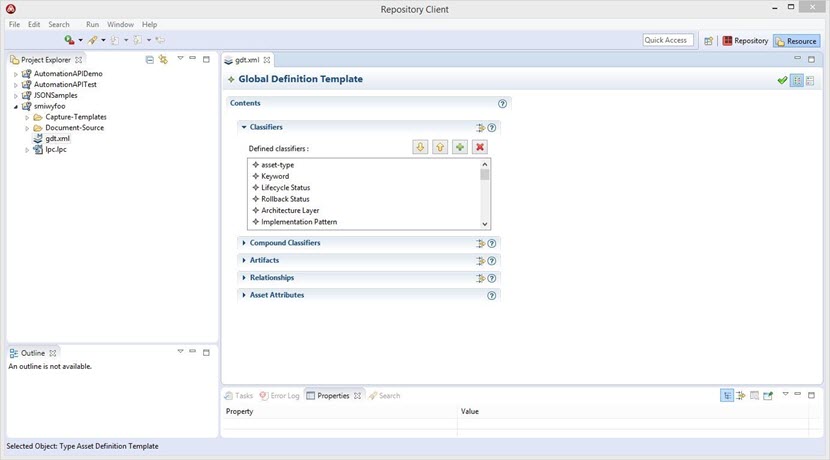
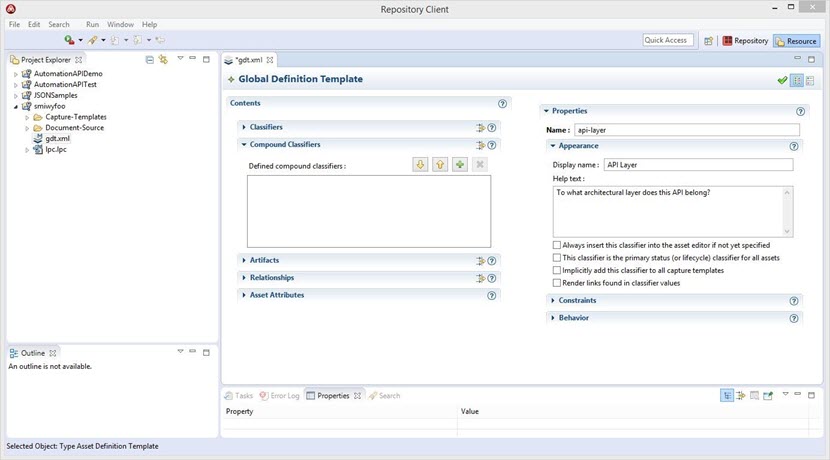
Close the LPC editor. In the configuration project, double-click the gdt.xml file. The Global Definition Template Editor opens in the editor view.
Define New Metadata Element
To define a simple metadata element, left-click the Plus icon (+) on the Classifiers section of the editor, as shown below. For information on supported metadata elements, see Extensible metadata types supported.
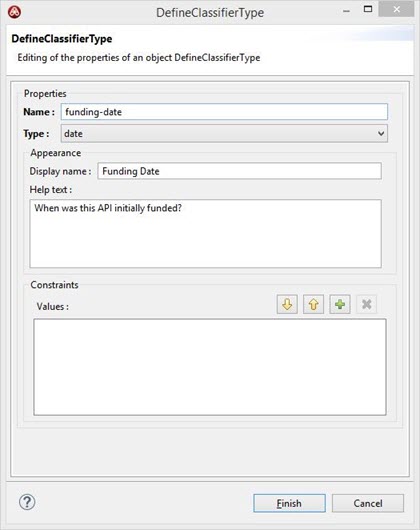
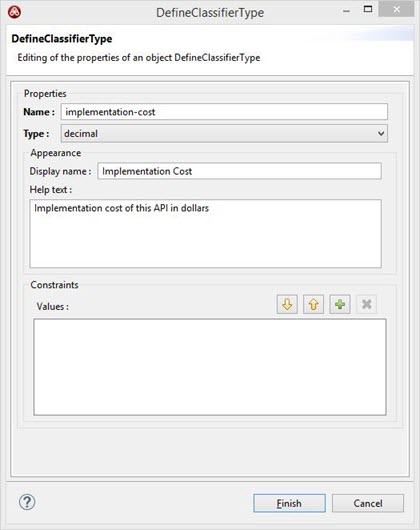
The convention for the classifier name is to use lower case characters with connecting hyphens: for example, funding-date, implementation-cost.
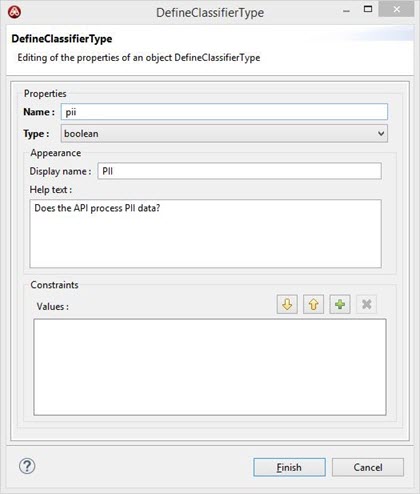
when you click Finish, the new classifier is added to the GDT, as shown below. This example is a Boolean classifier.
Further editing of the newly defined classifier is typically not required.
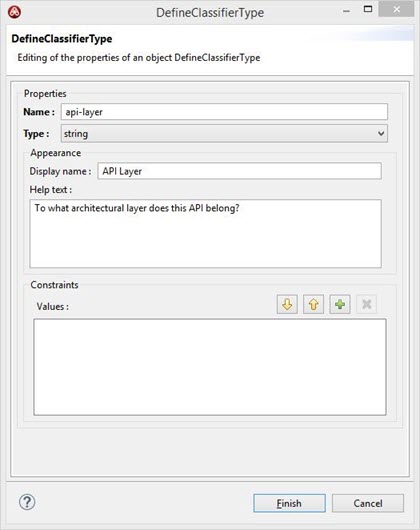
You can define additional classifiers in the same way, as shown below.
- Date classifier
- Decimal classifier
- String classifier (open)
- String classifier (enumerated)
- Taxonomic classifier
Date classifier
Decimal classifier
String classifier (open)
String classifier types can be specified as open or enumerated. The example below shows an open string classifier.
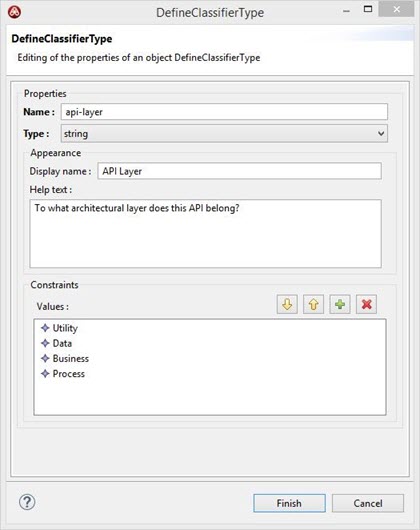
String classifier (enumerated)
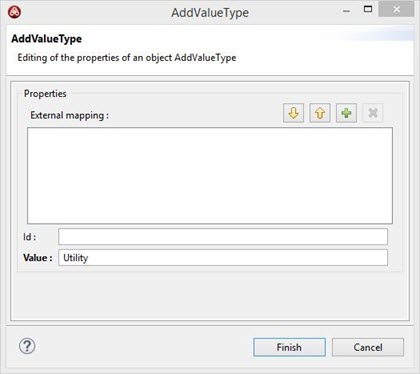
To specify a string as enumerated, define the enumeration values by selecting the + action on the Values Constraints section of the Define Classifier Type dialog. Fill in the value field with the desired enumerated value, leave the other fields blank, and click Finish.
The enumerated values are presented by the Community Manager developer portal UI in the order in which they are specified. If necessary, you can reorder individual values by selecting the value and clicking the up or down arrow.
Taxonomic classifier
To specify taxonomic classifiers (for example, business domain/subdomain) expand the Compound Classifiers section of the editor.
When specifying a compound classifier, specify the fields of the classifier first, and then specify the allowed values.
The ordering of fields in the editor dialog controls the definition of the taxonomy levels. Use the up and down arrow actions as needed to establish the correct ordering.
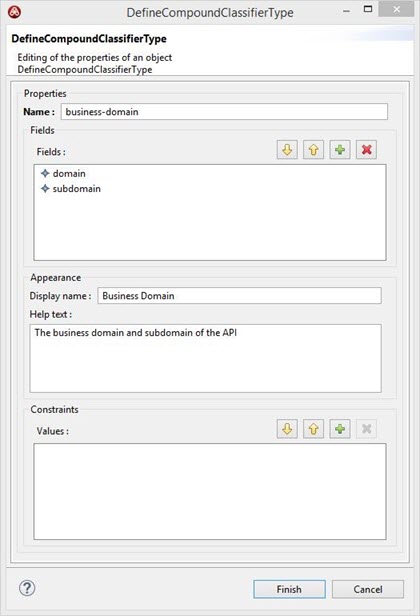
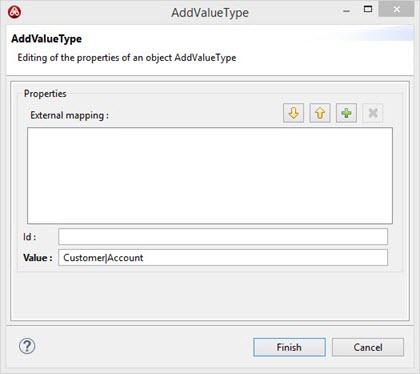
You must specify all valid value combinations for the taxonomy in the Values section of the dialog. To separate field values, use the pipe character (|).
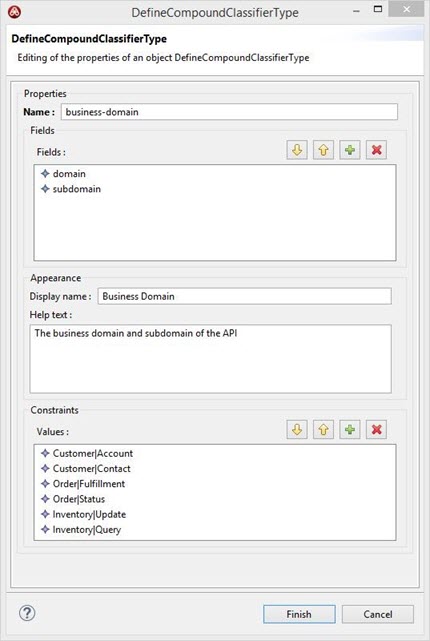
You can specify URL-based fields by defining by-reference artifact types.
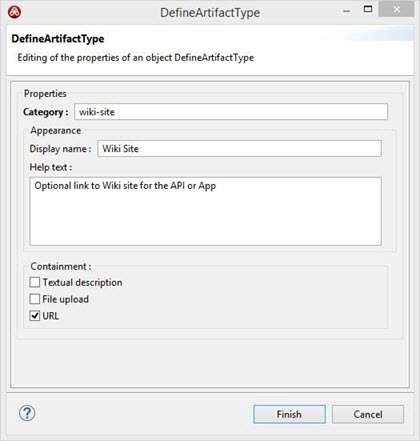
Note that you must clear the Textual description and File upload containment options. These are currently not supported by the Community Manager developer portal user interface.
Once all new elements are defined, save, and then close the GDT editor.
Populate Defined Elements into API and/or App Types
Expand the Capture-Templates folder of the configuration project. Also expand the Common Asset.ctxml template to view its child templates.
Capture Templates are used to associate elements defined in the Global Definition Template with specific asset type/state combinations. The asset types that support extensible metadata in the Community Manager developer portal are API, app, and user. This use case addresses setting up extensible metadata for API and app. For information about setting up extensible metadata for users, see Extensible Properties for Users.
For API and App, there are two sets of templates:
- The API - Initial and App - Initial templates are used to specify create-time extensible metadata elements and constraints.
- The API - Specified and App - Specified templates are used to specify edit-time metadata elements and constraints (for example, to lock down a value entered at create time to become read-only, or to introduce an additional element that is applicable only after initial creation).
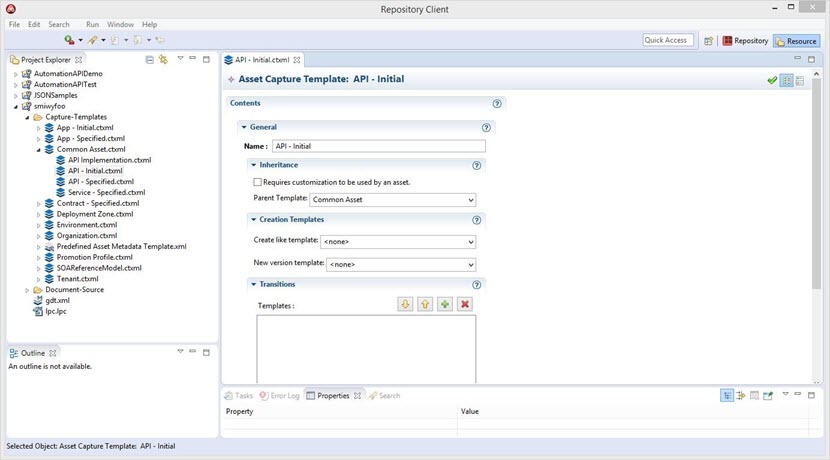
Double-click the desired template to open the template editor. Start with the Initial template prior to editing the Specified template; all changes made to the Initial template are automatically inherited by the Specified template.
Collapse the General section of the Editor, and expand the Classifiers section to add Boolean, date, decimal, string (open or enum), and taxonomy types previously specified in the GDT.
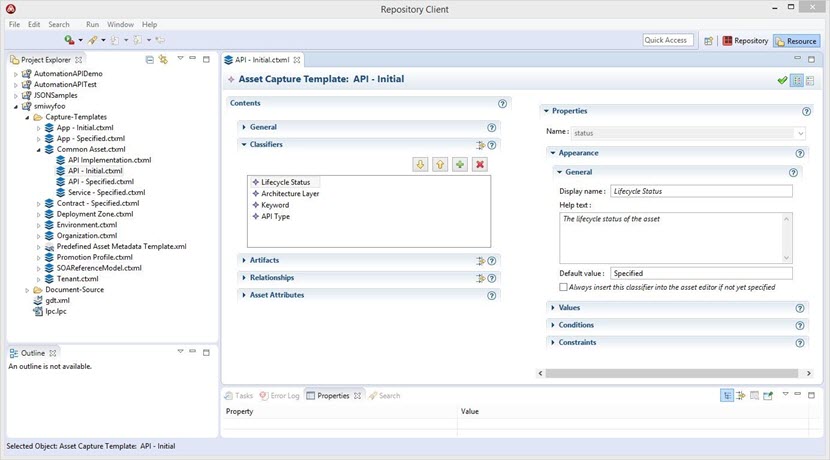
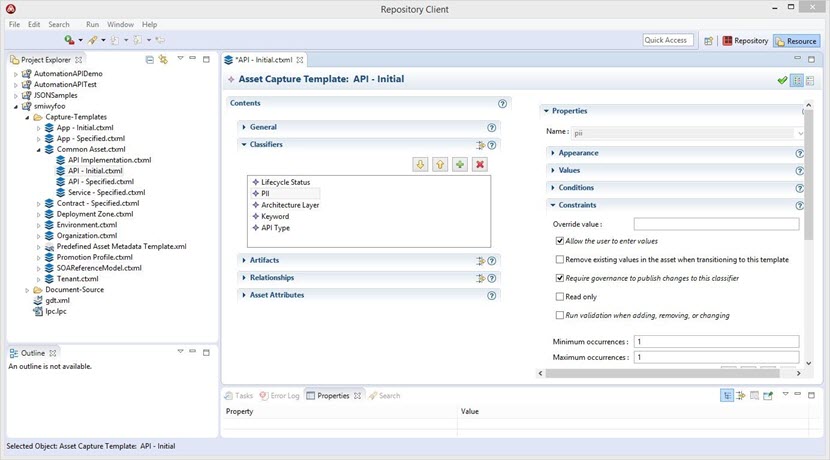
Select the + action to add a classifier to the template. It's only necessary to specify a name.
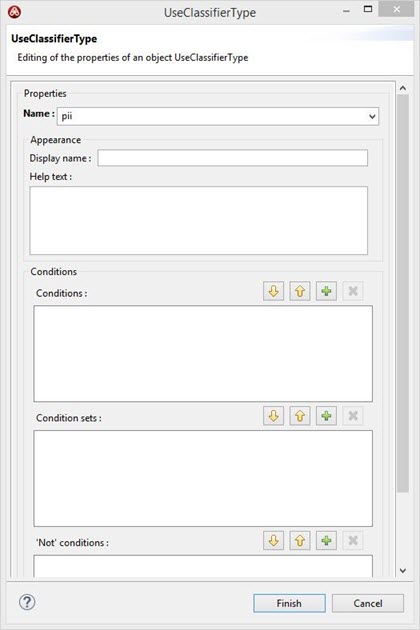
Click Finish, and then expand the Constraints subsection of the Properties section of the newly added classifier to add cardinality or read-only constraints. Read only, Minimum occurrences, and Maximum occurrences are the only constraints currently supported by the Community Manager developer portal. In addition, you can specify a default value, in the General Appearance Properties section of the editor.
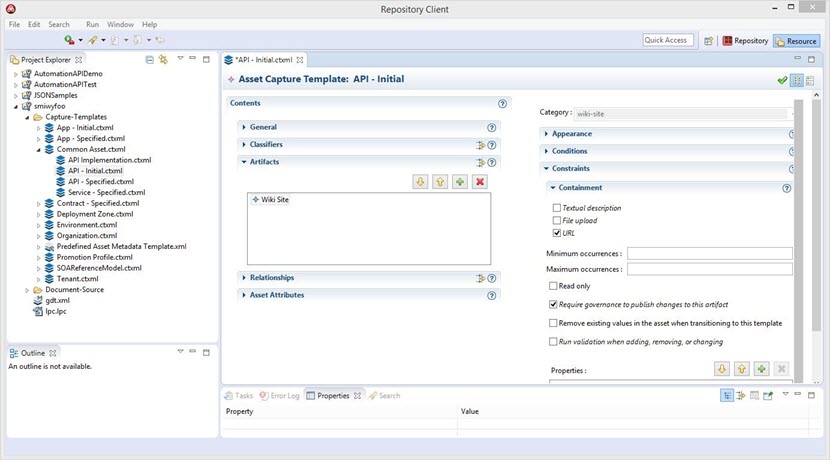
Expand the Artifacts section of the editor to add a previously-defined URL element to the template.
Upload the Configuration
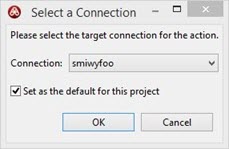
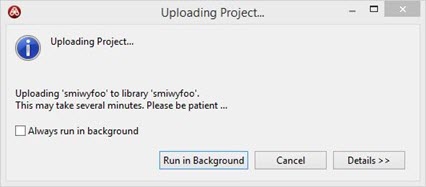
After saving all the edited template files, go to the Project Explorer view, right-click on the top-level configuration project folder, and select Upload to Library to access the upload dialog. If this is the first time this configuration has been uploaded, select the correct tenant connection and check the set as the default for this project option. Click OK to initiate the upload.
A progress dialog appears until the upload is complete.
Extensible Properties for Users:
Lifecycle Repository Asset Structure
The Lifecycle Repository component deployed as part of the Akana API Platform comes with a default configuration that includes specification of an empty User asset type. This includes:
- Specification of two User capture templates:
- User - Initial
- User - Specified
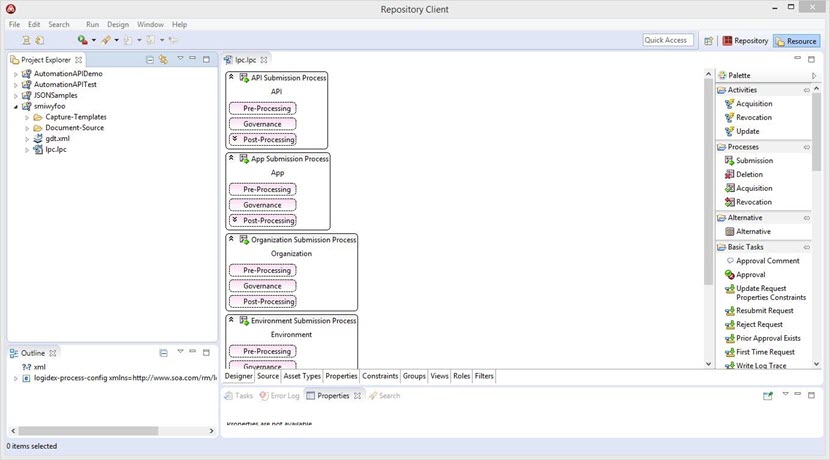
- Declaration of the User asset type in the Lifecycle Repository Client user interface (LPC) with a default association of this type to the User - Initial capture template, as shown below.
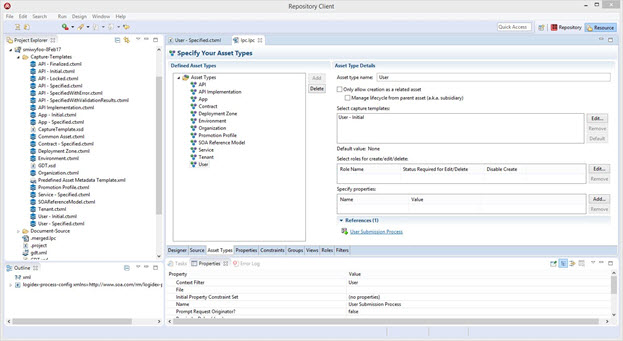
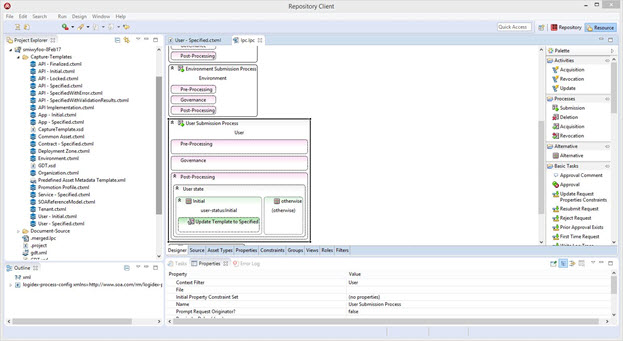
- Specification of a User Submission process in the LPC which automatically transitions a User asset in the Initial state to the User - Specified capture template after initial publication, as shown below.
This default configuration is suitable as a baseline configuration for each of the two User creation scenarios supported by the API Platform. This document addresses configuration steps for both scenarios:
Scenario 1: User creation by the Site Admin
A Site Admin can create new users in the Community Manager developer portal via the List of Users page: in the Community Manager developer portal user interface, Admin > Users.
The default configuration assumes that the Site Admin is not responsible for populating any of the extensible User metadata fields specified for the tenant. Instead, it's expected that the user will populate these fields at first login.
To set this up, implement the User - Initial capture template as the default template to be used at the time of User asset creation. This template is empty except for an internal state classifier; this classifier is used to control template transition only, and should never be edited.
User Creation Scenario 2: User self-signup
An individual user can sign up to the Community Manager developer portal, creating a local account, without Site Admin involvement. This process initiates the creation of a unique UserID which is assigned to the user and linked to the user's credentials and other information provided by the user, and is stored in the database.
When extensible metadata is in use, the Community Manager developer portal user interface should present such users with the set of extensible User metadata fields at the time the user creates a profile. In order to enable this behavior, it's necessary to modify the User asset type entry in the LPC so that it references the User - Specified capture template in place of the default User - Initial capture template setting.
Adding Extensible User Metadata
Adding extensible metadata is a multi-step process.
For a list of supported metadata types, see Extensible metadata types supported.
This document does not provide an exhaustive guide covering each type. Instead, it provides a single example (an enumerated String labeled User Type). You can apply the principles of this example to elements of other types.
The process steps are as follows:
- Step 0: Create a library connection and download the Lifecycle Repository tenant library configuration
- Step 1: Declare a new metadata type in the GDT
- Step 2: Add the newly-declared metadata type to the User - Specified capture template
- Step 3: Configure the LPC to properly expose the new metadata element
- Step 4: Upload the configuration to the Lifecycle Repository tenant library
Step 0: Create a library connection and download the Lifecycle Repository tenant library configuration
If this is the first time that a Lifecycle Repository tenant library is being edited within the Repository Client user interface, the administrator must create a new library connection from the Repository Perspective of the client.
- From the Library Explorer view, choose the red New Library Connection action. This allows the Administrator to configure the connection, as shown below.
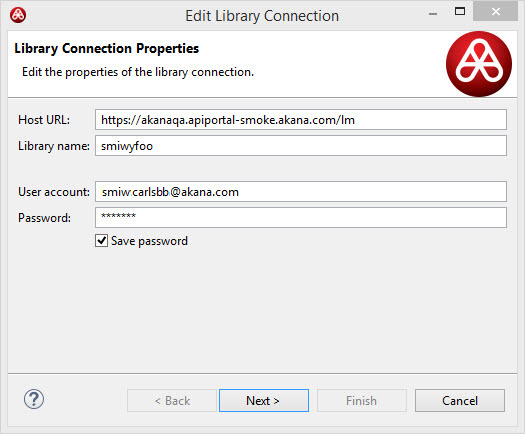
Note: By default, the Community Manager developer portal Site Admin role includes the appropriate permission to edit library configurations. Lifecycle Repository delegates user authentication to the Community Manager developer portal, so the same user credentials used to log in to the Community Manager developer portal should be populated into the Lifecycle Repository Library Connection.
- Once the connection is successfully created, switch to the Resource perspective and create a new Repository Project. To do this:
- In the Project Explorer, right-click and choose New Project.
- Expand the Repository folder.
- Choose a configuration project and click Next.
- On the next panel of the wizard, choose the correct Connection and make sure that the other settings are set to Retrieve from.
This creates a new project, primed with the default Lifecycle Repository tenant library configuration, in the Project Explorer.
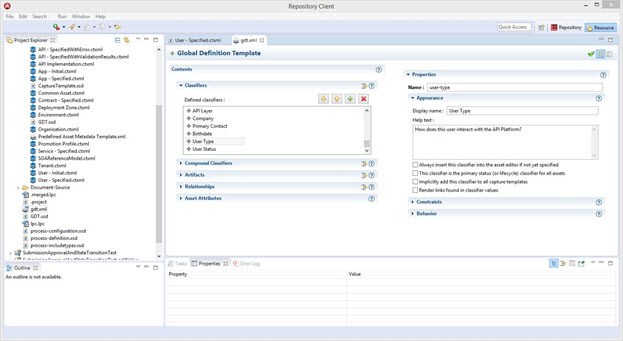
Step 1: Declare a new metadata type in the GDT
All metadata types must be declared in the GDT (Global Definition Template) of the tenant library. This action makes them available for use within asset types.
The GDT is an XML file that can be opened in either of two ways:
- Using the graphical editor provided by the Repository Client. Installation of Repository Client is via a separate installation package that is part of the Lifecycle Manager installation ZIP file. It does not require installation of Lifecycle Manager. When you install the Lifecycle Repository feature, it installs Eclipse as well as the Repository Client which is an Eclipse add-on.
- Within the schema-aware XML editor that comes as part of Eclipse (or in any XML editor).
Since the GDT is a declarative document, it can be very efficient to copy and paste existing elements as a starting point for new element declaration. However, many users prefer to use the graphical editor as a guide to populating the various attributes that control element behavior. The right-click context menu controls which editor is applied when opening a file.
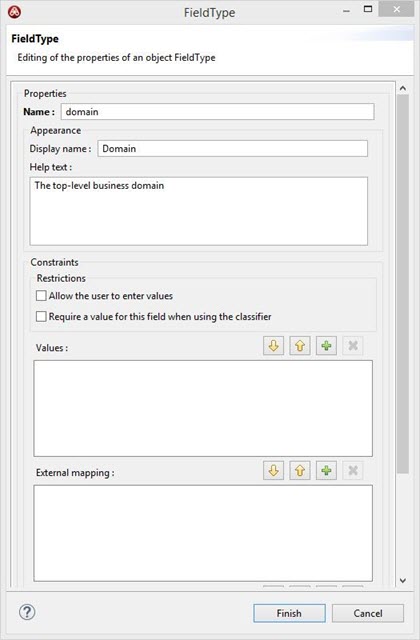
When using the graphical editor, to add a new classifier, select the green plus icon on the Defined Classifiers list. A dialog box opens, and the administrator can specify the details of the newly declared classifier, as illustrated in the two images below.
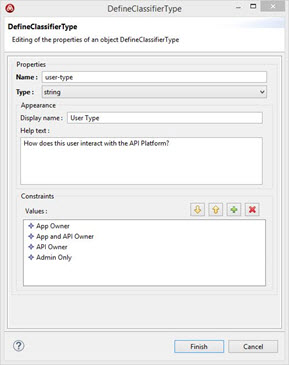
In the example above, when the user clicks Finish, the editor generates the following underlying XML fragment:
<define-classifier display-name="User Type" help-text="How does this user interact with the API Platform?" name="user-type" type="string">
  <add-value uuid="_FrMwIA4_Eeew5aMeFxkGxw" value="App Owner"/>
  <add-value uuid="_HI0ksA4_Eeew5aMeFxkGxw" value="App and API Owner"/>
  <add-value uuid="_DEi28A4_Eeew5aMeFxkGxw" value="API Owner"/>
  <add-value uuid="_IxnugA4_Eeew5aMeFxkGxw" value="Admin Only"/>
</define-classifier>
You could also enter an equivalent XML fragment directly, using a schema-aware XML editor. In this case, you can omit the uuid attribute since the editor generates values on an as-needed basis based on other editing activities.
Step 2: Add the newly-declared metadata type to the User - Specified capture template
As discussed previously, the default configuration for user metadata is capable of supporting both user creation scenarios with minimal change.
In both cases, only the User - Specified capture template should be used as a basis for modification.
The User - Initial template should never have customer-specific metadata types. The only exception to this is if you want a hybrid Site Admin user creation scenario where the Site Admin fills in a subset of the extensible user fields and the user fills in the remainder.
When an element is added to a capture template, the administrator can control options that control presentation behavior and logic, such as:
- Cardinality (mandatory/optional)
- Single/multi-valued)
- Default values
- Editable vs. read-only
In this scenario, again the Lifecycle library administrator has the option of using either the graphical editor or the Eclipse-provided schema-aware XML editor.
When using the graphical editor, be aware that most options presented on the editor UI are not relevant for embedded LM within the API Platform. In most cases, the only section that should be edited is the Constraints section, shown below.
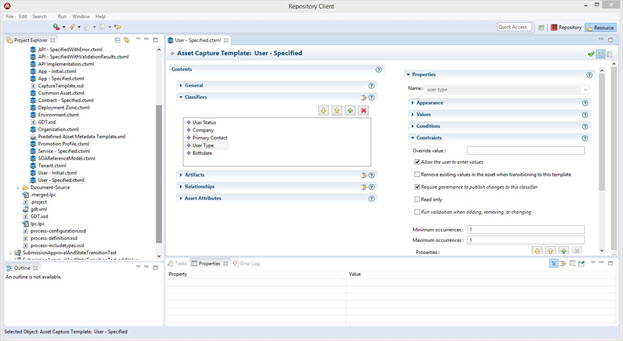
In the example above, the specific configuration settings enforce the following behavior on the newly-specified User property within the Community Manager developer portal user interface:
- The User Type field is:
- Mandatory (Minimum occurrence = 1)
- Single-valued (Maximum occurrence = 1)
- The end-user can edit the value (this is the most common use case for integrated metadata).
- The metadata value is processed through submission governance (that is, the User submission process referenced earlier).
If you edit the User Type classifier as above, the following XML fragment is generated in the underlying capture template document:
<use-classifier min-occurs="1" max-occurs="1" name="user-type" />
To create an optional single-valued field, delete the Minimum occurrence value in the graphical UI. This is represented in the underlying XML as follows:
<use-classifier appear-on-edit="true" max-occurs="1" name="birthdate" />
You can define a field as read-only in a similar way. Read-only values are generally not needed for User metadata, but might be useful in more advanced scenarios, such as API state transition with metadata lockdown after final transition.
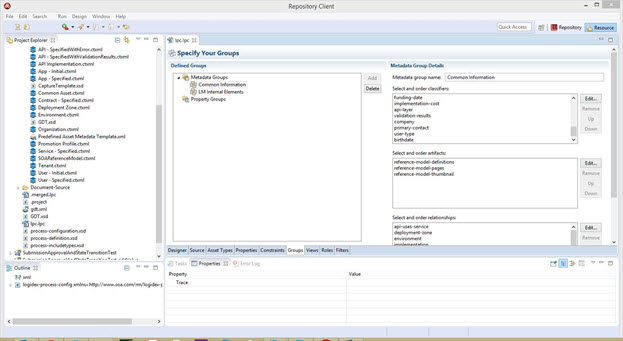
Step 3: Configure the LPC to properly expose the new metadata element
You must configure each metadata element into at least one LPC Group so that the element is accessible to Lifecycle Repository or to the Community Manager developer portal user interface.
By convention, the Lifecycle Repository default configuration defines two well-known LPC Groups:
- LM Internal Elements—This group is used to block exposure of an element to the Community Manager developer portal, so it is used only for control metadata (such as the user-status field used in the User Submission Process to control template transition).
- Common Information—In general, all newly specified User metadata elements should be added to this group, in the order in which you want them to be displayed in the Community Manager developer portal user interface. An example is shown below.
Step 4: Upload the configuration to the Lifecycle Repository tenant library
To upload the modified configuration to the Lifecycle Repository tenant library, right-click on the project folder and choose Upload to Library. In the dialog box, choose the correct connection and click OK.


