Using the XML Policy
Learn about the XML policy.
For information about using policies in the context of the Community Manager developer portal, see Business Policies.
Table of Contents
- About the XML policy
- Creating an XML policy
- Configuring an XML policy
- Sample XML policy
- Activating a policy
- Attaching a policy
About the XML policy
You can use the XML policy to write or import XML that will perform a specific function or functions.
If a policy is imported with a WSDL document, and it holds an assertion that is not known within the product and therefore does not have an associated user interface, it is treated as an XML policy.
Notes:
- This policy supports standard XML as defined in the XML 1.0 specification.
- The default encoding type supported by this function is: <?xml version="1.0" encoding="UTF-8"?>.
- XML must be well-formed, following the requirements stated in the XML 1.0 specification.
- Schema structures included in an XML 1.0 document must be compliant with the W3C XML Schema specification
- When a policy is attached to a service, the Policy Element (wsp:Policy) is added to the WSDL. Therefore, the XML provided in this policy must contain only the Policy Assertion XML.
Creating an XML policy
The first step in creating a policy is to define the basic policy information.
To add an operational policy
- Go to Workbench > Browse > Organization, and select Policies > Operational Policies. The Policies Summary is displayed.
- Click Add Policy.
- Choose the policy type and click Next.
- Specify a name (required) and description (optional) and click Finish. At the Completion Summary, click Close. The Add Policy Wizard creates a draft policy instance that you can then configure on the Policy Details page.
For more information, see Add Policy.
Configuring an XML policy
Once you've created the policy, you can configure the policy options.
To configure an XML policy
- Go to Workbench > Browse > Organization and select the Policies > Operational Policies folder. The Policies Summary is displayed.
- Find the policy on the list and click to go to the pane for the XML policy.
- In the second section, click Modify. The Modify XML Policy page opens, as shown below.
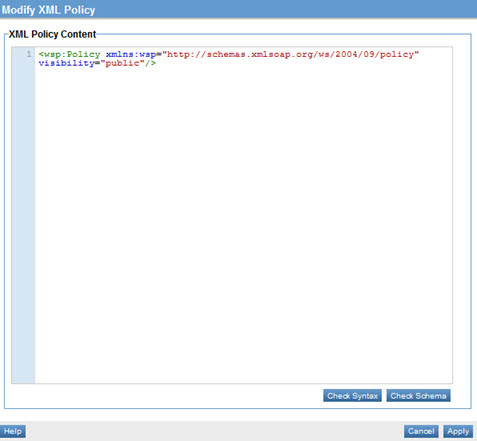
- In this pane you can:
- Write or paste XML.
- Check your syntax
- Check the schema.
- When done, click Apply to save and close the policy definition.
That completes the policy configuration. You can now assign the policy to a service.
Sample XML policy
An XML policy must include a policy assertion. In this example, an Authentication Policy is used to illustrate the Policy Element and Policy Assertion that represent the configuration of the policy. Policy Manager adds the Policy element (line 01, wsp:Policy). The Policy Assertion XML (lines 2-5) is added to the policy using the Modify XML Policy page.
01  <wsp:Policy Name="urn:uuid:1768f579-3775-11df-8848-bfb88465a32e" wsp:Id="Policy1" xmlns:wsp="http://schemas.xmlsoap.org/ws/2004/09/policy">
02    <Authentication SubjectCategory="urn:org:federatedgovernance:security:subject-category:consumer" xmlns="http://federatedgovernance.org/policy/authentication">
03      <Realm>Local Domain</Realm>
04    </Authentication>
05  </wsp:Policy>
Activating a policy
When you create and configure a policy, the policy is in Draft state. When the policy configuration is complete, activate the policy: click Activate Policy and then confirm. See Activate a Policy.
A policy in Draft state is not available for general use. Once you activate the policy, it is in Active state and is available for use.
Attaching a policy
To use the policy, go to the Policies folder in the respective organization and attach the policy to a web service, binding, or binding operation.


