App OAuth Profile
Specify OAuth settings that you want to support/use for your app.
Table of Contents
- How do I set up my app to use OAuth?
- What is the OAuth Profile and what choices should I make?
- How do I configure my app's OAuth profile settings?
- What are the settings available on the App OAuth Profile page?
- What is the redirect URI for Test Client?
- Registering the Test Client redirect URI with your OAuth Authentication Provider
- How do I configure OAuth credentials?
- How do I configure a Resource Owner OAuth Authorization page for my app?
- What are the OAuth 2.0 Client Types?
How do I set up my app to use OAuth?
If you want your app to support OAuth, you'll need to:
- Decide which service you want to use for user authentication (for example, Google, Facebook) and set up an account for yourself so you have credentials.
- Code your app to send, receive, and validate OAuth messages, including encryption and decryption if you want to use those.
- Specify the OAuth settings you prefer to use, as part of your app setup in the platform, via App Details > OAuth Profile.
What is the OAuth Profile and what choices should I make?
In the Community Manager developer portal, your app's OAuth Profile allows you to specify to determine how the app uses OAuth.
For example:
- What authentication method do you want to use for the API to authenticate your app?
- Do you want to use encryption?
- If your app is using encryption, which encryption algorithm is it using?
- Do you have requirements about grant expiration?
- Do you want to display a different logo on your app's OAuth grant Authorization page, where your users approve your access request, or do you want to use the default logo set up for your app in the platform?
How do I configure my app's OAuth profile settings?
Once you've set up the basic information about your app (see How do I add an app?), you can set up the values you want to use for your app's OAuth implementation.
Important: To allow access to external URLs, you can add them to the list of allowed hosts. For more information, see Prevent forward proxying.
To configure app OAuth profile settings
- Log in to the Community Manager developer portal.
- Go to the app's Details page for your app, and click OAuth Profile.
- Change the settings as needed. For explanations of your choices, refer to the following tables:
- Branding: see, Branding Settings.
- Access Token: see, Access Token Settings.
- Authentication: see, Authentication Settings.
- ID Token: see, ID Token Settings.
- Authorization Settings: Might be present, or not, depending on platform configuration. If you don't see the authorization settings, they are controlled by the Site Admin. For details about these settings, see How do I configure App OAuth Profile Authorization settings? (Site Admin help).
- When done, click Save.
What are the settings available on the App OAuth Profile page?
The App OAuth Profile page lets you configure values that your users will see on the OAuth Authorization page when authorizing your grant request. You can also configure your OAuth preferences and other values relating to OAuth support on this page. When you connect to an API, these preferences are used.
The tables below provide basic information about the settings available, the choices for each setting, and reasons why you might make specific choices. There are four groups of settings. The groups are:
Note: In some cases there might be an additional section, Authorization Settings. If you see these additional settings and need help, check with your Site Admin for information on what choices to make. For more information, see How do I configure App OAuth Profile Authorization settings? (Site Admin help).
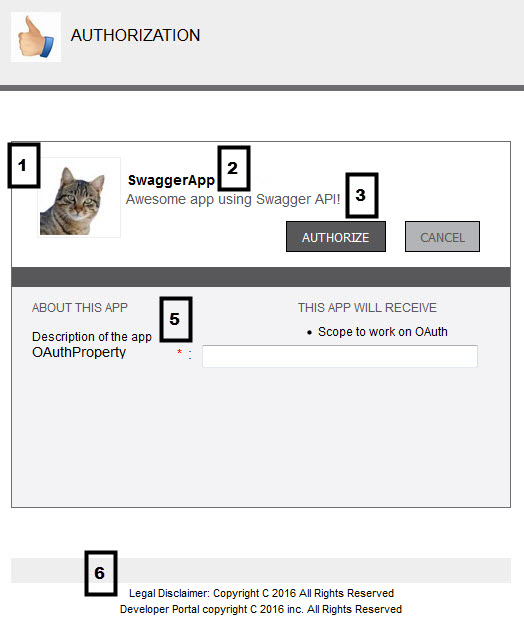
Branding Settings
| Setting | Explanation / possible values |
|---|---|
| Logo | Allows you to upload a logo for the resource. The logo should be 50px high. For more information, see How do I upload and crop icons |
| Title | The name of the app, to be displayed on the page where users approve the app's access to their resources. |
| Sub-Title | A subtitle or tag line for the app, to be displayed below the app title on the page where users approve the app's access to their resources. |
| Website URL | The URL for the app's website. |
| Description | Represents the description of the app that displays below the sub-title (for example, This is the app description). |
| Legal Disclaimer | Copyright/legal information for the app, to be displayed at the bottom of the page where users approve the app's access to their resources. For example: 2016 {Company Name} All rights reserved. |
Access Token Settings
| Setting | Explanation / possible values |
|---|---|
| Token Type |
The access token type the app will use for OAuth. Choose from valid options or leave as Provider Default, indicating no preference.
|
| Authentication Method
(if present) |
Choose from the list of authentication methods supported by the OAuth Provider, or choose Provider Default to use any of the authentication methods allowed by the provider. By default, the Akana OAuth Provider allows all authentication methods except that a confidential client is not allowed to use none. |
Authentication Settings
| Setting | Explanation / possible values |
|---|---|
| Application Type | Choose whether the app is confidential (capable of maintaining the confidentiality of the client credentials) or public (incapable of maintaining the confidentiality of the credentials). For more information, see What are the OAuth 2.0 Client Types? |
| Authentication Method |
One or more authentication mechanisms that the app will use to authenticate with the OAuth Provider. You must first provide the applicable values. Options might vary according to the OAuth setup on the Community Manager developer portal. Available options:
Notes re Private Key JWT:
|
| Replay Prevention | Applicable if the client authentication method is Private Key JWT. Check this box if the client uses signed JWTs for client authentication or transmission of request parameters, or both, and the JWT should be unique for each request. |
|
Private Key JWT Signing Algorithm (Version: 2020.2.8 and later) |
Applicable if the client authentication method is Private Key JWT: The signing algorithm that the client must use to sign the JWTs for client authentication. Available values:
|
| Require Signed Requests |
Determines whether the client must transmit request parameters in a single self-contained parameter named request. The value of the request parameter is a signed JWT. The claims in the JWT represent the request parameters of the authorization request. The OpenID Connect specification calls this JWT a request object. For more information see Section 6, Passing Request Parameters as JWTs. If authorization requests from this app should always be signed, check the box. If you choose this option, you must also provide the app's Client Registration JWKS URL. If this box is not checked, a value of false is assumed. |
|
Request Object Signing Algorithm (Version: 2020.2.8 and later) |
Applicable if Require Signed Requests is selected: The signing algorithm that the client must use to sign the request object that is sent as a JWT for transmission of request parameters. For more information, refer to the OpenID Connect specification: Section 6, Passing Request Parameters as JWTs. Available values:
If a value is not specified, the client can use any of the supported signing algorithms. |
| JWKS URL |
The JWKS URL for the app (PingFederate 9.x). See note under Authentication Method above. |
| Restricted Common Scopes |
If you want to restrict the client's use of scopes to only allow specified common scopes, choose one or more scopes that the app can use, from the following:
Note: You cannot restrict openid and profile scopes. All apps have access to these scopes. |
| Restricted Response Types |
If you want to restrict app/API interactions to only allow specified response types, choose one or more response types that are valid for the app:
Note: You cannot restrict code and id_token token. These response types are valid for all apps. |
| Redirect URI |
The Client Redirection URI, which the user is redirected to after authentication/authorization; the redirect_uri value that you register with the OAuth Provider. Specify all redirect URIs or URNs that are valid for the app. Valid values: either a fully-qualified URL, including protocol, or a valid Google iOS app mobile schema, per https://developers.google.com/identity/toolkit/ios/. Example: com.googleusercontent.apps.902730282010-ks3kd03ksoasioda93jldas93jjj22kr:/oauth2redirect. If the Community Manager developer portal is the OAuth Provider, the Test Client redirect URI is automatically trusted since it has the same base URL as the platform itself. In all other cases, including any external OAuth Provider or the case where the OAuth Provider is on a different tenant ("external Akana OAuth Provider"), you must register the redirect_uri with the provider. The OAuth Provider will only redirect the user to a redirect URI which is trusted. Register the following Test Client redirect_uri value with your external OAuth provider:
For more information, see Registering the Test Client redirect URI with your OAuth Authentication Provider. |
ID Token Settings
| Setting | Explanation / possible values |
|---|---|
| ID Token Signing Algorithm | The algorithm that will be used for signing OpenID Connect ID tokens. Choose from valid options or leave as Provider Default, indicating no preference. |
| ID Token Encryption Key Management Algorithm | The algorithm that will be used for key encryption for OpenID Connect ID tokens. Choose from valid options, specify dir to use direct JWE encryption, or leave as Provider Default, indicating no preference. |
| ID Token Content Encryption Algorithm | The algorithm that will be used for content encryption for OpenID Connect ID tokens. Choose from valid options or leave as Provider Default, indicating no preference. |
| Require Authentication Time Claim | Check the box if you want the provider to include the auth_time claim in OpenID Connect ID tokens indicating the time at which the user was authenticated. Some clients choose to require this so they can validate the age of the claim. |
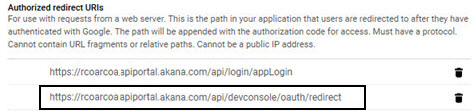
What is the redirect URI for Test Client?
The redirect URI that Test Client uses is:
- {base_url}/api/devconsole/oauth/redirect
Test Client acts in the client role for the purpose of testing apps with APIs in the Community Manager developer portal. In a real-world scenario, the client (end-user) is redirected back to the app; in the context of Test Client, the redirect is back to Test Client.
If you're testing an app and API with OAuth in Test Client, the Test Client redirect URI will need to be registered with the OAuth Provider. If it isn't, the client redirect part of the OAuth exchange, where the client is redirected back to the app after authenticating with the identity provider and authorizing the scopes, will fail and the message response will not be successful.
Registering the Test Client redirect URI with the OAuth Authentication Provider
If you want to test in Test Client using your app and an API that supports OAuth, you'll need to make sure that the Test Client redirect_uri value is trusted, so that the OAuth Provider will successfully redirect the user back after authentication.
There are several scenarios, as shown in the table below.
| OAuth Provider | Details |
|---|---|
| External OAuth Provider such as Okta, Google, or PingFederate |
You must register the app redirect_uri and the Test Client redirect_uri with the external OAuth Provider so they will be trusted. |
| Akana OAuth Provider in the current instance of the Community Manager developer portal |
Any URI that uses the same base (hostname) as the Community Manager developer portal is trusted. |
| Akana OAuth Provider in another instance of the Community Manager developer portal (External Akana OAuth Provider) | Although the OAuth Provider is Akana, the OAuth Provider is on a different tenant, so the base URL is different. Therefore, you must register the app redirect_uri and the Test Client redirect_uri with the external OAuth Provider so they will be trusted, in the same way as you would do for a non-Akana external OAuth Provider. |
The OAuth Provider must always be able to recognize and trust:
- The app credentials (AppID and Shared Secret, as set up on the Edit App Version page (App Details > Edit, App ID and Shared Secret fields). You can register the credentials with the OAuth Provider, or you can register an app with the OAuth Provider, generate credentials, and update your Edit App Version page with those credentials.
- The app's redirect_uri value. Set it up in the same way as the above so that it is trusted by the OAuth Provider.
- In the context of Test Client, the Test Client redirect URI, so that Test Client is treated as a trusted party and the message exchange can complete successfully. Again, register this with the OAuth Provider, as an alternate redirect_uri value.
As an example, if authentication is with Google, you'll register the app at the Google Developers Console: https://console.developers.google.com/. Create an account, add the app, and add the URL in the Authorized Redirect URIs field, as shown below.
How do I configure OAuth credentials?
If the API your app is connected to uses OAuth 1.0a (with the Authentication Code and Resource Owner Password Credentials grant types), or OAuth 2.0 (with Authentication Code and Implicit grant types), you will need to:
- Configure a Shared Secret or Public Keys. See, How do I regenerate a shared secret?, How do I import a certificate signing request?, or How do I import an X.509 certificate?
- Configure a Resource URL and other values in the app's OAuth Profile page. See, How do I configure my app's OAuth profile settings?
- Configure the Resource Owner OAuth Authorization page which allows app developers to provide different details for branding to app users and customers. See, How do I configure a Resource Owner OAuth Authorization page for my app?
How do I configure a Resource Owner OAuth Authorization page for my app?
If the API your app is connected to uses an OAuth "Authentication Code" grant and you've configured a Redirect URL and Application Type using the instructions given in How do I configure OAuth credentials? the next step is to configure a Resource Owner OAuth Authorization page. This page allows app developers to provide different details for branding to app users.
To configure a Resource Owner OAuth Authorization page for your app
- Go to the app's Details page.
- Click OAuth Profile.
- On the OAuth Profile page, in the Branding section, specify information that will determine how your app is represented on the OAuth authorization page. For explanations of the fields available, refer to Branding Settings.
- Click Save.
The image below gives an idea of how your branding page will look to your user at runtime.
|
|
What are the OAuth 2.0 Client Types?
- Confidential Client—This client type is an application that is capable of keeping a client password confidential to the world. This client password is assigned to the client app by the Authorization Server. This password is used to identify the client to the Authorization Server, to avoid fraud. An example of a confidential client could be a web app, where no one but the administrator can get access to the server, and see the client password.
- Public Client—This client type is an application that is not capable of keeping a client password confidential. For instance, a mobile phone application or a desktop application that has the client password embedded inside it. Such an application could get cracked, and this could reveal the password. The same is true for a JavaScript application running in the user's browser. The user could use a JavaScript debugger to look into the application, and see the client password.


