Use Case: Open Banking
An end-to-end example of successfully implementing the UK Open Banking standards via the Akana API Platform, using the JOSE Security Policy v2.
FAPI, the financial-grade API security standard, covers critical aspects of API authentication and authorization. The UK Open Banking standard extends it in part; for example, by requiring payload protection using JOSE security for its Payment Initiation API.
This use case focuses on the use of the Akana JOSE Security Policy v2 to send a message that is protected in accordance with the UK Open Banking specification, for an API secured with OAuth 2.0 over mutual TLS, and demonstrates how this approach ensures message integrity and non-repudiation.
The example described here could also be applied to alternative standards, such as the ones being created by the Berlin Group for PSD2 and CDS for Australian Open Banking.
In this use case, payload content is signed but not encrypted. The policy also supports encryption of JSON Web Tokens, but this is not mandated under the standard, and is not covered in this use case.
For information about using policies in the context of the Community Manager developer portal, see Business Policies.
Table of Contents
- Use case overview
- Step 1: Set up the OAuth Provider domain
- Step 2: Create the policies
- Step 3: Create and configure the API
- Step 4: Create the app
- Step 5: Create a contract between the app and the API
- Step 6: Create the keystore/certificate
- Note: Uploading the p12 file to Test Client
- Step 6-1: Keystore Explorer: Generate a new key pair
- Step 6-2: Keystore Explorer: Generate a certificate signing request (csr file)
- Step 6-3: Community Manager developer portal: Import certificate signing request to app (csr file)
- Step 6-4: Community Manager developer portal: Export signed certificate (certificate.cer file)
- Step 6-5: Keystore Explorer: Import certificate (cer file)
- Step 6-6: Keystore Explorer: Save the keystore as a p12 file
- Running the use case
- Additional information/resources
- Extra steps for on-prem setup
Use case overview
The UK Open Banking security profile is based on a layered architecture. Security is implemented:
- At the transport layer.
- At the client authorization layer.
- At the message level, with the JOSE Security Policy v2 which ensures the integrity of the message.
This example shows all three layers:
- Mutual TLS via certificate-based client authentication applied to the transport layer (explicitly enforced by the HTTP Security Policy).
- Client authorization using OAuth 2.0 (which some API resources will require to be extended with OpenID Connect for explicit resource owner authentication and consent). Enforced by the OAuth Policy.
- Message security, with the security requirements specific to the UK Open Banking standard in place (enforced by the JOSE Security Policy v2).
Note: This example uses the UK Open Banking specification version 3.1, as set up in the JOSE Security Policy v2 configuration.
In this use case we will set up:
- Domain: An OAuth Provider domain
- API: An API that is created by importing a Swagger/OAS document that describes the UK Open Banking interface, as published by the UK Open Banking Implementation Entity.
Note that this is an example for illustration purposes; of course, the API does not actually connect with a bank. This is a sandbox API scenario. If the API is called successfully and all the security rules are satisfied, a static response is returned.
- App: An app that accesses the API, has an active contract with the API, has a certificate in place, and presents the certificate when calling the API in Test Client. You'll be able to send a message and receive a successful response, and you can see the JOSE headers in action and see how the integrity of the message is preserved.
In this example the content is signed, but not encrypted.
This use case includes all artifacts and instructions you'll need to set up the use case yourself, in the Additional information/resources section.
Prerequisites
To run this use case you'll need the following:
- A working installation of the Akana API Platform, either on-prem or a SaaS account. The API Gateway must be configured to have an HTTPS listener that accepts (or requires) client certificates:
- SaaS: If you are using the SaaS platform, the HTTPS listener is already configured for you, but you must be sure to use the mTLS endpoint (hostname includes mtl). In this use case, this is set up in Step 3-2: Modify the API implementation so that only mutual HTTPS is valid.
- On-Prem: If you have an on-prem installation, set up an inbound HTTPS listener for any Network Director container that needs it. For more information, see On-prem setup: Setting up the HTTPS listener.
- A keystore, in .p12 format, or a way of generating it. The keystore contains the cryptographic private key and corresponding certificate chain. The platform supports both .p12 and .jks format. This use case includes instructions for using Keystore Explorer to generate a keystore in .p12 format. See Create the keystore/certificate.
These are required for setting up the mutual TLS connection and also for signing the message (JWT) as required by the JOSE Security policy.
Setting up the use case: summary
To set up this use case in the Akana API platform you'll need to:
- Step 1: Set up the OAuth Provider domain (Business Admin/Site Admin)
- Step 2: Create the policies (Business Admin)
- Step 3: Create and configure the API
- Step 4: Create the app
- Step 5: Create a contract between the app and the API
- Step 6: Create the keystore/certificate
Once all the above is set up, you're ready to test the API in Test Client: see Running the use case.
Step 1: Set up the OAuth Provider domain
In this section:
- Step 1-1: Create the OAuth Provider domain (Business Admin task)
- Step 1-2: Add the authorization server URL as a trusted hostname (Site Admin task)
Step 1-1: Create the OAuth Provider domain
You'll need to have Business Admin permissions to set up the OAuth provider domain (or ask a Business Admin to do it for you).
- Go to More > Admin > Domains and click Add Domain.
- Choose Akana OAuth/OIDC Provider.
- In the Add OAuth/OIDC Provider wizard, set values as follows:
- Tab 1: Name, optional description. In this example: OAuth_OIDC_UK_OB_UC.
- Tab 2, Grant Types: Choose Client Credentials.
Note: For simplicity, this example uses the Client Credentials grant type. The scenario could easily be extended to support additional grant types, such as Authorization Code, which would require a Resource Owner Authentication Domain.
- Tab 3, Token: Choose Referenced Bearer.
- Tab 4: no setup needed.
- Tab 5, Scopes: Create one scope, payments. This is required to comply with the UK Open Banking specification. In this use case:
Name: payments
Short Description: payments scope for UK_OB_UC
Full Description: payments scope for UK Open Banking use case
Default Scope: leave it as checked.
Note: By default, the Default Scope box is checked, meaning that the new scope is granted automatically to any client that passes validation for accessing any API that uses this OAuth Provider domain. In a production scenario it might not be a good idea to allow a scope to be granted by default. However, for the purposes of this use case it's convenient, and means that you don't need to specify the scope in the request when testing in Test Client.
- Tab 6: no setup needed.
- Tab 7, Branding: Enter the Authorization Server URL for your own Community Manager developer portal. In this example: https://oauth-uk-ob-uc.acmepaymentscorp.apiportal.akana.com.
Note: If you're not sure what value to use for the authorization Server URL, see Defining the authorization server URL below.
- Click Save.
Defining the authorization server URL
The authorization server URL must be unique. Unless you have a unique URL, you can create a valid authorization server URL for your new OAuth Provider domain as follows:
- Prefix your tenant hostname with some unique characters.
- Keep the protocol the same.
- End with the domain designation (for example, .com).
For example:
- Community Manager developer portal URL: https://acmepaymentscorp.akana.com/#/home/landing
- Authorization server URL: https://oauth-uk-ob-uc.acmepaymentscorp.akana.com
The prefix value can be anything that meets normal URL guidelines, as long as it is unique over all your domains.
Step 1-2: Add the authorization server URL as a trusted hostname
You must make sure that the Authorization Server URL you set up in the OAuth Provider domain in the previous step (Tab 7, Branding) is trusted:
- All users: Add the authorization server URL in the Community Manager developer portal site settings. You'll need to have Site Admin permissions for this step. See below.
- On-prem only: Add the authorization server URL to your etc/hosts file. See On-prem setup: Updating the etc/hosts file.
To add the authorization server URL in the site settings as a trusted hostname
- Log in to the Community Manager developer portal as a Site Admin.
- Go to More > Admin > Site.
- In the Themes section, find the theme you're using. To the right, click the arrow and choose Edit Theme.
- In the Edit Theme dialog box, in the Virtual Hosts / Vanity Hostnames field, add the authorization server URL. In this example, oauth-uk-ob-uc.rcoaless.apiportal.akana.com. Use a comma separator between multiple hostnames, as shown below.
Important: Be sure to leave your existing hostname untouched. Add the authorization server URL as an additional hostname.

- Click Finish.
- In the Site Settings page, click Save.
Step 2: Create the policies
In this section:
Policy overview
In this use case you'll set up and apply the four policies listed below. For more information about the individual policies and what each is doing, see Policy details.
Note:
- The Detailed Auditing policy is optional for logging, and is not required for UK Open Banking.
- The OAuth Policy and Detailed Auditing policy do not require configuration.
These two policies require setup and configuration by the Business Admin:
Setting up the policies
You'll need to have Business Admin permissions to create and configure the policies for this use case (or ask a Business Admin to do it for you).
To create the policies
- Log in to the Community Manager developer portal as a Business Admin.
- Go to More > Organizations > All Organizations and choose your organization.
- From the left menu, choose Policies.
- Create the HTTP Security policy:
- Click Add.
- Specify policy name. In this example: HTTP Security Policy_UK_OB_UC.
- For Policy Category, choose Operational Policy.
- For Policy Sub-Type, choose HTTP Security Policy.
- Click Save.
- Configure the HTTP Security policy:
- In the Policy Summary section, click Edit.
- For Authentication Options, choose Client Certificate.
- Click Finish and then click Close.
- Activate the HTTP Security policy: from the drop-down arrow at the top right, choose Activate Policy, enter a comment, and confirm.
- Click Go back to policies.
- Create the JOSE Security Policy v2:
- Click Add.
- Specify policy name. In this example: JOSE Policy v2_UK_OB_UC.
- For Policy Category, choose Operational Policy.
- For Policy Sub-Type, choose JOSE Security Policy v2 (Unencoded Payload Support).
- Click Save.
- Configure the JOSE Security Policy v2 policy options:
- In the Policy Summary section, click Edit.
- In the Options page, for Protection Scope, choose IN (this means in from the client to the Gateway)
- For Serialization, leave it as Compact (the default).
- For Role, leave it as Provider (the default).
- Unencoded Detached Payload: Check the box.
- Header Parameter Name: x-jws-signature
- Enforce Appendix F: check the box.
- UK Open Banking: Check the box, and set the version to Version 3.1.
- Click Next.
- Specify the following JOSE Security Policy v2 IN message options (leave other options unchanged):
- Signed Content: check the box.
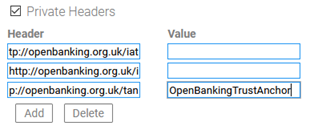
- Private Headers: check the box and specify three UK Open Banking headers: http://openbanking.org.uk/iat ("issued at" header), http://openbanking.org.uk/iss ("issuer" header), and http://openbanking.org.uk/tan, the tan header required by the UK Open Banking specification version 3.1. For the tan header, provide a value of OpenBankingTrustAnchor. The private headers are shown in the example below.
- Click Finish and then click Close.
- Activate the JOSE Security Policy v2: from the drop-down arrow at the top right, choose Activate Policy, enter a comment, and confirm.
Step 3: Create and configure the API
In this section:
- Step 3-1: Create the API
- Step 3-2: Modify the API implementation so that only mutual HTTPS is valid
- Step 3-3: Turn off anonymous access
- Step 3-4: Turn on debug mode
- Step 3-5: Attach the policies to the API
- Step 3-6: Create a mock response
- Step 3-7: Set up the API OAuth Details
Step 3-1: Create the API
This example uses a version of the Swagger for the Open Banking Payment Initiation API, one of the APIs published by the UK Open Banking Implementation Entity. For the Swagger JSON file, see Input Swagger file for the API.
In Add API:
- Choose APIs > Add API.
- Upload the Swagger file. In this use case we are using the Open Banking Payment Initiation API. For the Swagger file, see Input Swagger file for the API.
- Click the Advanced Options slider bar to see additional settings.
- Choose Implementation Pattern of Orchestration.
Note: This use case uses Orchestration so that we can set up a mock response, in the Process Editor.
- In the Implementation field, click the drop-down list and choose Sandbox, then choose the Deployment Zone. An example is shown below.
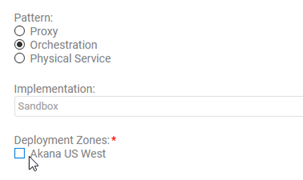
- Click Save.
- Optional: in this use case, for clarity, edit the API description to modify the title:
- Old title: Payment_Initiation_API
- New title: Payment_Initiation_API_UK_OB_UC
Step 3-2: Modify the API implementation so that only mutual HTTPS is valid
When you create the API, by default it is connected to all valid endpoints. Follow the steps below to delete any protocols other than Mutual HTTPS.
To modify the Sandbox implementation
- Go to API > Implementations and choose the Sandbox implementation (it should be the only one).
- In the Deployments section, click Edit.
- Delete all protocols except mutual-https. In this example, there are two protocols to delete, default-http0 and default-https, as shown below.
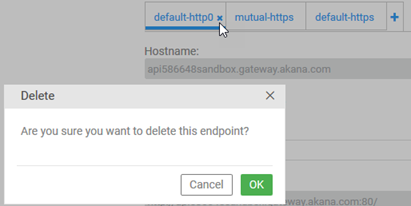
- Click Save.
Step 3-3: Turn off anonymous access
By default, a Sandbox implementation allows anonymous access. Make sure this setting is turned off.
To disable anonymous access
- Go to API > Implementations and choose the Sandbox implementation.
- In the top section, click Edit.
- Clear the Allow Anonymous Access checkbox.
- Click Save.
Step 3-4: Turn on debug mode
Debug mode is not necessary, and is not recommended in a production environment. However, turning on debug mode for this use case will enable you to see additional details of the transactions, when reunning the use case: see Debug mode below.
For instructions for turning on debug mode in your implementation, see How do I turn on debug mode for my implementation? (Community Manager developer portal help documentation).
Step 3-5: Attach the policies to the API
- Go to API > Implementations and choose the Sandbox implementation.
- In the Policies section, click Edit.
- Add the following policies to the API:
- Detailed Auditing (for tracking message requests and responses for information and debug purposes)
- OAuth Security Policy (so that you can use OAuth)
- HTTP Security Policy (to enforce Mutual TLS)
- JOSE Security Policy v2 (to enforce UK Open Banking requirements)
- Click Save to save the policy selections.
Step 3-6: Create a mock response
The next step is to modify the first resource in this API, CreateAccountAccessConsent, which allows the third-party provider (TPP) to request access consent in order to provide a service to the consumer. In the Process Editor for the CreateAccountAccessConsent operation, create a mock response.
To create the mock response
- Go to API > Implementations and choose the Sandbox implementation.
- Scroll down to the bottom section, Resources.
- In the top row, for the /domestic-payment-consents operation, click the drop-down arrow to the right and choose Edit Process, as shown below.

- In the Process Editor, add a Content Activity (on the left, third or fourth icon from the top). Connect it in between the Receive and Reply nodes.
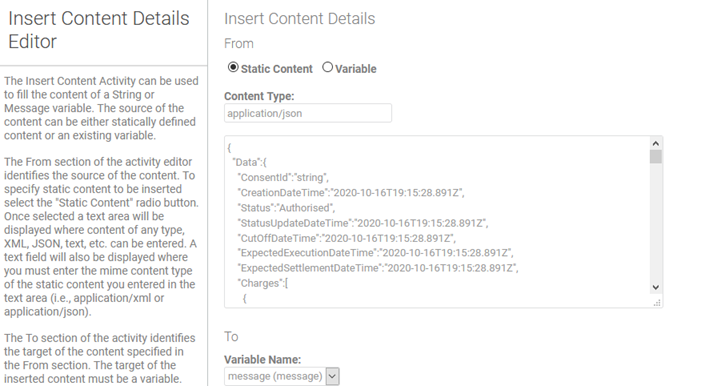
- Double-click to edit the Content Activity. Set up values as shown below: From Static Content, Content Type application/json. In the box, paste the static text for the response: see Response content for the Content Activity in the Process Editor.
Note: For additional information on working with the Process Editor, see Managing Processes.
- Click Finish to save the Content Activity.
- In the Process Editor, click the Save icon (on the left, fifth icon from the bottom) to save the process changes.
- Click Finish to exit the Process Editor.
Step 3-7: Set up the API OAuth Details
You'll need to set up the OAuth Details so that the API can use the domain that you set up, as an OAuth Provider domain.
To set up the API OAuth details
- Go to API > Details. From the drop-down on the right, choose OAuth Details.
- In Tab 1, Provider, set up the following:
- OAuth Provider: choose the OAuth Provider domain you set up earlier. For this use case, the OAuth Provider domain was OAuth_OIDC_UK_OB_UC.
- Click Add Provider.
- Make sure OAuth 2.0 is selected and no other OAuth version.
- In the Apply OAuth Settings to the Following Endpoint(s) field, make sure only the Sandbox implementation is selected. In this use case, it is the only one.
- In Tab 2, Scope Mapping, choose API-Wide Scope Mapping and then choose the payments scope: click Edit, check the box for the payments scope, and then click Finish.
- In the API OAuth Settings wizard, click Finish to save and close.
Step 4: Create the app
Create an app.
- Navigation: Apps > Add App.
- Provide required values:
- App Name: In this use case, PaymentsApp_UK_OB_UC
- Version ID: In this use case, v1
- Click Finish.
Step 5: Create a contract between the app and the API
To request a contract
- Go to the Overview page for the API you created. In this example: Payment_Initiation_API_UK_OB_UC.
- At the top right, click Access.
- In the API Access Wizard, choose:
- Tab 1, Select App: Choose the app that you created. In this example, PaymentsApp_UK_OB_UC.
- Tab 2, Endpoint: Choose Sandbox.
Note: Depending on platform configuration, you might see additional tabs in the API Access Wizard. If so, you can skip them. No additional changes are needed. For details, see The API Access Wizard (Community Manager developer portal help).
- Click Save.
Note: Because this is a Sandbox implementation, activation is immediate. By default, API Admin approval is not required for a contract in the Sandbox implementation.
Step 6: Create the keystore/certificate
This example uses Keystore Explorer to generate the keystore needed to authenticate the app when accessing the API in Test Client. Whatever tool you use to manage your keystore, the steps are the same:
- Step 6-1: Keystore Explorer: Generate a new key pair
- Step 6-2: Keystore Explorer: Generate a certificate signing request (csr file)
- Step 6-3: Community Manager developer portal: Import certificate signing request to app (csr file)
- Step 6-4: Community Manager developer portal: Export signed certificate (certificate.cer file)
- Step 6-5: Keystore Explorer: Import certificate (cer file)
- Step 6-6: Keystore Explorer: Save the keystore as a p12 file
Note: Uploading the p12 file to Test Client
In this scenario, for testing purposes, Test Client is emulating the API. Test Client needs the private key, included in the p12 file (Step 6), for two reasons:
- To take care of the client part of the TLS handshake (mTLS = client authentication at the transport layer). Test Client takes care of this configuration to ensure that a client-authenticated TLS session is setup with the API Gateway.
- To sign the JWT, as required by the JOSE Security Policy v2.
Of course, in a production scenario you would not upload the private key. Make sure that you are using a temporary keystore that you will not use in your production implementation.
Note: Test Client supports upload of only one keystore; therefore, in this scenario, the same keystore is used for both mTLS and JOSE Policy v2 signing requirements. In a production scenario, you would probably use two separate keystores/certificates for these two functions. For testing purposes, Test Client demonstrates that the keystore/certificate process works as expected.
Certificate Process: Overview
When you create the keystore, you create a private and public key pair. To turn that into something that you can use, you need a certificate. It’s the certificate that you exchange with others. The private key, you store in a secure location such as a vault, to keep it safe.
The CSR (Certificate Signing request) is essentially a copy of your public key, signed with your private key, which you submit to a Certificate Authority.
The Certificate Authority verifies your identity and generates a certificate, signed by the Certificate Authority and with its seal on the certificate. From then on, the certificate binds that public key to the private key, which is kept secret.
When the CA verifies a CSR and then puts its seal on a certificate, the CA is vouching that the public key is valid and will only work in conjunction with the private key of the party that has handed over the CSR.
As the final step, to have your public key as a vouched-for public key in your keystore, you import the CER reply back to the keystore. At that point, the keystore has three things:
- The public key
- The private key
- The seal of the vouching Certificate Authority (trust anchor), confirming that the public key is valid
At this point, for the purpose of this use case, you can generate the .p12 file, which Test Client uses to:
- Govern the establishment of the client-authenticated mutual TLS (mTLS) connection.
- Create the JWS signature required by the JOSE Security Policy v2.
Note: The .p12 file contains the private key, which you would not normally share. For testing purposes, it's necessary to share the private key with Test Client. Although Test Client does not store this information, it's important to have a separate public/private key pair that you use only for testing, and a different key store that you use for production.
Step 6-1: Keystore Explorer: Generate a new key pair
The first step is to generate a public/private key pair.
- In Keystore Explorer, click the Create a new KeyStore icon.
- In the New KeyStore Type dialog box, choose PKCS12 and click OK.
A new, unnamed keystore is created.
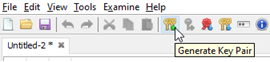
- Click the Generate Key Pair icon to create a new key pair:
- In the Generate Key Pair dialog box, choose RSA and click OK.
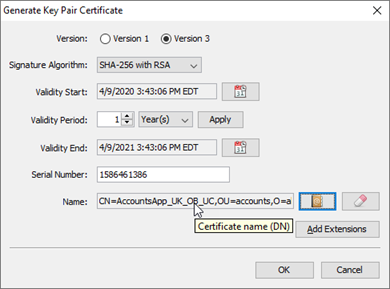
- At the Generate Key Pair Certificate dialog box, in the Name field, click the book icon.
- In the Name dialog box, specify values for each field. These values are used later. In this example:
- CN: PaymentsApp_UK_OB_UC
Note: It's a good idea to use the app name as the Common Name (CN), for simplicity.
- OU: payments
- O: akana
- L: EUS
- ST: FL
- C: US
Note: Make sure there are no leading or trailing spaces in the values.
- CN: PaymentsApp_UK_OB_UC
- Click OK.
- At the Generate Key Pair Certificate dialog box, copy the value from the Name field and save it out (for example, to a text file:
- Click OK.
- At the New Pair Key Entry Alias dialog box, enter an alias. It's a good idea to use the app name. By default, Keystore Explorer uses the CN from the Name field, so if you used the app name for the Common Name, you can just accept the default.
- At the New Pair Key Entry Password dialog box, specify the password and then confirm it. Make sure you remember the password.
- Click OK.
The key pair is generated, and you'll see a confirmation message.
Step 6-2: Keystore Explorer: Generate a certificate signing request (csr file)
The next step is to generate a Certificate Signing Request in the form of a csr file, which you will then import into the Community Manager developer portal.
- In Keystore Explorer, right-click the key pair file and choose Generate CSR.
- In the CSR File field, browse to the location where you want to store the CSR, and then click OK. You'll see a confirmation message: CSR Generation Successful.
Step 6-3: Community Manager developer portal: Import certificate signing request to app (csr file)
The next step is to import the certificate signing request (csr file) to the Community Manager developer portal.
- In the Community Manager developer portal, go to the app's Details page.
- In the Security section, click Show Keys, and then click Import Credentials.
- Browse to the location of the CSR file and choose it.
- Enter a comment and then click Save.
Step 6-4: Community Manager developer portal: Export signed certificate (certificate.cer file)
Now, download the certificate (.cer file) that the platform provides based on the CSR that you uploaded.
- In the Community Manager developer portal, in the app's Details page, Security section, click Show Keys, and then click Export Credentials, as shown below.
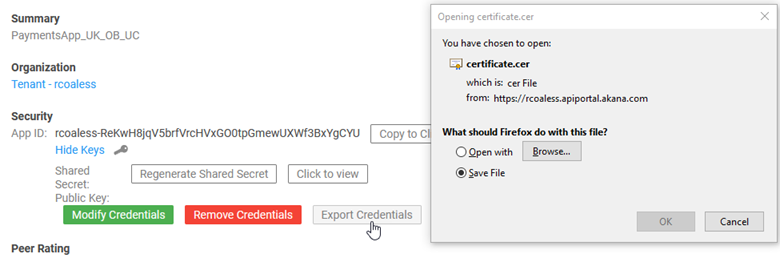
- Browse to the location where you want to save the file, and save it.
Note: It's a good idea to use the same location for all files, and to change from the default file name, certificate.cer, so that the name matches the .csr file. In this example: paymentsapp_uk_ob_uc.cer.
Step 6-5: Keystore Explorer: Import certificate (cer file)
The next step is to import the certificate (cer file) that the platform generated, to Keystore Explorer, so that the keystore will include the certificate information along with the public and private key pair.
- In Keystore Explorer, right-click and choose Import CA Reply, then choose From File, as shown below.
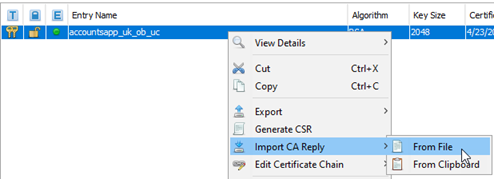
- Browse to the location of the certificate (cer file) that you exported from the Community Manager developer portal and import it. You'll see a confirmation message, CA Reply Import Successful.
Note: If there is any problem with the certificate, Keystore Explorer returns an error message. Validation is done before import.
Step 6-6: Keystore Explorer: Save the keystore as a p12 file
The final step is to save the keystore as a .p12 file, which you can then import to Test Client for authenticating the app. The .p12 file includes the private key and the digital certificate.
To create the p12 file
- In Keystore Explorer, click File > Save As.
- In the Set KeyStore Password dialog, specify the password, confirm it, and then click OK. Make sure you can remember the password.
- Navigate to the location where you want to save the file. In the Save as type field, specify file type of p12, and then, in the File name field, make sure the extension is p12. Click Save. In this example: paymentsapp_uk_ob_uc.p12.
Running the use case
At this point, everything is set up. It's time to test the API in Test Client to see how the UK Open Banking rules are enforced.
In this section:
- Testing in Test Client
- Reviewing the Trace tab
- Reviewing the Headers tab
- Decoding the JWT token
- Reviewing the metrics
Testing in Test Client
In the context of your API, you can test the API with the contracted app, uploading the credentials, and see how Test Client applies the policy settings to enforce the UK Open Banking specification.
To run the use case
- Go to the API > Test Client.
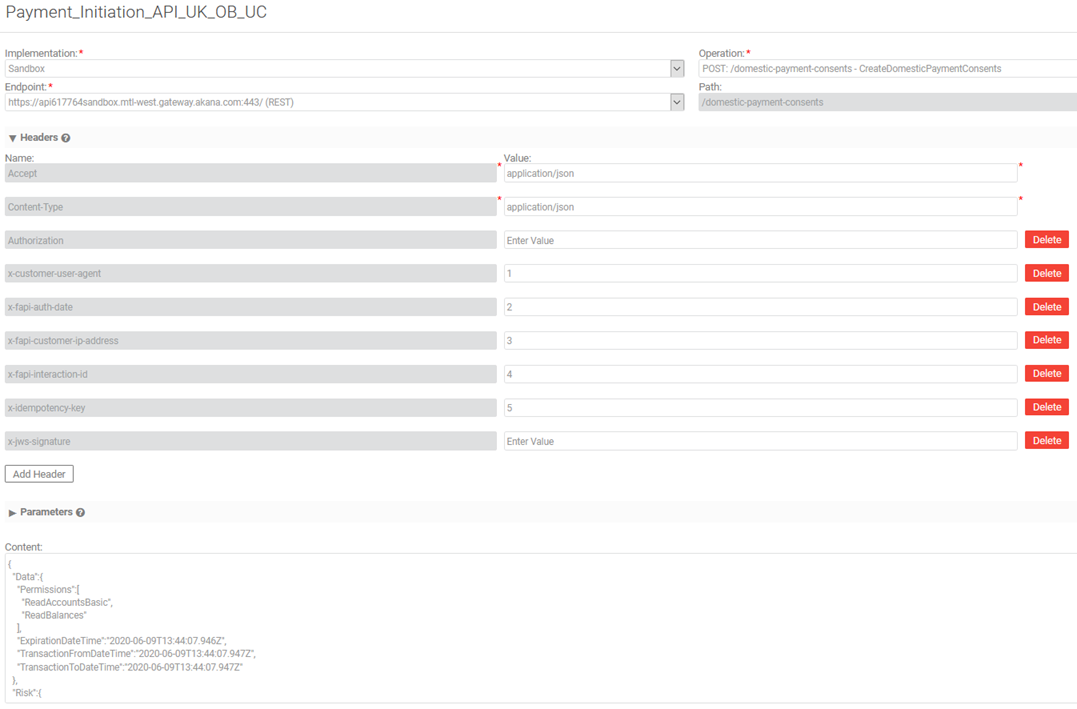
- In the Operation drop-down list, make sure the operation you used in Step 3-6: Create a mock response is selected. It's the first operation so should be the default.
- Provide a value for some of the custom headers that are part of this operation, as indicated below. Test Client does not validate these headers; you can use any string value. Where indicated, leave the headers blank.
- Authorization: Leave blank.
- x-customer-user-agent: Provide any value.
- x-fapi-auth-date: Provide any value.
- x-fapi-customer-ip-address: Provide any value.
- x-fapi-interaction-id: Provide any value.
- x-idempotency-key: Provide any value.
- x-jws-signature: Leave blank.
- In the Content field, paste the content included in Request content for the Test Client message below.
Note: It really doesn't matter what the request content is, as long as you use valid JSON. You could just include one set of curly braces: {}. The validation is the important thing. However, the example provided with this use case is the standard request format for this operation, per the API definition.
- Click the Setup button. In the Setup dialog box:
- Make sure the correct app is displayed.
- Check the Upload Keystore box.
- For Keystore Type, choose PKCS12.
Note: In this scenario, you are uploading the p12 file, which includes the private key. Make sure that you are using a temporary keystore that you will not use in your production implementation. For more information, see Note: Uploading the p12 file to Test Client.
- In File to Upload, browse to the location of the .p12 file, and upload it. In this example: paymentsapp_uk_ob_uc.p12.
- Enter the password, and click Save.
- Click the Security button.
- In the page for the OAuth policy, choose Client Credentials and click Get Token to generate the OAuth access token. Click Next.
Note: The sequence of the pages for the policies might not match the sequence given in the next few steps. Follow the steps for each policy page as it appears.
- In the HTTP Security Policy page, click Next.
- In the JOSE Security Policy v2 page:
- In the Signature/MAC Algorithm field, choose RS256. The UK Open Banking standard requires an RS value. HS256 is the default value, so you must change it.
Note: It's easy to miss this step. If you don't choose the RS256 algorithm, the message will fail. The UK Open Banking specification requires an RS* algorithm.
The JSON web token, which Test Client will create to satisfy the JOSE Security Policy v2, will be signed using the keystore that you just uploaded. The same keystore is used for the TLS connection (HTTP Security Policy) and to sign the JSON web token (JWT) for the JOSE Security Policy v2.
- In the Private Headers section, add the http://openbanking.org.uk/iat ("issued at" header) in the Name field, and provide any value. At runtime, Test Client updates with the correct value (date/time in Epoch format).
- In the Private Headers section, add the http://openbanking.org.uk/iss ("issuer" header) in the Name field, and then, in the Value field, provide the Subject DN. This value must match the subject DN from the certificate that corresponds with the keystore that you just uploaded. In this use case:
CN=PaymentsApp_UK_OB_UC,OU=payments,O=Akana,L=EUS,ST=FL,C=US
- In the Private Headers section, add the http://openbanking.org.uk/tan ("trust anchor" header), with a value of OpenBankingTrustAnchor as defined in the policy configuration.
- Click Next.
- In the Signature/MAC Algorithm field, choose RS256. The UK Open Banking standard requires an RS value. HS256 is the default value, so you must change it.
- In the SameOriginPolicy page, click Finish.
- In Test Client, click Invoke.
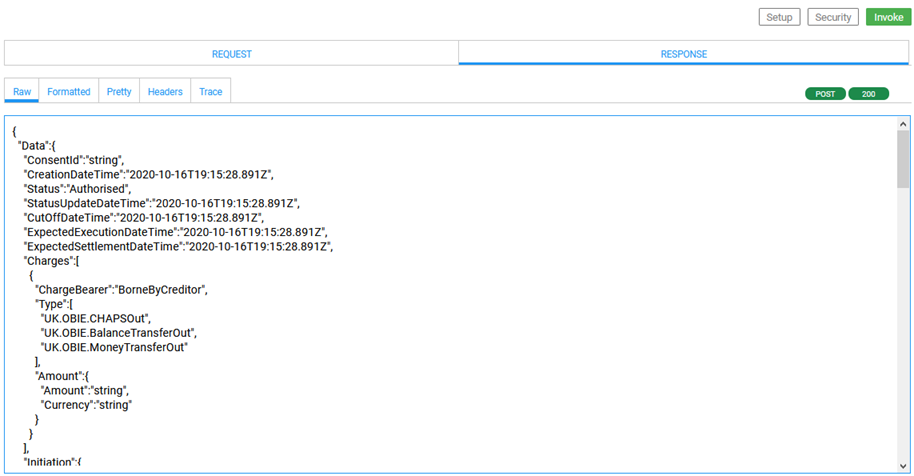
- Review the successful response, as shown in the Results section below. See also:
Results
The illustration below shows the request in Test Client.
The illustration below shows the successful response.
Reviewing the Trace tab
In Test Client, review the Trace tab. The results should look something like the below.
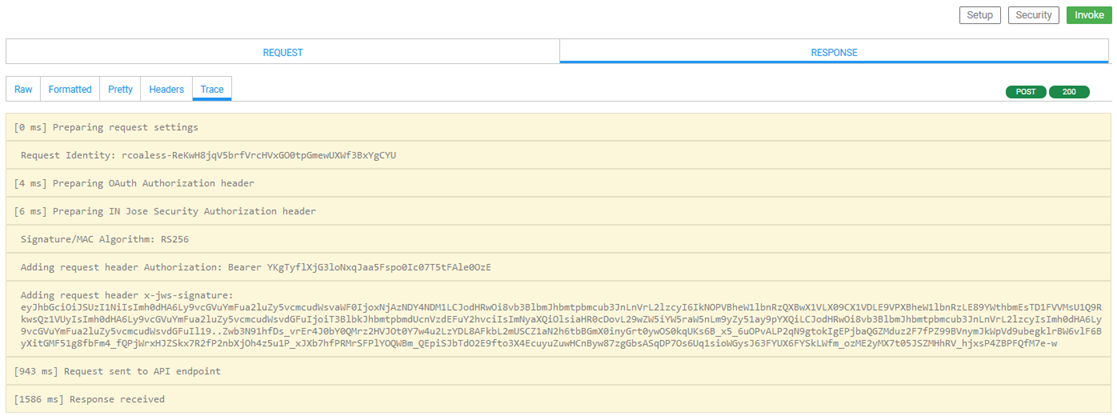
You can see that:
- The JOSE Authorization header has been prepared.
- The JWT has been generated and added to the x-jws-signature request header.
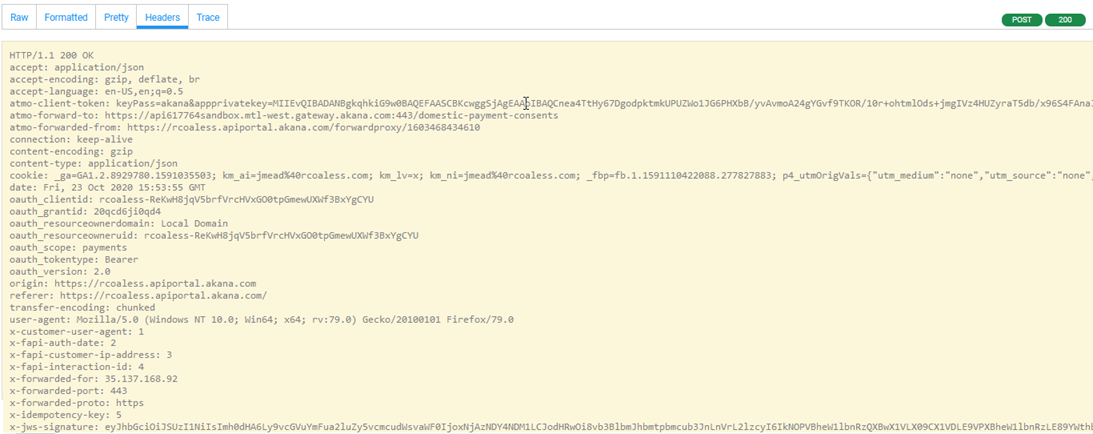
Reviewing the Headers tab
In Test Client, review the Headers tab. You can see the custom headers and the x-jws-signature header, as shown in the example below.
Decoding the JWT token
You can copy the token in the x-jws-signature header and decode it in the JWT debugger at https://jwt.io/. An example is shown below.
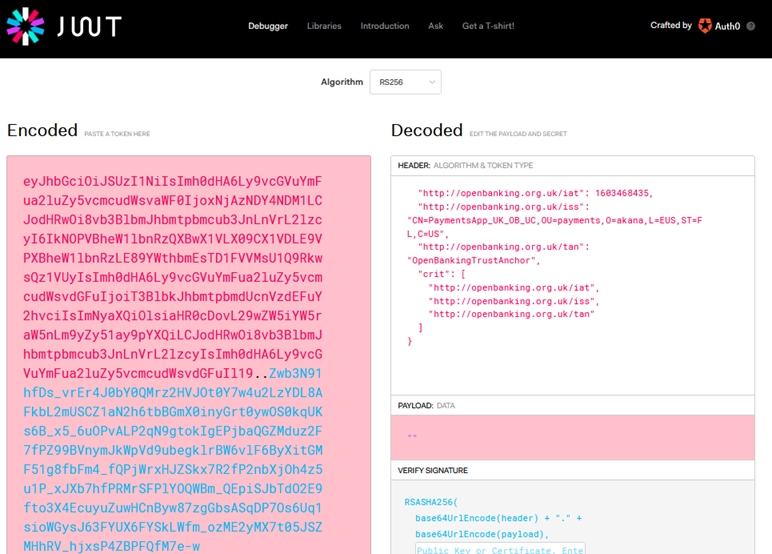
Note: Since this example uses the Detached Payload option, the payload is not included in the JWT token, so the Payload section of the token is empty.
Reviewing the metrics
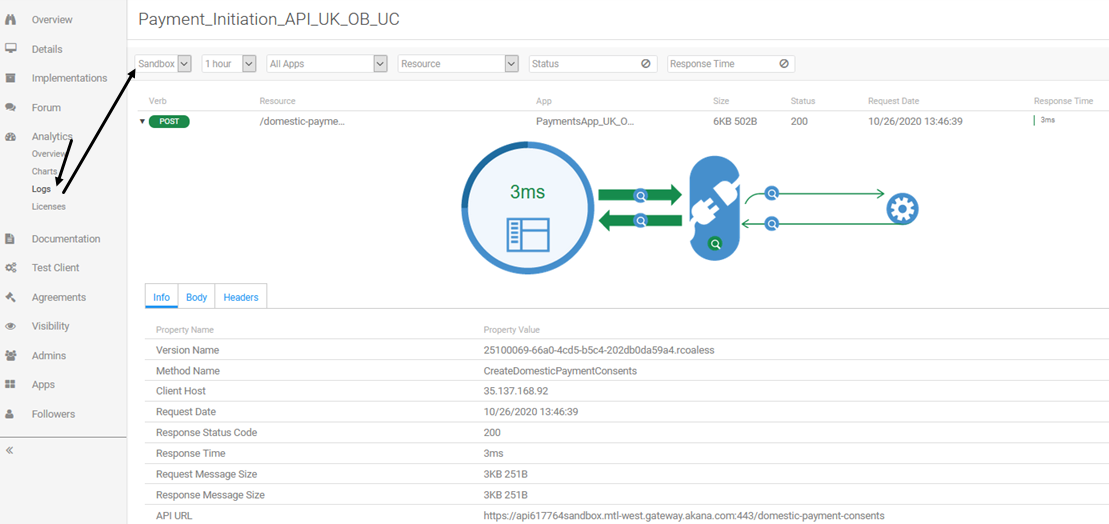
You can also review the analytics information.
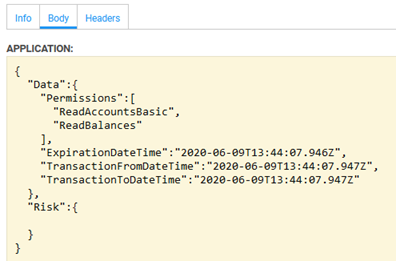
In the Community Manager developer portal, in the context of the API, go to Analytics > Logs. Choose one of the messages you just sent. You can look at the Info, Body, and Headers. In the Body tab you'll be able to see that the policies were enforced successfully.
The Info tab is shown below.
The Body tab:
Debug mode
If you turned on Debug Mode in your implementation (see Step 3-4: Turn on debug mode above), you'll also be able to view additional details. Click the Debug magnifying glass as shown below.
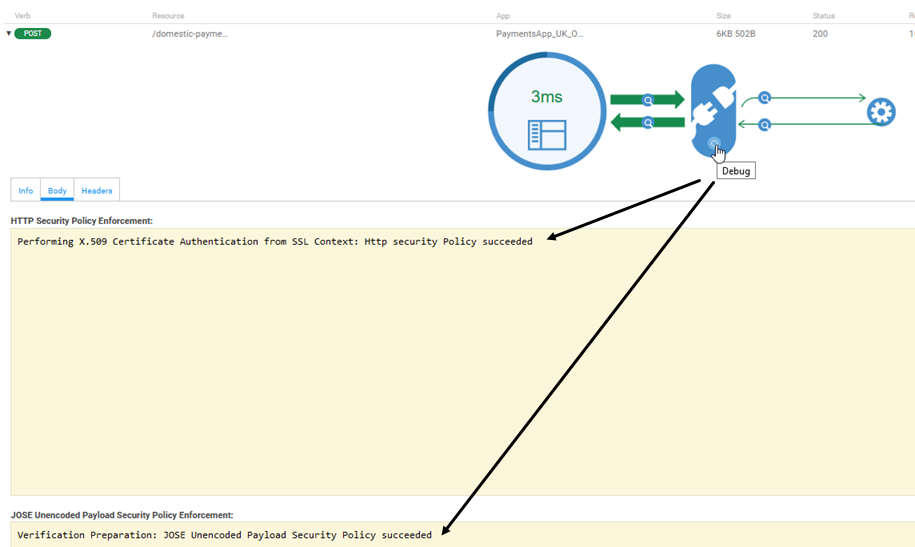
You can see from the above that the API Platform validated the certificate and authenticated that the client is a valid entity associated with the certificate.
Additional information/resources
Resources for this use case include:
- Input Swagger file for the API
- Request content for the Test Client message
- Response content for the Content Activity in the Process Editor (set up in Step 3-6: Create a mock response)
- A valid keystore
Input Swagger file for the API
This example uses the Open Banking Payment Initiation API. The OAS JSON file for this API is available at the following URL:
For this use case, we've made two slight modifications to the JSON file:
- Slightly modified the JSON to remove the application/jose+jwe content type, for simplicity since this use case does not use JWE, which is not mandatory for UK Open Banking compliance, and the application/jose+jwe content-type would display as the default in Test Client (since available content-type values are displayed alphabetically).
- Removed the charset values from the parameters. In the original file, the default values for Consumes and Produces include a charset parameter: application/json; charset=utf-f. Both versions of the UK Open Banking Specification state that the media type must be application/json (apart from specific exceptions).
The file used in this use case is available here:
Request content for the Test Client message
The message POST content used in the use case is below.
{
  "Data":{
    "Permissions":[
      "ReadAccountsBasic",
      "ReadBalances"
    ],
    "ExpirationDateTime":"2020-06-09T13:44:07.946Z",
    "TransactionFromDateTime":"2020-06-09T13:44:07.947Z",
    "TransactionToDateTime":"2020-06-09T13:44:07.947Z"
  },
  "Risk":{

  }
}
Response content for the Content Activity in the Process Editor
Because this use case is run in the Sandbox implementation and is not really accessing an Open Banking API, the API response is defined as a static response that is returned when the operation is accessed successfully. The response content is shown below.
This content is used in Step 3-6: Create a mock response.
It really doesn't matter what content you define since the response is static. However, this is an example of what a response for this operation might look like in a production environment.
{
  "Data":{
    "ConsentId":"string",
    "CreationDateTime":"2020-10-16T19:15:28.891Z",
    "Status":"Authorised",
    "StatusUpdateDateTime":"2020-10-16T19:15:28.891Z",
    "CutOffDateTime":"2020-10-16T19:15:28.891Z",
    "ExpectedExecutionDateTime":"2020-10-16T19:15:28.891Z",
    "ExpectedSettlementDateTime":"2020-10-16T19:15:28.891Z",
    "Charges":[
      {
        "ChargeBearer":"BorneByCreditor",
        "Type":[
          "UK.OBIE.CHAPSOut",
          "UK.OBIE.BalanceTransferOut",
          "UK.OBIE.MoneyTransferOut"
        ],
        "Amount":{
          "Amount":"string",
          "Currency":"string"
        }
      }
    ],
    "Initiation":{
      "InstructionIdentification":"string",
      "EndToEndIdentification":"string",
      "LocalInstrument":[
        "UK.OBIE.BACS",
        "UK.OBIE.BalanceTransfer",
        "UK.OBIE.CHAPS",
        "UK.OBIE.Euro1",
        "UK.OBIE.FPS",
        "UK.OBIE.Link",
        "UK.OBIE.MoneyTransfer",
        "UK.OBIE.Paym",
        "UK.OBIE.SEPACreditTransfer",
        "UK.OBIE.SEPAInstantCreditTransfer",
        "UK.OBIE.SWIFT",
        "UK.OBIE.Target2"
      ],
      "InstructedAmount":{
        "Amount":"string",
        "Currency":"string"
      },
      "DebtorAccount":{
        "SchemeName":[
          "UK.OBIE.BBAN",
          "UK.OBIE.IBAN",
          "UK.OBIE.PAN",
          "UK.OBIE.Paym",
          "UK.OBIE.SortCodeAccountNumber"
        ],
        "Identification":"string",
        "Name":"string",
        "SecondaryIdentification":"string"
      },
      "CreditorAccount":{
        "SchemeName":[
          "UK.OBIE.BBAN",
          "UK.OBIE.IBAN",
          "UK.OBIE.PAN",
          "UK.OBIE.Paym",
          "UK.OBIE.SortCodeAccountNumber"
        ],
        "Identification":"string",
        "Name":"string",
        "SecondaryIdentification":"string"
      },
      "CreditorPostalAddress":{
        "AddressType":"Business",
        "Department":"string",
        "SubDepartment":"string",
        "StreetName":"string",
        "BuildingNumber":"string",
        "PostCode":"string",
        "TownName":"string",
        "CountrySubDivision":"string",
        "Country":"string",
        "AddressLine":[
          "string"
        ]
      },
      "RemittanceInformation":{
        "Unstructured":"string",
        "Reference":"string"
      },
      "SupplementaryData":{

      }
    },
    "Authorisation":{
      "AuthorisationType":"Any",
      "CompletionDateTime":"2020-10-16T19:15:28.891Z"
    }
  },
  "Risk":{
    "PaymentContextCode":"BillPayment",
    "MerchantCategoryCode":"string",
    "MerchantCustomerIdentification":"string",
    "DeliveryAddress":{
      "AddressLine":[
        "string"
      ],
      "StreetName":"string",
      "BuildingNumber":"string",
      "PostCode":"string",
      "TownName":"string",
      "CountrySubDivision":[
        "string"
      ],
      "Country":"string"
    }
  },
  "Links":{
    "Self":"string",
    "First":"string",
    "Prev":"string",
    "Next":"string",
    "Last":"string"
  },
  "Meta":{
    "TotalPages":0,
    "FirstAvailableDateTime":"2020-10-16T19:15:28.891Z",
    "LastAvailableDateTime":"2020-10-16T19:15:28.891Z"
  }
}
A valid keystore
For this example, you'll need to be able to generate a keystore, including generating the public and private key pair, creating a certificate signing request, importing a signed certificate, and generating a P12 file. For details of the steps, see Step 6: Create the keystore/certificate.
For these activities, you could use a tool such as Keystore Explorer, downloadable from http://keystore-explorer.org/downloads.html.
Policy details
The table below summarizes information about the policies used in this use case, in Setting up the policies.
| Policy Name | Function | Comments |
|---|---|---|
| OAuth | Enforces OAuth. |
When the OAuth policy is attached to an API, and the user invokes the API in Test Client, the client is redirected to an authorization server to get an access token in order to be able to access the API. Test Client uses the authorization server specified in the API's configuration (API OAuth Details). This use case uses the Client Credentials OAuth grant; therefore, the user must provide the credentials in Test Client. When the client's credentials are validated, the authorization server generates the token, which is sent with the message request. In the context of this example, OAuth scopes are not a significant factor. No configuration required. |
| HTTP Security | Validates whether a valid client certificate is presented by the client. |
When the HTTP Security policy is attached to an API, the HTTP security policy validates the client certificate that is presented by the client invoking the API. It is a good practice to use this policy to explicitly specify that a client certificate is required. With the policy configuration given in this use case, this policy extracts the client certificate from the TLS context. Note that this requires that the API is called over an HTTPS connection, with the API Gateway HTTPS listener configured to either accept or require client certificates. On the Akana SaaS Platform, an HTTPS endpoint has already been preconfigured for this purpose. At runtime, once an HTTPS connection has been established, the policy explicitly validates the presence of a valid client certificate, and only allows the process to continue to execute if a valid certificate is found. Akana Test Client allows the user to upload a keystore. If a valid keystore has been uploaded, with this use case Test Client uses the certificate to:
The HTTP Security policy comes into play in the second part of Running the use case. Configuration required. |
| JOSE Security Policy v2 | Enforces UK Open Banking rules. |
The JOSE Security Policy v2 adds very specific security to the part of the message exchange where the message is coming in from the client. The message is subjected to a number of rules, as specified by UK Open Banking standard and as configured in the JOSE Security Policy v2. Configuration required. |
| Detailed Auditing | Logs message information for later review. |
Because the use case is a test scenario, it's a good idea to add the Detailed Auditing policy, so that you can view transaction details. This doesn't relate to Open Banking; it's just for developer convenience. No configuration required. |
Extra steps for on-prem setup
If you're setting up and running this use case in an on-prem scenario, there are a couple of extra setup steps that are already done for you in the SaaS environment:
On-prem setup: Setting up the HTTPS listener
This use case requires HTTPS. If you have an on-prem installation, you'll need to have an inbound HTTPS listener for any Network Director or Policy Manager container that will process messages for this use case.
It's best to set up the listener before starting the use case steps. It's listed in the prerequisites section.
For instructions on setting up an HTTPS listener, including explanations for each field, see Adding a Listener.
Configure your HTTPS listener with these settings:
- Listener Type: HTTPS.
- Listener Name: make sure the name is unique for the container.
- Bind to all interfaces: Check the box to set this field to true.
- Port Number: Specify the port. Make sure you choose a port that isn't already in use.
- Client Certificates: Set to either accept or require. If you choose require, the listener will reject any connection request that does not offer a valid client certificate.
- Clone services hosted on other listener(s): Check the box.
On-prem setup: Updating the etc/hosts file
If you're running the use case in an on-prem scenario, you'll need to update the etc/hosts file on the server to make sure that the URLs that you are using are trusted. Specifically, in Step 1-2: Add the authorization server URL as a trusted hostname you define the Authorization Server URL, needed for using OAuth. You'll need to add this URL to the etc/hosts file.
The location of the file depends on local setup. For example, on a Windows machine it might be in this location: C:\Windows\System32\drivers\etc\hosts.


