Managing API Implementations
Add or modify one or more implementations for your API. Manage deployment zones, policies, and security for each implementation.
Table of Contents
Implementations:
- What is an API implementation?
- How do I add an API implementation?
- How do I add a Sandbox implementation?
- What is an implementation pattern and which one should I choose?
- How many API implementations can I have?
- How do I edit an API implementation?
- How do I delete an API implementation?
- How do I add or modify a target endpoint for an implementation?
- How do I delete a target endpoint for an implementation?
- What is the context path and how do I make sure I have the right context path for my API implementation?
- What are the validation rules for the context path?
- What is debug mode?
- How do I turn on debug mode for my implementation?
- How do I specify a listener when adding/editing an implementation endpoint?
- How do I set up my API implementation to support POX or JMS bindings?
Managing Deployment Zones for an API Implementation:
- What is a deployment zone?
- How do I see which deployment zones my API is deployed to?
- What does the color coding on deployment zones mean?
- How do I add an API deployment zone?
- How many API deployment zones can I have?
- How do I edit an API deployment zone?
- How do I add a new protocol for an API deployment zone?
- How do I delete an API deployment zone?
Managing Certificates for an API Implementation:
- How do I manage keys and certificates for my API?
- How does the platform support SNI?
- How do I set up my API to support SNI?
Managing Identities for an API Implementation:
Managing Policies for an API Implementation:
- What types of policies are available for my API?
- How do I assign policies to my API implementation?
- What security and monitoring policies are available for my API?
- Which policies should I choose?
- How can I see details about a policy?
- What is the minimum policy requirement for my API?
- How do I see which policies are assigned to my API implementation?
- How do I set up my API to support CORS?
Managing Processes for an API Implementation:
Managing Dependencies for an API Implementation:
Implementations:
What is an API implementation?
Different implementations of an API represent the different endpoints of the API in the same lifecycle stage. For example, it is common for an API to have Sandbox and Live implementations.
When you create your initial API definition, the API platform creates the Live implementation automatically. You can create a second implementation for Sandbox, if needed.
If an existing implementation is deleted, you can create another; however, you cannot have more than two implementations of an API at the same lifecycle stage.
Implementation Summary
The Implementations page for your API (API > Implementations) will look something like the below:

In this example, there are three deployment zones available and active for each implementation; therefore, each implementation has three endpoints, one for each deployment zone. You can modify as needed. For more information, see Managing Deployment Zones for an API Implementation.
Implementation details: Overview
In Version 2020.2.0, there was a significant redesign of the Implementations page. Rather than having all the information on one long page, the information is broken out into separate pages, accessible via the left menu.
Review the applicable section below depending on your platform version:
- Implementation Details: Version 2020.2.0 and later
- Implementation Details: Versions prior to 2020.2.0
Implementation Details: Version 2020.2.0 and later
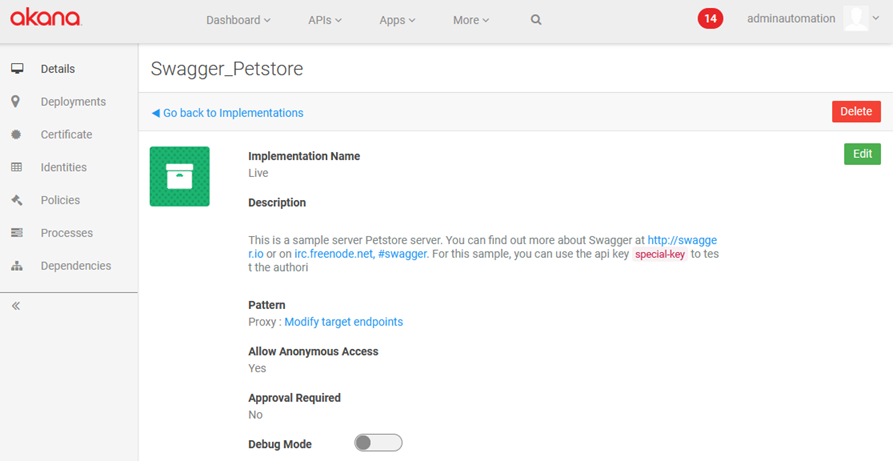
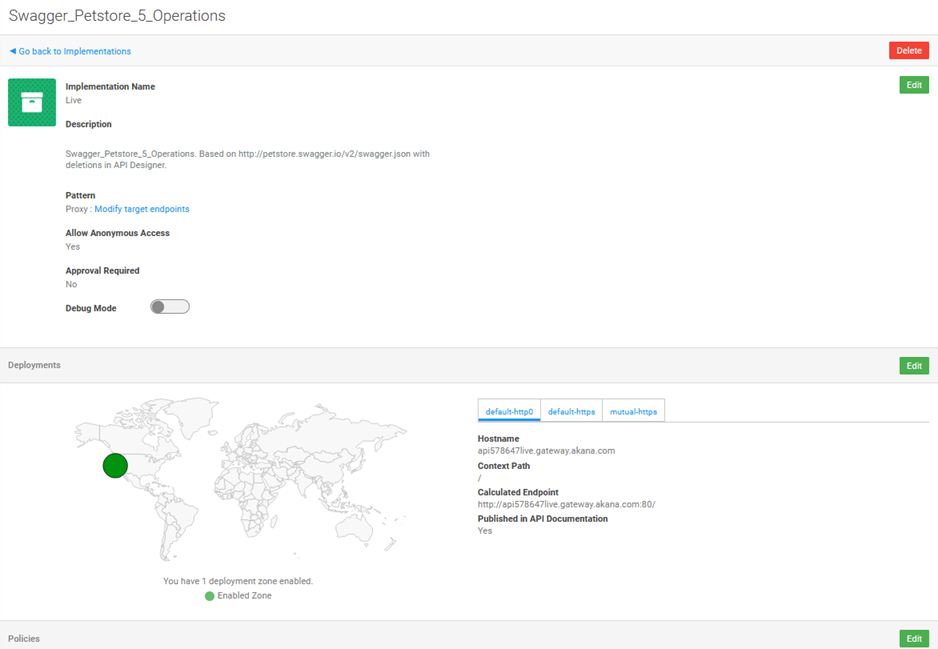
When you click through on a specific implementation, you'll see the Implementation Details page, as shown below.
On this page you can:
- Click Edit to modify metadata about the implementation such as description and proxy URL: See How do I edit an API implementation?
- Delete the implementation: See How do I delete an API implementation?
- Turn on debug mode: See How do I turn on debug mode for my implementation?
- Modify target endpoints: See How do I add or modify a target endpoint for an implementation?
From this page, from the left menu bar, you can go to the page for the following activities relating to the implementation:
- Deployments: A map-like chart, from which you can manage deployment zones for the implementation. See Managing Deployment Zones for an API Implementation.
- Certificate: Manage trusted keys and certificates separately for each implementation. See Managing Certificates for an API Implementation.
- Identities: Configure the identity to be used for outbound calls to the downstream API service. See Managing Identities for an API Implementation.
- Policies: Allows you to secure and monitor your implementation with policies. See Managing Policies for an API Implementation.
- Processes (Version 2020.2.1) / Resources (Version 2020.2.0): Allows you to add or edit processes associated with individual resources. See Managing Processes for an API Implementation.
- Dependencies: A hierarchy of elements in the implementation. These elements can include the actual web service application (physical service) and one or more virtual services. See Managing Dependencies for an API Implementation.
Implementation Details: Versions prior to 2020.2.0
When you click through on a specific implementation, you'll see the implementation details, something like the below.
Top part of the page:
Bottom part of the page (Hermosa Theme):
On this page, you can manage all aspects of the implementation:
- Top section: modify metadata about the implementation such as description and proxy URL.
- Deployments section: modify the technical details about the implementation such as deployment zones and vanity hostname.
- Policies section: specify policies to be applied to API traffic for this implementation.
- Identities section: manage identity settings for the implementation, and add, modify, or delete identities. See How do I manage my implementation identity settings?
- Certificate section: manage certificates for the implementation. See How do I manage keys and certificates for my API?
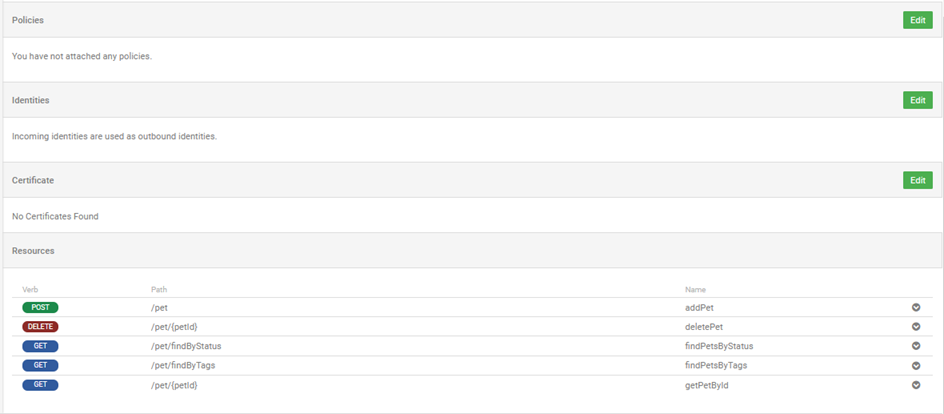
- Resources section: view a list of resources for the implementation, and manage processes for individual resources.
How do I add an API implementation?
If you create your API by importing an API description document, the platform creates the Live implementation as part of creating the API. In this scenario, it's best to review the API implementation definition, and modify if needed. See How do I edit an API Implementation? below.
If you created your API from scratch, or you want a second implementation for an existing API, you'll need to add a new implementation. Follow the steps below.
To add an API implementation
- Log in to the Akana API Platform and go to the overview page for your API.
- From the left menu bar, choose Implementations.
- Click Add.
- At the Add Implementation page, provide the following:
- Implementation Name: choose from the drop-down list available. You can have one implementation for each option available on the list.
- Description: a short description of the implementation. This field supports Markdown, so you can add formatting. Click the question mark (?) for help with Markdown, if needed.
- Pattern: Choose Proxy for a simple scenario where the API implementation has a 1:1 relationship with a back-end physical service/API; then provide the API endpoint that you want to set up a proxy for. Choose Orchestration for a more complex API implementation that might include one or more services, processes, or additional steps.
- Click Save.
- At the Implementations page, click the link for the new implementation to add additional values. See To edit an API implementation below.
How do I add a Sandbox implementation?
If you're designing your API from scratch, there are no implementations until you create them. In this scenario, to add a Sandbox implementation, follow the instructions in To add an API implementation above.
If you create the API from an API description document, the first implementation is automatically created as a Live implementation.
If you want to add an additional implementation for Sandbox, follow the instructions in To add an API implementation above.
If you want only a Sandbox implementation, first add the new Sandbox implementation, and then delete the Live implementation following the instructions in How do I delete an API implementation? below.
What is an implementation pattern and which one should I choose?
When you're setting up an implementation, you'll need to specify the implementation pattern and then provide additional details.
The implementation pattern determines how you want to go about creating the implementation and/or what existing service you want to use or to base the new service on.
Generally, Proxy is the default. It is appropriate for a simple scenario where the API implementation has a 1:1 relationship with a back-end physical service/API.
For a more complex API implementation, that might include one or more services, processes, or additional steps, choose Orchestration. Later, you can use the built-in Process Editor to fine-tune the process.
How many API implementations can I have?
You can have two API implementations for each lifecycle stage. Each implementation represents a different endpoint; generally, Live and Sandbox.
When you create your initial API definition, you can specify the implementation. If you don't specify, by default the Live implementation is created. You can create a second implementation for Sandbox, if needed.
If an existing implementation is deleted, you can create another; however, you cannot have more than two implementations of an API at the same lifecycle stage.
How do I edit an API implementation?
Follow the steps below.
To edit an API implementation
- Log in to the Akana API Platform and go to the overview page for your API.
- From the left menu bar, choose Implementations.
- Click the implementation you want to edit. The Details page for the implementation is displayed.
- Optional: edit basic information about the implementation:
- Click Edit.
- Add or modify the description. You can use Markdown if needed.
- Check or clear the Allow Anonymous Access check box.
- Check or clear the Approval Required check box (applicable only if anonymous access is not allowed).
- In the Pattern field, change the implementation pattern if needed. Choose Proxy for a simple scenario where the API implementation has a 1:1 relationship with a back-end physical service/API. Choose Orchestration for a more complex API implementation that might include one or more services, processes, or additional steps.
- When done, click Save.
- Optional: edit deployment zone details:
- From the left menu bar, click Deployments.
- Click Edit.
- Zone: choose a different deployment zone out of the valid values available.
- Enable Zone: To add or remove deployment zones for the implementation, click the zone on the left and then check or clear the Enable Zone box on the right.
- Add protocol: click the + tab. At the Add Endpoints overlay, choose the protocol and click Add.
Note: If you want to use SNI to serve up the implementation's key/certificate, in the HTTPS tab, check the Use Implementation's Key/Certificate for SSL box (requires that API Clients are SNI-compliant).
- Context Path: defaults to a single forward slash (/) but you can change it. For information about the context path, see What is the context path and how do I make sure I have the right context path for my API implementation?
- Optional: edit policies:
- From the left menu bar, click Policies.
- On the Policies page, add or remove policies for the entire implementation, or for individual operations. For detailed instructions, see How do I assign policies to my API implementation?
- Optional: edit identities:
- From the left menu bar, click Identities.
- Click Edit.
- On the Identities page, modify the identity settings as needed, and then click Save. For more information, see How do I manage my implementation identity settings?
- Optional: edit certificate information for the implementation:
- From the left menu bar, click Certificate.
- Click Edit.
- On the Keys and Certificates page, manage keys and certificates. You can upload, download, or delete. When you're done, click Save. For more information, see How do I manage keys and certificates for my API?
- Optional: edit processes:
- From the left menu bar, click Processes (in versions prior to 2020.2.1, Resources).
- On the Processes page, find the resource that you want to edit the process for, and click Edit Process. The Process Editor opens.
- Edit the process for the resource, and then click Save. For more information, see How do I use the Process Editor?
- Optional: review or update dependencies:
- From the left menu bar, click Dependencies.
- View or modify dependencies as needed. For more information, see How do I use the implementation dependencies tool?
The changes are effective immediately.
How do I delete an API implementation?
You can delete one or more implementations for an API.
Note: When you delete an implementation, all apps are disconnected from the implementation, and all process configuration, policies, and endpoints are deleted. This action is not reversible. To set up the implementation again you'd need to recreate from scratch, including policies, process configuration, and endpoints, and apps would need to connect to the new implementation.
To delete an API implementation
- Log in to the Akana API Platform and go to the overview page for your API.
- From the left menu bar, choose Implementations.
- Click the implementation you want to delete. The Details page for the implementation is displayed.
- At the top right, click Delete.
- At the confirmation prompt, click OK. The implementation is deleted.
The changes are effective immediately.
How do I add or modify a target endpoint for an implementation?
After your API is set up, you might need to change the target endpoint for a specific implementation, or add a new target endpoint. You can add or change a target endpoint at any time.
To add or modify a target endpoint for an API implementation
- Log in to the Akana API Platform and go to the overview page for your API.
- From the left menu bar, choose Implementations.
- Click the implementation you want to modify. The Details page for the implementation is displayed.
- Under Pattern, click the Modify target endpoints link.
- On the Endpoints page, you have two options:
- Edit an existing endpoint: click the Expand icon (...) to expand, and then click the Edit icon (pencil).
- Add an endpoint: click Add.
- Set values for the following fields:
- Location: enter the full URL for the target endpoint (the actual endpoint for your API; the proxy endpoint relays traffic to the target endpoint).
- Protocol version: Leave as Unspecified, the default, or specify HTTP 1.0 or HTTP 1.1.
Note: When Unspecified is selected, the API Gateway takes the HTTP version in the request message and uses it in the downstream request message to the target endpoint. If another version is specified, the API Gateway always uses the specified version for downstream requests.
- Require Content-Length Header: Check this box if the proxy endpoint should send a Content-Length header to the target endpoint, to indicate the message length.
Note: If the protocol version is HTTP 1.0, the Requires Content-Length Header field is checked by default and cannot be changed; it is required.
- Click Finish to save the endpoint.
- Click Finish to exit from the Endpoints page.
How do I delete a target endpoint for an implementation?
You can delete a target endpoint. In case the endpoint is in use, make sure users are notified before deleting the endpoint.
To delete a target endpoint for an API implementation
- Log in to the Akana API Platform and go to the overview page for your API.
- From the left menu bar, choose Implementations.
- Click the implementation you want to delete. The Details page for the implementation is displayed.
- Under Pattern, click the Modify target endpoints link.
- On the Endpoints page, find the endpoint you want to delete. Click the Expand icon (...) to expand, and then click the Delete icon (X).
- At the confirmation message, click OK.
- On the Endpoints page, click Finish (if you don't confirm on this page, the endpoint is not deleted).
What is the context path and how do I make sure I have the right context path for my API implementation?
The endpoint for an API must be a fully unique address to the resource that the API is giving access to.
The endpoint is made up of the HTTP verb and the full URL, including protocol, hostname, optional port, context path, and object path.
- HTTP verb: most commonly GET, POST, PUT, or DELETE. OPTIONS, HEAD, and PATCH are also supported.
- Protocol: generally HTTP or HTTPS. The platform also supports POX and JMS bindings.
- Target hostname: the part after the protocol and before the context path (see below). Example: http://www.acmepaymentscorp.com.
- Port (optional): port number, sometimes part of the URL. Example: http://example.com:7900/atmosphere/#/home/landing.
- Context path: The context path is the next part of the API endpoint, after the hostname (and optional port). It provides the context for the specific API; this is the part of the URL that's consistent for each operation within the API. Occasionally, there might be nothing specified in the context path, in which case it's just a forward slash (/) and is called root. Example of a context path: /api/payments.
- Resource path: the part after the context path, that might be different for different operations within an API. Examples: POST http://www.acmepaymentscorp.com/api/payments/payment adds a payment, GET http://www.acmepaymentscorp.com/api/payments/payment/{PaymentID} returns details about a specific payment.
The API endpoint is a concatenation of the above elements, as shown below:
{HTTP_VERB} {protocol}://{hostname}{sometimes,port}{context path beginning with slash}/resource path
For example:
GET http://www.acmepaymentscorp.com/api/payments/payment/pmtid9346582364
In the above example:
- HTTP verb: GET
- Protocol: HTTP
- Port: none
- Target hostname: www.acmepaymentscorp.com
- Context path: /api/payments
- Resource path: /payment/pmtid9346582364
Community Manager developer portal behavior with regard to uniqueness of API endpoint
By default, when you define an API in the Community Manager developer portal, the platform performs a validation check for unique combination of virtual host and context path, to make sure that the API endpoint, up to and including the context path, is unique. If the combination of virtual host and context path is not unique, the platform automatically modifies the API endpoint to make sure it's unique.
Note: The platform includes a configuration setting that the Site Admin can use to turn off this validation check. If the validation check is disabled, you must make sure that the API path (protocol, hostname, optional port, and context path) will be unique. For information about this setting, see General API Settings (Site Admin help).
What are the validation rules for the context path?
The rules applied to the context path are:
- It cannot have spaces.
- Question mark (?) is not allowed.
- The following special characters are allowed: forward slash (/), comma (,), dash (-).
- No other special characters are allowed.
What is debug mode?
Debug mode is a setting that controls the level of logging of API traffic. Debug mode, the second-highest level of logging, records additional information to the API's logs, above and beyond the normal settings.
You can turn on debug mode if there's an issue with the API, in a specific implementation, and you need more information to determine what the problem is. Debug mode requires that there is at least one auditing policy, of any type, attached to the API.
As long as there's an auditing policy attached to the API, when debug mode is turned on the platform adds log entries for each of the steps performed by the underlying infrastructure, for every transaction. The steps recorded in debug mode are:
- Policy enforcement/implementation
- Orchestration activity execution
If you turn on debug mode, remember to turn it off when your debug activities are complete. Because it records additional information, which is then also stored, there is a small performance impact as well as a storage impact.
For information about turning on debug mode, see How do I turn on debug mode for my implementation? below.
How do I turn on debug mode for my implementation?
You can turn on debug mode in two places:
- In the Implementation Details page
- In the Logs page for the API
To turn on debug mode in the Implementation Details page
First, make sure there is at least one auditing policy attached to the API; either Basic Auditing or Detailed Auditing. If there is no auditing policy, transactions are not logged at all.
- Log in to the Akana API Platform and go to the overview page for your API.
- From the left menu bar, choose Implementations.
- Click the implementation. The Details page for the implementation is displayed.
- Click the Debug Mode swipe button, as shown below. Debug mode is turned on immediately.
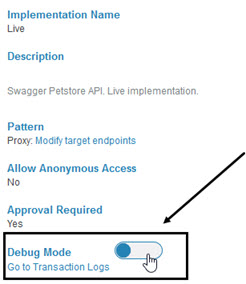
- If needed, use the Go to Transaction Logs link. This is a shortcut to the API > Analytics > Logs page. For more information on the transaction logs, see What information can I see on the API Logs page?
Remember to turn off debug mode when you're done.
How do I specify a listener when adding/editing an implementation endpoint?
When adding or editing an endpoint for an implementation in the Community Manager developer portal, the API Admin can specify the listener, choosing from a list of valid listeners available, on the Protocol tabs for the implementation.
The first listener is generated automatically as part of the API creation process. You can specify a listener as part of adding a subsequent implementation, or as part of editing any implementation.
If only one listener for a specific protocol is available for the deployment zone, the listener pull-down does not appear.
To specify a listener
- Log in to the Akana API Platform.
- Choose the API.
- From the left menu bar, click Implementations to access the Details page for the implementation.
- From the left menu bar, choose Deployments.
- On the Deployments page, click Edit.
Note: If there are no deployment zones listed in the Zone drop-down list, the Business Admin hasn't added any. The Business Admin sets up deployment zones as part of business organization configuration. See How do I add a deployment zone? (Business Admin help).
- If it's not yet checked, check the Enable Zone box. Additional fields are displayed so you can choose from available protocols and settings.
- Optional: to delete one or more existing listeners, click the X next to it, as shown below. At the confirmation prompt, click OK to delete the listener.

- To add a listener, click the + icon, and then choose one or more available listeners, as shown below.

Note: this overlay shows all available listeners, even if they are already selected. When you're modifying listeners, it's a good idea to delete existing listeners first, as explained in Step 6 above.
- Click Add.
- Click Save to save changes and return to the Details page for the implementation.
How do I set up my API implementation to support POX or JMS bindings?
The most common bindings for API implementations are HTTP and HTTPS (see What is the context path and how do I make sure I have the right context path for my API implementation?). However, you might want to support POX or JMS bindings.
To do this, you'll have to do a little bit of setup in Policy Manager, part of the underlying infrastructure of the Community Manager developer portal. Coordinate with the Administrator as needed if you don't have access to Policy Manager.
To set up an API implementation to support POX or JMS
- Log in to Policy Manager.
- Choose Configure > Registry > Bindings and then click Import Bindings from WSDL.
- On the Select WSDL Import Option page, import the WSDL file for your service that uses POX or JMS and save.
- Next, go the Network Director container and add a JMS listener. Provide values for Listener Name (for example, jms-listener), JNDI URL, JNDI Initial Context, and JMS Destination Factory Name.
- Log in to the Community Manager developer portal and create an API using the same WSDL file.
- In Policy Manager, find the virtual service for the API: Under Workbench > Browse, search for the name.
- Select the virtual service and click Access Points.
- Delete all existing access points.
- Conditional for JMS: Add a new access point:
- Specify the Network Director container and click Next.
- Make sure JMS is selected for the binding, and make sure that the Listener is set to the JMS listener you created in Step 3 above.
- Conditional for POX: add a new access point:
- Specify the Network Director container and click Next.
- Make sure POX is selected for the binding, and make sure that the Listener is set to the JMS listener you created in Step 3 above.
- In the Community Manager developer portal, go back to the API. On the API Details page, and other pages where the API endpoint is displayed, you'll see the POX HTTP URL or the JMS jms:// endpoint.
Managing Deployment Zones for an API Implementation:
What is a deployment zone?
A deployment zone is a physical location, such as a geographical area or a specific data center, that the API endpoint uses to proxy the API, if the API is hosted on the platform and is using the proxy capability.
One or more deployment zones are configured as part of the platform setup. When the API Admin creates the API, either from scratch or by uploading an API description document, the platform matches the API against the deployment zones that are defined. The API is deployed to all matching deployment zones.
For example, a deployment zone might be defined as being for live implementations only. An API sandbox implementation would not be deployed to this deployment zone.
How do I see which deployment zones my API is deployed to?
Once you've added your API, it is automatically deployed to any of the API Platform deployment zones with criteria that match your API definition.
The deployment zones for your API are displayed in a map-like chart, as shown below:
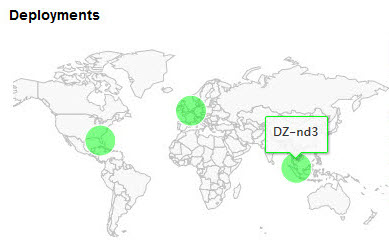
Deployment zones are assigned to each API implementation when the implementation is created. You can then fine-tune as needed.
Note: If a physical location hasn't been specified for the deployment zone, it shows on the map as Unknown, and the dot appears on the top left of the map.
To view the deployment zones for a specific implementation
- Log in to the Akana API Platform.
- Choose the API.
- From the left menu bar, click Implementations.
- Click the link for the implementation you want to view.
Note: If your API implementation meets the criteria for multiple deployment zones, it has a unique endpoint for each deployment zone.
What does the color coding on deployment zones mean?
When you view the deployment zone map for an API implementation, you might see one or more deployment zones.
The platform uses color coding to convey information about deployment zones, as follows:
- Pale blue—Disabled and not selected
- Pale green—Enabled and not selected
- Dark blue—Disabled and selected
- Dark green—Enabled and selected
How do I add an API deployment zone?
You cannot specifically add a deployment zone to an API. Deployment zones are set up by the Administrator; when you add an implementation, deployment zones are assigned automatically based on the criteria for the API and the deployment zones.
However, there are a couple of scenarios that allow you to make an additional deployment zone available to your API:
- if you disable a deployment zone from your API implementation, you can re-enable it.
- If a new deployment zone becomes available on the platform, and it matches the criteria for your API, you can then add it to your API.
When you create your API from an API description document, the platform automatically matches up your API definition against the existing deployment zones, and deploys the API to all deployment zones for which it matches the criteria.
Note that Live and Sandbox implementations are likely to be deployed to different deployment zones.
How many API deployment zones can I have?
An API can have many deployment zones.
The number of deployment zones for an API is determined by these factors:
- The number of deployment zones defined on the platform.
- The eligibility requirements for each deployment zone; for example, a specific deployment zone might be limited to Live implementations, so an API's Sandbox implementation would not have access to it.
- The API definition.
How do I edit an API deployment zone?
When you're adding a new implementation, or editing an implementation that was manually added or automatically generated for your API, you can fine-tune the deployment zone assignments by modifying the settings. You can:
- Disable/enable one or more deployment zones from the API's implementation.
- Add a protocol for an existing deployment zone, if additional protocols are available for the specific deployment zone.
- Add a vanity hostname.
- Add a context path.
- Set up a new protocol for the deployment zone, or modify an existing one (from available protocols)
- Specify whether the deployment zone is included in automatically-generated API documentation.
Note: By default, when the implementation is added for a specific deployment zone, a unique hostname is created; for example, api11192live.developer.acmepaymentscorp.com. Each API has a unique hostname for each valid zone it's deployed in. Your API users can use either the unique hostname generated by the platform or the vanity hostname you provide yourself.
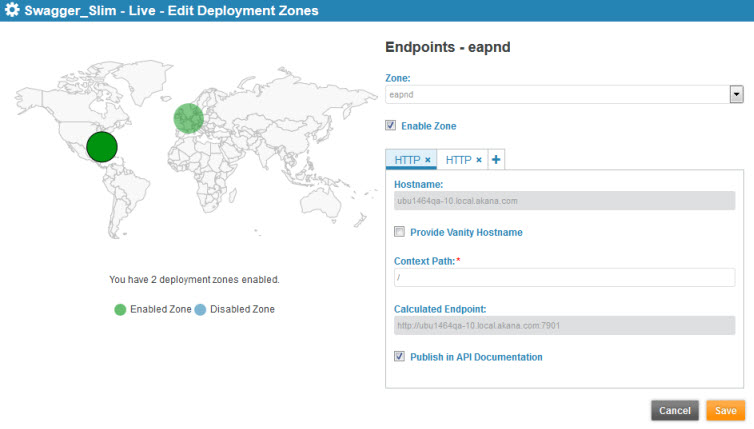
To edit an API's deployment zone assignment for a specific implementation
- Log in to the Akana API Platform.
- Choose the API.
- From the left menu bar, click Implementations to access the Details page for the implementation.
- From the left menu bar, choose Deployments.
- On the Deployments page, on the right, click Edit.
- Choose the deployment zone to edit by clicking in the map view or choosing from the drop-down list.
- Choose the protocol to edit by clicking the applicable tab on the right. To add an available protocol, click + and then, in the Add Endpoint dialog, choose the protocol. Available protocols are determined by how the deployment zone is defined; if you don't have the protocol you need, ask a Site Admin or Business Admin.
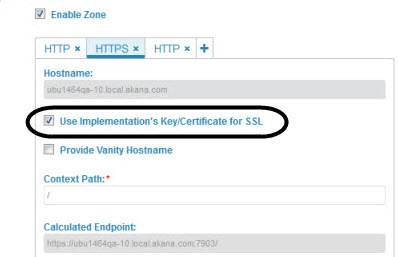
Note: If you want your API to support SNI, choose HTTPS and click the Use Implementation's Key/Certificate for SSL check box, as shown below. (For more information on implementing SNI, see How do I set up my API to support SNI?)
- Change values as needed. For help with the field definitions, see Add Deployment Zone / Edit Deployment Zone Dialog: Field Values below.
- Click Save.
Note: If you're not using a vanity hostname, you don't need to provide a context path; the path is already unique to the API implementation.
Add Deployment Zone / Edit Deployment Zone Dialog: Field Values
The Add Deployment Zone / Edit Deployment Zone dialog provides the following:
- Map view
- To view information about a deployment zone, click the zone on the map.
- Zone
- Choose from the drop-down list. The list shows all deployment zones that are valid for the specific API implementation.
- Enable Zone
- Check or clear the box to enable or disable the deployment zone.
- Protocol tabs
- To add a protocol, click the + sign and choose from additional protocols available (if any; determined by the deployment zone definition as set up by the Site Admin or Business Admin).
- Hostname
- The generated, unique hostname for the API implementation is displayed.
- Use Implementation's Key/Certificate for SSL (HTTPS only)
- Check the box if you want to use SNI to serve up the implementation's key/certificate. Requires that API Clients are SNI-compliant.
- To support SNI, you must also upload a certificate for the implementation (see How do I manage keys and certificates for my API?).
- Provide Vanity Hostname
- When an API implementation is automatically created with one or more valid deployment zones, a random prefix is added to the hostname. Check the box if you want to give the implementation a vanity hostname that's easy to remember and in a different domain (for example, api.acmepaymentscorp.com) rather than the unique hostname assigned by the platform.
- Note: Whether you use the assigned hostname with the random prefix or a vanity hostname, make sure your hostname is configured in the DNS server as a CNAME to the unique hostname assigned by the platform.
- Vanity Hostname (CNAME)
- Provide the vanity hostname; for example, acmepaymentscorp.com. Make sure it is mapped to a valid CNAME in the DNS server of the domain for the vanity host.
- Context Path
- To make the URL unique, use the context path if necessary. The generated hostname is unique to each API implementation, so if you're using the unique hostname you don't need a context path. If you're using a vanity hostname, use the path to make the URL for each API unique. For validation rules, see What are the validation rules for the context path? below.
- Calculated Endpoint
- The full endpoint for the API implementation is generated based on the settings provided, and is displayed. It is a composite of values: protocol, generated URL or vanity URL, and context path. If the implementation doesn't use a vanity hostname, the calculated endpoint is composed of protocol, assigned URL, and context path if specified.
- Publish in API Documentation
- You might want to restrict use of a specific endpoint with a generated hostname, for private or internal use. To do this, clear the check box. Only URLs that have this box checked (the default) are included in the API documentation and displayed to users who are not API Admins.
How do I add a new protocol for an API deployment zone?
You can add an additional protocol supported by the deployment zone your API implementation is using.
To add a new protocol to an existing deployment zone
- Log in to the Akana API Platform and go to the overview page for your API.
- From the left menu bar, choose Implementations.
- Click the implementation you want to edit.
- From the left menu bar, choose Deployments.
- On the Deployments page, click Edit.
- In the protocol section on the right, click the + tab.
- At the Add Endpoints overlay, choose the protocol and click Add.
Note: the list of protocols available is determined by the properties of the deployment zone that the implementation is using. Deployment zones are defined by the Site Admin or Business Admin.
- Click Save.
How do I delete an API deployment zone?
Deployment zones are set up by the Site Admin and are assigned to your API automatically based on the deployment zone criteria and the API definition. You cannot delete a deployment zone; however, you can disable a specific deployment zone for your API, which achieves the same result.
Any customization of settings is lost when you disable a deployment zone.
To disable a deployment zone for an API
- Follow the steps in To view the deployment zones for a specific implementation to get to the Overview page for the deployment zone.
- From the left menu bar, choose Deployments.
- On the Deployments page, on the right, click Edit.
- Choose the deployment zone you want to disable, either by clicking in the map view or choosing from the drop-down list.
- Clear the Enable Zone check box.
- Click Save.
Note: If you previously disabled a deployment zone, you can re-enable it by going back in and checking the box, then editing the settings as needed.
Managing Certificates for an API Implementation:
How do I manage keys and certificates for my API?
When you upload a private key and certificate for an API implementation, the key and certificate pair can be used for encrypting content for the API implementation through mechanisms such as:
- WS-Security encryption (see the specification at: http://docs.oasis-open.org/ws-sx/ws-securitypolicy/200702/ws-securitypolicy-1.2-spec-os.html)
- JSON Web Encryption (JWE) (https://tools.ietf.org/html/rfc7516)
- HTTPS (see How do I set up my API to support SNI?)
You can manage trusted keys and certificates separately for each implementation, including uploading new certificates, uploading trusted certificates, downloading existing certificates, and assigning aliases.
The key is unique for each service identity (implementation).
The key/certificate must already be trusted. If it isn't yet trusted, ask the Policy Manager Admin to add it to the trust store. See Trusted CA Certificates (Policy Manager help).
To manage keys and certificates for an API implementation
- Log in to the Akana API Platform and go to the overview page for your API.
- From the left menu bar, choose Implementations.
- Click the implementation.
- From the left menu bar, choose Certificate.
- On the Certificate page, click Edit.
- On the Keys and Certificates page, choose one of these options:
- Download: see To download a certificate for an implementation below.
- Upload New: see To upload a new private key and certificate for an implementation below.
- Delete: to delete a certificate that's been uploaded. See To delete a trusted certificate for an implementation below.
- When done, click Save.
Note: If you see a Certificate not trusted error message, the certificate has not yet been added to the Policy Manager Trust Store. See Trusted CA Certificates (Policy Manager help).
To upload a new private key and certificate for an implementation
Go to the Keys and Certificates page for your implementation (see To manage keys and certificates for an API implementation above).
- Click Upload New.
- In the Import Private Key + X.509 Certificate from Keystore overlay, enter the values for the new key/certificate:
- Browse to the location of the keystore file, such as a JKS file, and upload it.
- In the Keystore Password field, enter the secure password for the keystore file so that the platform can read the file.
- Click the Load Aliases button. The platform reads the file and displays a list of one or more key aliases for you to choose from.
- In the Key Alias field, choose the alias you want to use.
- In the Key Password field, enter the secure password for the specific key.
- Click Finish. The certificate details are displayed on the Implementation > Certificate page. An example is shown below.

To download a certificate for an implementation
- Go to the Keys and Certificates for your implementation (see To manage keys and certificates for an API implementation above). The existing certificate is displayed. An example is shown below.

- Click Download.
- Choose to open or save the certificate file.
To delete a trusted certificate for an implementation
- Go to the Keys and Certificates for your implementation (see To manage keys and certificates for an API implementation above).
- Click Delete.
- At the prompt, click OK to confirm the deletion.
How does the platform support SNI?
When API transactions are sent to the Network Director using HTTPS, typically the Network Director uses the key and presents the certificate uploaded as part of the HTTPS listener configuration. In order to support different certificates based on the virtual host of an API, Server Name Indication (SNI) can be used. In this scenario, the key and certificate uploaded for an API can be used to negotiate with clients by specifying the virtual host of the API instead of the listener's key and certificate as part of the SNI extension.
If you want to use an API-specific security key/certificate, you'll need to:
- Create the key and certificate, which must meet certain conditions (see below).
- Upload the key and certificate to the platform.
- In the implementation, designate that you want to use the API-specific key and certificate.
For details, see How do I set up my API to support SNI? below.
Note: The Community Manager developer portal also supports SNI at the tenant level, for Community Manager developer portal access. See How do I manage security for a Community Manager developer portal theme? (Site Admin help).
How do I set up my API to support SNI?
The API platform's support of SNI means that multiple keys/certificates can be used for one HTTPS endpoint. You can have individual identity keys/certificates per API implementation. Each implementation can use its own key/certificate for its own clients.
To use SNI, the deployment zone must support HTTPS, and you must complete these steps:
- When you create your key/certificate externally, make sure the subject common name (CN) field in the certificate matches the virtual host.
Note: the platform also supports the use of subject alternate names in the certificate. If you're using a subject alternate name, the same constraint applies; the CN field must match the virtual host name.
- Upload the certificate to the API implementation. This is set up on the Implementation > Certificate page. See To upload a new private key and certificate for an implementation.
- In the implementation page, in the HTTPS tab for the deployment, check the Use Implementation's Key/Certificate for SSL option. See To edit an API's deployment zone assignment for a specific implementation.
Once these settings are in place, the platform uses the appropriate certificate based on the requested hostname.
Managing Identities for an API Implementation:
What is an implementation identity?
When securing outbound calls from the API Platform to an API proxied on the platform, an Identity is typically required in the outbound request message to the downstream API service.
The API Platform allows you to configure the identity to be used for outbound calls to the downstream API service, in the Manage Outbound Identities page for the implementation.
There are two options for managing outbound identities:
- Use incoming identities as outbound identities (the default).
- Specify outbound identities.
You can specify these two identities:
- Source identity—You can define which identity received in the inbound message should be used in the outbound message: Consumer, End-User, Service, or another category which you can define yourself.
- Outbound identity—You can specify the subject category of the inbound identity that will be used for the outbound identity: Consumer, End-User, or another category which you can define yourself.
Background
When the API Gateway receives an incoming request, it created an exchange that governs everything that happens with the request while the Gateway is processing it. Authentication policies put an Identity Principal in the exchange. Typically, in a standard configuration, there can be 0, 1, or 2 Identity Principals in the exchange.
The incoming message includes the Identity Principal object, which includes authentication and authorization information. The two most common Identity Principal objects are:
- Consumer: Represents the consuming application.
- End User: Represents the user of the consuming application.
Those two things are represented in the Subject of the Identity Principal object.
By default, the Identity Principals are mapped one to one. However, in some cases, it might be a little more complex. For example, let's say the outbound request has a custom subject of AcmeID. In this case, you might need to set up the Manage Outbound Identities configuration to use the Consumer identity to populate the AcmeID.
Use Cases
Some implementation scenarios:
- Perhaps the inbound Identity is really a service identity, but you're using HTTP Basic Auth for authentication. The default HTTP Basic Auth policy identifies an end user, so you might decide that you want to take the end-user credentials from the Consumer subject and use those for the End User object.
- Perhaps inbound requests to the service are not going to have any security policies, and there will be no credentials. In this case, you'll need to make sure that whenever you invoke a downstream service, you have an identity you can use. You might configure your service to use a specific consumer identity in the local domain store. In this case, the identity is static, and you specify the username and password in the implementation setup.
- If the API uses orchestration, you might want to do different things with Identities for different outbound invokes. You might specify default identity mapping at the implementation level, but you can also override it in the orchestration, at the point at which you invoke a physical service. Each Invoke operation offers the same UI so that you can manage the implementation identity settings and can map app identities differently for each invoke.
If you need to manipulate the subjects and the principals that are present in the exchange, you can do that through scripting. For example, you can have a script in the process that adds your own static security principals to the request; or you could switch the subject of the consumer principal to be end user.
The most common use case is invoking a downstream service that requires an AppID specified as an HTTP Basic Auth token. In this scenario, you can add the username and password as an identity to the local domain, and then you can reference that identity as the Consumer subject, as a static identity in the outbound configuration.
How do I manage my implementation identity settings?
On the Manage Outbound Identities page, you can manage identity settings for your implementation. You can:
- Choose to use incoming identities as outbound identities (the default) or map outbound identities.
- Add one or more outbound identities.
- Choose to use the service identity for outbound HTTPS. This option configures the identity to be used when communicating over the next hop.
To manage implementation identity settings
- Log in to the Akana API Platform and go to the overview page for your API.
- From the left menu bar, choose Implementations.
- Click the implementation.
- From the left menu bar, choose Identities.
- On the Identities page, click Edit.
- On the Manage Outbound Identities page, choose one of these options:
- Use Incoming Identities as Outbound Identities: the default. You can change this setting by choosing Specify Outbound Identities.
- Specify Outbound Identities: when you click this button, additional fields become available. Any existing identities are displayed, and you can also add a new one. See To add a new identity for an implementation below.
- Use Service Identity for Outbound HTTPS: Check the box if you want to use the service identity for outbound secure messages to the API.
- When done, click Save.
To add a new identity for an implementation
- Go to the Manage Outbound Identities page for your implementation (see To manage implementation identity settings above).
- Click Specify Outbound Identities.
- Click Add. The Edit Outbound Identity page appears, as shown below.
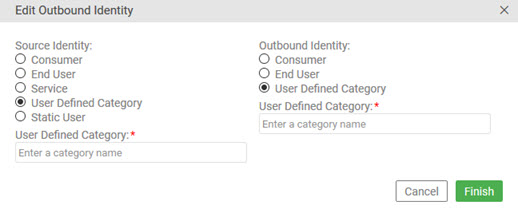
- Specify options for the source identity, as needed:
- If you choose User-Defined Category, you'll need to specify the category. Type it exactly, including capitalization.
- If you choose Static User, you'll need to specify the domain and the credentials (username/password).
- Specify options for the outbound identity, as needed:
- If you choose User-Defined Category, you'll need to specify the category. Type it exactly, including capitalization.
- Click Finish. The new identity is displayed in the Manage Outbound Identities page.
- Click Save. The changes are saved, and the Identities summary on the Implementation Details page is updated based on your changes.
Managing Policies for an API Implementation:
What types of policies are available for my API?
The platform allows you to secure and monitor your APIs with policies. A selection of policies is available to apply different rules to your API.
There are three main policy categories:
- Simple Header Security—Used to identify (authenticate) the application that is attempting to consume an API to determine if it is authorized or not. This policy type supports multiple mechanisms for the app to present its identity, including plain text App Id, signed header with X.509 or a shared secret, or OAuth (1.0a or 2.0).
- Analytics—Collects transaction details including recorded messages for every transaction.
- OAuth—Provides support for applications performing authentication and authorization using OAuth.
For details, see below.
Note: For general information about all policies, see About Policies (Policy Manager help).
How do I assign policies to my API implementation?
You can assign policies:
- To the entire implementation. See To assign a policy to an API implementation (all operations).
- To an individual operation (valid in version 2020.2.0 and later). See To assign a policy to a specific operation in an API implementation below.
Note: Although the Community Manager developer portal allows attaching a policy at the operation level, the Concurrency Quota policy (see Using the Concurrency Quota policy) works correctly only when attached to a service, not to an individual operation.
To assign a policy to an API implementation (all operations)
- Log in to the Akana API Platform and go to the overview page for your API.
- From the left menu bar, choose Implementations.
- Click the implementation you want to edit. The Details page for the implementation is displayed.
- From the left menu bar, click Policies.
- On the Policies page, in the top section, click Edit.
- On the Edit Policies page, in the Available Policies section, choose the policy that you want to add and click Attach.
- Click Save.
To assign a policy to a specific operation in an API implementation
Note: You can add policies that have not been added at the implementation level. You cannot remove policies at the operation level if they have been added at the implementation level.
- Log in to the Akana API Platform and go to the overview page for your API.
- From the left menu bar, choose Implementations.
- Click the implementation you want to edit. The Details page for the implementation is displayed.
- From the left menu bar, click Policies.
- On the Policies page, in the Operations section, find the operation that you want to attach the policy to.
- In the Operations section, click Edit Policies. An example is shown below.

- On the Edit Policies page, in the Available Policies section, choose the policy that you want to add and click Attach.
- Click Save.
What security and monitoring policies are supported?
Video content: Learn how to use Akana to apply API security by protecting API integrity with authentication and authorization.
The platform offers the preconfigured policies listed below.
- AtmosphereApplicationSecurityPolicy
- This is a default security policy for Enterprise API Platform applications. It provides support for SHA1 (Shared Secret), allowing the API to authenticate the app.
- For full documentation about this type of policy, refer to: Using the API Consumer Application Security Policy (Akana docs site).
- Policy Category: Simple Header Security
- BasicAuditing
- Provides basic auditing of messages. Message metrics are recorded in the Usage Logs Analytics tab. The messages themselves are not audited. For message auditing, use the DetailedAuditing policy.
- For full documentation about this type of policy, refer to: Using the Basic Auditing Policy (Akana docs site).
- Policy Category: Monitoring
- CORSAllowAll
- CORS (cross-origin resource sharing) enables users to access resources from within the browser serving a web page, and defines a way in which the browser and the server can interact to determine whether or not to allow the cross-origin request.
- The CORSAllowAll policy allows all cross-origin requests.
- If you're using the platform as a proxy, you can add the CORSAllowAll policy to allow cross-origin requests to the proxy service.
- For full documentation about this type of policy, refer to: Using the CORS policy (Akana docs site).
- DetailedAuditing
- Provides detailed auditing of messages. Message metrics are recorded in the Usage Logs Analytics tab as well as the entire message for each exchange.
- For full documentation about this type of policy, refer to: Using the Detailed Auditing Policy (Akana docs site).
- Policy Category: Monitoring
- OAuthSecurity
- The OAuthSecurity Policy uses the OAuth configuration assigned to an API when enforcing OAuth tokens in the received request.
- Note: If you're applying this policy, remember to also specify OAuth details for the API. On the API Details page, from the drop-down on the right, click OAuth Details. For information about the API OAuth Details settings, see How do I configure OAuth Details for my API?
- For full documentation about this type of policy, refer to Using the OAuth Security Policy (Akana docs site).
- Policy Category: OAuth
For more information about policies, see Policy List.
Note: In some cases, such as an on-premise installation, the Site Admin has the ability to create and manage additional policies. In this scenario:
- If you require a policy that isn't on the default list, ask the Site Admin.
- If you see policies on the list that are not explained above, ask the Site Admin for information.
Which policies should I choose?
Your selection of one or more policies for a specific API will be determined by the level of security required, whether monitoring is required, whether the API supports OAuth, and other factors.
If the API doesn't allow anonymous requests, you'll need to have the AtmosphereApplicationSecurityPolicy in place so that the API can authenticate app requests.
If the API allows anonymous requests, do not specify any policies.
Note: We don't recommend accepting anonymous requests. At minimum, particularly for a Live implementation, it's best to include at least the AtmosphereApplicationSecurityPolicy.
If you want to have monitoring for your API, choose one of the monitoring policies also.
If you want your API to support OAuth, enable the OAuthSecurity policy.
If you want your API to support the JOSE standard—for example, to conform to the UK Open Banking standard—attach the JOSE Security Policy v2; see Using the JOSE Security Policy v2 (Unencoded Payload Support). If the policy is configured for JSON serialization, you must make sure that the operations in your API support a content-type of application/jose+json.
Note: Only attach one auditing policy to an API; for example, Basic Auditing policy or Detailed Auditing policy, but not both.
For more information about policies, see Policy List.
How can I see details about a policy?
When you're adding policies to your implementation, you just see the policy title, not the details about how the policy is configured.
If you want to know more, you can click the title of the policy. Policy details are displayed in a pop-up window. This information is view-only; if you want any changes to the available policies, check with the Business Admin.
You can also review a brief description of the policy and click through for more details about each type of policy (see What security and monitoring policies are supported? above).
To view details for a policy
- Log in to the Akana API Platform and go to the overview page for your API.
- From the left menu bar, choose Implementations.
- Click the link for the implementation. The Details page for the implementation is displayed.
- From the left menu bar, click Policies.
- On the Policies page, click Edit. In the Edit Policies page, find the policy you want to view, and click the policy title.
What is the minimum policy requirement for my API?
There is no minimum policy requirement for an API. However, it's best to at minimum select the AtmosphereApplicationSecurityPolicy, which gives you basic security.
If you want to see charts and logs, you must also select a monitoring policy.
How do I see which policies are assigned to my API implementation?
When you assign policies to an API implementation, they're displayed in the summary view for the implementation, on the Implementation > Policies page.
To see which policies are assigned to an API implementation
- Log in to the Akana API Platform and go to the overview page for your API.
- From the left menu bar, choose Implementations.
- Click the implementation.
- From the left menu bar, choose Policies.
- Implementation level: On the Policies page, in the top section, view policies assigned to the implementation.
- Operation level: In the Operations section, find the operation and then, to the right, click the ellipsis menu (three dots) to view policies assigned to the operation.
How do I set up my API to support CORS?
If you want your API to support cross-origin resource sharing (CORS), you can do that in your API implementation in the platform.
In your API setup, choose the implementation and then, on the Implementation > Policies page, add the CorsAllowAll policy.
When the API definition includes this policy, the proxy endpoint will accept request messages that come from a different domain, in the context of a browser.
Managing Processes for an API Implementation:
How do I manage orchestration for my implementation?
If your API implementation is more complex, and might include one or more services, processes, or additional steps, choose an implementation pattern of Orchestration. Then, you'll be able to use all the features of the built-in Process Editor to fine-tune the orchestration of your API.
To access and use the Process Editor, follow the procedure below. If you need more details about the specific activities available and how you can configure them, refer to the full standalone Process Editor documentation (links below).
For a tutorial video showing an example of using the Process Editor, see Add an API using orchestration (external link).
To access the Process Editor to manage orchestration for your implementation
- Log in to the Akana API Platform and go to the overview page for your API.
- From the left menu bar, choose Implementations.
- Click the link for the implementation. The Details page for the implementation is displayed.
- From the left menu bar, click Processes.
Note: In versions prior to 2020.2.1, this left menu option was called Resources.
- On the Processes page, find the resource that you want to manage the process for.
- In the right column, click Edit Process. The Process Editor opens.
- Edit the process for the resource, and then click Save. For more information, see How do I use the Process Editor?
Managing Dependencies for an API Implementation:
How can I see implementation dependencies?
The Community Manager developer portal includes a dependencies tool—a graphical interface that you can use to more clearly understand the hierarchy of elements in the implementation. These elements can include the actual web service application (physical service) and one or more virtual services.
By viewing and manipulating the elements in the visual representation, you can get a high-level, or very detailed, view of the upstream and downstream dependencies of the implementation.
This is particularly useful in an orchestration scenario where there might be more complex factors at play, not just a one-to-one virtual service to physical service scenario.
To view the dependencies for an implementation
- Log in to the Akana API Platform.
- Choose the API.
- From the left menu bar, click Implementations.
- Click the implementation you want to work with.
- In the left menu bar, click Dependencies. The dependency map is displayed. An example is shown below.

How do I use the implementation dependencies tool?
You can manipulate the elements in the implementation dependencies tool to get a better understanding of your API implementation.
This is particularly useful if your API includes orchestration; the visual representation can help you to understand the dependencies in an aggregate sense, rather than having to open up each operation and view the orchestration process that has been implemented for each.
In the implementation dependencies tool, you can:
- Drag nodes to change the visual display.
- Zoom in and out using the mouse scroll bar.
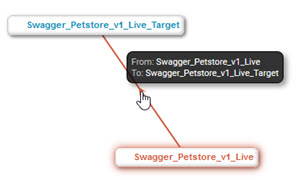
- Hover over a node to view details about the resource, as shown below (Name, Description).
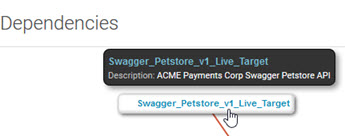
- Hover over the connection between nodes to view details about the relationship between resources, as shown below.