Adding an API
Add an API on the Akana API Platform.
Table of Contents
- Add API: Overview
- Add API: Process Flow
- How do I add an API?
- What information do I need to add an API from scratch?
- What is the process flow to add an API by designing from scratch?
- How do I add an API by designing from scratch?
- What types of API description document can I use to define my API?
- What is the process flow to add an API using an API description document?
- How do I add an API using an API description document?
- What is the process flow to add an API from an existing service?
- How do I add an API from an existing service?
- Can I upload my API description in a ZIP file?
- What information should I specify in the Advanced Options?
- What is the API pattern and which pattern should I choose?
- How do I know the implementation pattern for an API that's already set up?
- How do I specify the implementation/deployment zones when I'm creating an API?
- How do I add an implementation for an API?
- How do I add a SOAP-based API?
- How do I edit an API?
- How do I edit a SOAP-based API?
- How do I delete an API?
- How do I add an API version?
- How do I edit an API version?
- Should I allow anonymous access?
- Should I require approval for API access requests?
- Why would I use the platform to proxy my API?
- Does the platform support overloaded operations?
- How can I control the search results entry for my API?
- How can I validate the Swagger or OAS 3.0 file I upload when adding an API?
Import/Export:
- How do I export an API?
- What are the contents of the API export file?
- How do I import an API from an export file?
Add API: Overview
The Akana API Platform leads you through a simple, streamlined process for adding an API. It goes like this:
For information about how to complete each of these steps, refer to:
- Design: Add or Modify an API Using API Designer
- Implement: Manage API Implementations
- Test: API Testing with Test Client
If you want to create your API by importing an API description document such as a Swagger document, the process is even more streamlined:
To get started, see How do I add an API?
Add API: Process Flow
The process flow is a little different depending on how you add the API. For more information and process flow diagrams, choose the applicable link below:
- What is the process flow to add an API by designing from scratch?
- What is the process flow to add an API using an API description document?
- What is the process flow to add an API from an existing service?
How do I add an API?
To add a complete API definition on the platform, you'll need to provide information about the API: either manually, by uploading an API description document, or by referencing an API already set up in the underlying infrastructure (API Gateway).
To get started immediately, you can simply name your API and save. You can go back and add more information later.
To get started adding an API (minimum steps)
- Log in to the Akana API Platform.
- Go to APIs > Add API.
- Optional: click the advanced options icon on the right, and choose a different implementation pattern. Proxy is the default, but you can also choose Orchestration or Physical Service. See What is the API pattern and which pattern should I choose?
- Specify a name for the API, and click Save.
You can add the rest of the information later.
Probably, you'll want to be prepared with information about your API, so that you can set up all the information the platform needs, and you can then test. You have three choices:
- Design a REST API from scratch: manually provide all the information about the API, including operations, parameters, headers, and so forth. See How do I add an API by designing from scratch?
- Provide an API description document. The platform reads in the information, and you can then review (if you want to) and save. See How do I add an API using an API description document? For supported formats, see What types of API description document can I use to define my API?
- Create an API from an existing service: reference the existing service. The platform reads the information and creates the API, and you can then review (if you want to) and save. See How do I add an API from an existing service?
Important: To add an API using an API description document hosted on an external URL, specify external URLs by adding them to the allowed host and uploading a trusted CA certificate file to the trust store. For more information, see Prevent forward proxying.
Note: In some cases, if an extension is in place, additional fields might appear in the bottom section of the Add API page. If so, these additional fields collect information about your API. Fields might be required or optional and might be of various types such as text-based or numeric, multiple selection, or dates. If you have questions about any of these fields, check the in-page tooltip (question mark to the right of the field) for help.
What information do I need to add an API from scratch?
You can create an API with just the name, then save it and add the rest later.
To complete the task, if you're adding a REST API from scratch, you'll need to be ready with the exact information for the API definition.
Make sure you have the exact spelling/wording, where applicable.
The specific information you'll need depends on your specific API, its definition and its level of complexity.
Ideal:
To provide full details of your API, that will enable your users to take full advantage of the rich features of Test Client and ensure your API's generated documentation is really complete and useful, you'll need to provide exact details of the following:
- Operation definitions, including HTTP verb and URL
- Parameters
- Request headers
- Request and response media types
- Responses, including HTTP code and description
- Model object definitions that are sent in the request and response
You can also specify additional information about your API in the Advanced Options section on the right. See What information should I specify in the Advanced Options?
Bare minimum:
If you don't provide all of the above, your users will be missing out on the features of Test Client and the generated documentation. However, your API will still work as long as you provide the following:
- URL path
- HTTP verb
- Request media types
- Response media types
If you start defining your API and find you don't have all the information to hand, don't worry. You can save your work and come back to it later.
What is the process flow to add an API by designing from scratch?
Video content: Learn how to use Akana to easily create an API from scratch or from a file import (OAS3/Swagger/RAML/WSDL/WADL/GraphQL).
When you choose to add an API, and you don't have an API description document, you can define your API from scratch using the API Designer.
To fully design the API, you'll need to have your API documentation or other source of information handy so that you define the API accurately.
In API Designer, you can add operations, parameters, and media types, model objects, and any other information that's part of your API definition. For details, see Add or Modify an API Using API Designer.
Once that's done, you can create one or more implementations, add policy assignments, verify the access points, and test. The process flow is shown below.
How do I add an API by designing from scratch?
Video content: Learn how to use Akana to easily create an API from scratch or from a file import (OAS3/Swagger/RAML/WSDL/WADL/GraphQL).
To add an API from scratch, it's best to first gather the information about the API definition. See What information do I need to add an API from scratch? above. You can save the API definition at any point, and come back to it later.
To add an API by designing from scratch
- Log in to the Akana API Platform.
- Go to APIs > Add API. The Add API page opens.
- Click the I want to design my API from scratch (REST only) button.
- Provide a name for the API, and the endpoint if you have it already.
- Optional: click the Advanced Options slider button (blue dot) and specify additional settings. See What information should I specify in the Advanced Options?
- Click Save. The platform saves the data and takes you to the API Designer for adding details about your API, including:
- Adding resources: see How do I add a resource in API Designer?
- Adding parameters for operations: see How do I add or edit a parameter for an API operation?
- Adding responses for operations: see How do I define my API response?
- Specifying media types: see How do I set up media types in API Designer?
- Adding model object definitions: see How do I assign a model object to a resource in API Designer?
- When done, remember to click Save on the API Designer window, to save your API design.
Note: In some cases, if an extension is in place, additional fields might appear in the bottom section of the Add API page. If so, these additional fields collect information about your API. Fields might be required or optional and might be of various types such as text-based or numeric, multiple selection, or dates. If you have questions about any of these fields, check the in-page tooltip (question mark to the right of the field) for help.
For more information about API Designer, see Add or Modify an API Using API Designer.
When your API design is complete, remember to test your API, using Test Client, to make sure it's working properly. See API Testing with Test Client.
If you need to change something later, you can edit the API definition as needed.
What types of API description document can I use to define my API?
For details about the API description document formats and versions supported, go to the System Requirements doc, API description document formats section.
For more information, see API Description Language Support.
What is the process flow to add an API using an API description document?
When you choose to add a new API, you can then define your API by providing an API description document. The platform pulls all the information from the API description document and creates the API design and a Live implementation. You just need to add another implementation if needed, add or modify policy assignments, verify the access points, and test, as shown below.
How do I add an API using an API description document?
To add an API using an API description document, first get the document, or make sure you know its location:
- URL: an individual API description document. Make sure you have the full URL, with authentication credentials if needed.
- File: an individual API description document file or a ZIP archive file containing one or more API description documents. Make sure the file is accessible on the local filesystem.
Follow the steps below.
To add an API using an API description document
- Log in to the Akana API Platform.
- Go to APIs > Add API. The Add API page opens.
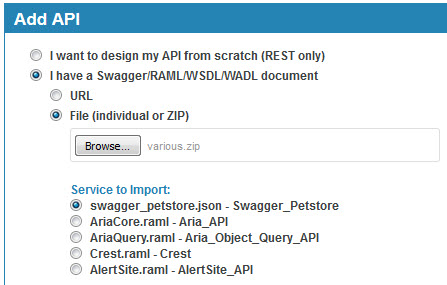
- Choose Add a new API, and then click the I have an OAS3/Swagger/RAML/WSDL/WADL/GraphQL document button. There are two ways you can provide the API definition:
- URL: Provide the full URL, including protocol. If the URL requires authentication, provide your username and password (for Authentication Options, the default is Anonymous).
Note: Depending on the platform settings, you might not be able to upload from a URL that isn't trusted. If you see an error message or a 403 Forbidden response, contact the Site Admin, who can add the URL to the trusted list. See Limit forward proxy feature to allow only these hosts (Site Admin help).
- File: Browse to the location of the file and upload. If the file includes multiple services, you'll be shown a list of options for the service to import; choose the one you want.
- URL: Provide the full URL, including protocol. If the URL requires authentication, provide your username and password (for Authentication Options, the default is Anonymous).
- Click Save. The API is created, and the API's Details page is displayed.
Note: In some cases, if an extension is in place, additional fields might appear in the bottom section of the Add API page. If so, these additional fields collect information about your API. Fields might be required or optional and might be of various types such as text-based or numeric, multiple selection, or dates. If you have questions about any of these fields, check the in-page tooltip (question mark to the right of the field) for help.
When you create an API from an API description document, the platform automatically creates a Live implementation. You'll need to review the implementation and, probably, add policies. Optionally, you can also add a Sandbox implementation. For information about implementations, see Manage API Implementations.
When you're done, remember to test your API, using Test Client, to make sure it's working properly. See API Testing with Test Client.
What is the process flow to add an API from an existing service?
When you specify an existing service, the platform pulls all the information already set up in the underlying infrastructure (API Gateway). You just need to add another implementation if needed, add or modify policy assignments, verify the access points, and test, as shown below.
How do I add an API from an existing service?
If you already have an API that's set up as a service in the API Gateway, or you want to create the service using the flexible service definition model offered by the API Gateway, you can use the Publish an existing service as an API option to add the API to the platform.
The platform references the information already set up in the API Gateway so you don't have to set up all the API details again.
You might choose this option if your service matches any of the following descriptions:
- A virtual service that is an aggregate of different target services.
- A virtual service that is implemented using an orchestration engine.
- Any service that supports multiple interfaces and bindings.
To add an API from an existing API Gateway service
- Log in to the Akana API Platform.
- Go to APIs > Add API. The Add API page opens.
- Choose Publish an existing service as an API and click Add. A wizard opens and displays at the first page, Details.
Note: If this option is not available, ask your Site Admin. Availability of this option is controlled by site settings. See Publish an existing service as an API.
- Specify basic API details: Name, Description, Visibility, Version ID, and Version Description.
- Check the box to indicate whether the API uses licenses.
For more information about setting up an API to use licenses, see How do I determine what licenses will be available for my API? For general information about the Licenses feature, see Licenses: Feature Overview.
- Optional: set up an avatar for your API. Click Upload and navigate to the avatar image file.
- Click Next to go to the Target API page.
- Set up the following values for at least one environment in which the API is running:
- Service Key. Enter the environment name, unique service key, or URL. The platform locates the API Gateway service, and you can then select it. To locate the appropriate value, go to the API Gateway, open up the service, and click Edit. Copy the value and paste it into this field.
- Allow anonymous access (yes/no)
- Approval required (yes/no)
- Click Finish.
Note: In some cases, if an extension is in place, additional fields might appear in the bottom section of the Add API page. If so, these additional fields collect information about your API. Fields might be required or optional and might be of various types such as text-based or numeric, multiple selection, or dates. If you have questions about any of these fields, check the in-page tooltip (question mark to the right of the field) for help.
Can I upload my API description in a ZIP file?
Yes. The file you upload can be an individual file or a ZIP file. However, you can only upload a ZIP file that's on your local filesystem, not via a URL.
If it is a ZIP file, it might include multiple services in one format; for example, several Swagger 2.0 documents. It might include a mix of Swagger versions, or a mix of different types of API description documents; for example, WADL and RAML or Swagger 2.0 and WSDL. If the file includes descriptions of more than one service, the platform displays a list of services so that you can choose the service to import for your API definition, as shown below.
What information should I specify in the Advanced Options?
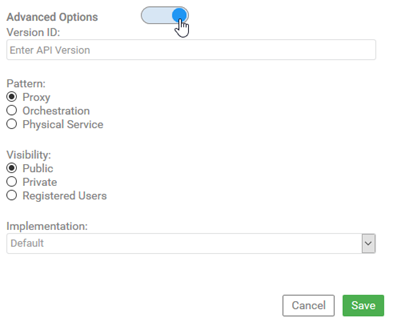
When you're adding an API, the basic information that you need to specify is covered by the fields on the left side of the page.
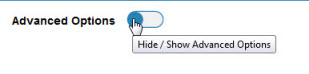
There are additional values that you usually won't need to change, that you can specify on the right side of the page. These options are not visible unless you click the Advanced Options slider button (blue dot), as shown below.
If you need to edit the API properties, you can access the same properties on the Edit API page, right side. To get there: from the API Details page, at the top right, click Edit.
API Advanced Options
- Version ID
- You can specify a custom value for the API Version ID. If you don't specify a value, and you don't upload an API description document that specifies the version, the Version ID defaults to:
- In versions prior to 2019.1.12: v1 or 0.0.0
- In version 2019.1.12 or later: 1
- Pattern
- There are three choices, Proxy, Orchestration, or Physical Service. For details, see What is the API pattern and which pattern should I choose? below. Default: Proxy.
- Visibility (2020.1.0 and later)
- You can specify the API visibility (Public, Private, or Registered Users, unless limited by the Site Admin in API Settings) when creating the API. For information on the values, see What are the API visibility settings? Default (unless limited by the Site Admin): Public.
- Implementation
- Click the drop-down to choose Live or Sandbox. If you don't specify a value in this field it defaults to creating a Live implementation, and assigns all available deployment zones.
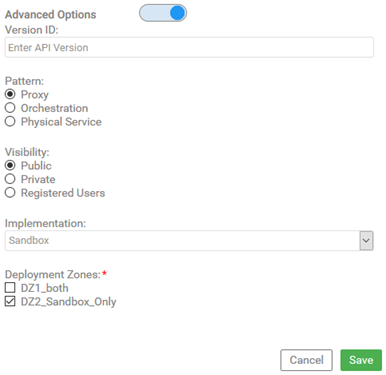
- Deployment Zones
- If you choose a value other than Default in the Implementation field, you'll see a list of all available deployment zones for the implementation. An example is shown below. Check the box for deployment zones you want to deploy the API to.
-
What is the API pattern and which pattern should I choose?
When you're adding an API, if you click the Advanced Options button, you'll see additional options, including a field where you can determine the implementation pattern for the API. See illustrations in What information should I specify in the Advanced Options? above.
There are three choices, Proxy, Orchestration, or Physical Service.
- For a simple API that just references one endpoint, leave at the default, Proxy.
In a proxy scenario, the API Implementation has a 1:1 relationship with a corresponding back-end Physical Service/API. The back-end Physical Service/API shares the same design as the API itself. A common use case is a scenario where you might want the platform to manage an existing API. In this scenario, you create a proxy and specify the existing API endpoint. The platform creates an API Implementation, automatically registers the appropriate back-end Physical Service/API, and creates default processes that tie each operation of the API Implementation to the appropriate back-end operation. The platform then provides a new (proxied) API endpoint that you can use and share for API access.
- For a more complex API implementation, that might include one or more services, processes, or additional steps, choose Orchestration.
In an orchestration scenario, you design the API and then manually build a mashup or orchestration for each operation of each implementation. You are free to call any number of other back-end Services/APIs in the orchestration. Unlike a proxy, where the platform automatically registers a back-end Physical Service/API and generates a default process for every operation, the orchestration simply creates an empty process. You can then edit each operation in turn and decide what kind of process you want and which back-end Services/APIs you want to invoke.
An orchestration creates a service that is implemented with a process, rather than being simply a proxy of another service. If the API has an implementation pattern of Orchestration, you can access the Process Editor to manage the process for a specific operation by clicking through for that specific operation, at the bottom of the page for the specific implementation. This feature offers many additional capabilities for orchestrating processes relating to the API. For more information, see How do I manage orchestration for my implementation?
For a tutorial video on orchestration, see Add an API using orchestration (external link).
- If you want to set up an external API so that you can reference it in a script or process for an API that uses orchestration, or you're adding an API that already exists as a physical service in the underlying infrastructure, Policy Manager, choose Physical Service. For information about adding an API as a physical service, see Working with Physical Services.
Note: Once you've chosen an implementation pattern and created the API, you can't change the pattern. If you need a different implementation pattern, you'll need to delete the API and then create it with the correct implementation pattern.
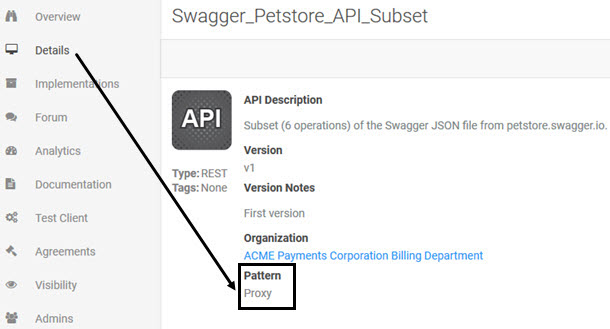
How do I know the implementation pattern for an API that's already set up?
Once you've chosen the implementation pattern (see What is the API pattern and which pattern should I choose? above) and created the API, that field is no longer available. You can't go back and change or review the implementation pattern.
If you're not sure of the implementation pattern for a specific API, you can check it on the API's Details page. An example is shown below.
How do I specify the implementation/deployment zones when I'm creating an API?
When you add an API, default values are assigned, unless you specify values in the Advanced Options. For information on the defaults and the options, see API Advanced Options.
In some cases, you might want to specify the implementation/deployment zones. For example, you might want to:
- Start with a Sandbox implementation, and release the API in a Live implementation later.
- Choose on or more specific deployment zones that the API will be deployed to.
You can specify these additional values in the Advanced Options when you're adding the API. Follow the steps below.
To specify implementation/deployment zones when creating an API
- In the Add API page, click the Advanced Options swipe button (blue dot), and then specify the implementation, as shown below.
- When you choose the implementation, the available deployment zones are displayed. For an illustration, see Deployment Zones. Choose one or more available deployment zones for the implementation, and then click Save.
For information about adding and managing API implementations, see Manage API Implementations.
How do I add an implementation for an API?
Your API implementation defines where the API is deployed.
When you create an API from an API description document, the platform automatically creates a Live implementation. Optionally, you can add a second implementation for Sandbox. You can also modify the implementation.
For information about adding and managing API implementations, see Manage API Implementations.
How do I add a SOAP-based API?
If your API is SOAP-based, make sure you have the WSDL available; either a WSDL URL or an individual file or ZIP file.
Then, create your API following the procedure in How do I add an API using an API description document? above.
When you add an API based on a WSDL file, the summary of description languages displayed in the Implementations section at the bottom of the API Details page and the API Design page lists only WSDL, as shown below (Hermosa theme); you cannot view the API description in other API description languages such as Swagger and RAML, as you can for REST-based APIs.
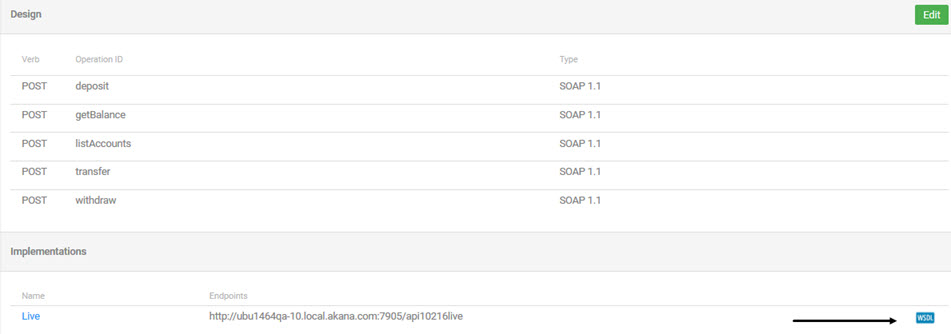
In addition, you cannot edit the API design specifically. Instead, you'll need to upload a new WSDL file. See How do I edit a SOAP-based API? below.
For general information on the platform's support of API description languages, see API Description Language Support.
How do I edit an API?
Once you've added an API, you might need to modify one or more aspects of the API, including:
- Basic data about the API such as description, information about API versions, and the privacy setting for the API: see To edit basic data about an API or API version below.
- Design information: see Add or Modify an API using API Designer.
- Implementation information: see Manage API Implementations.
- Properties (may or may not be present depending on Community Manager developer portal configuration): see To edit properties for an API or API version below.
To edit basic data about an API or API version
- Log in to the Akana API Platform and go to the overview page for your API.
- From the left menu bar, choose Details. The summary of the API design is displayed on the Details page.
- In the top section, click Edit.
- Optional: on the left, modify any of these fields:
- API name: A short and clear name to distinguish your API.
- Summary: A short, plain-text field for a very brief summary of the API description.
- API Description: A concise description of the API that will attract users. Supports Markdown.
Note: The values you provide for Summary and Description are used to construct search results. For more information, see How can I control the search results entry for my API? below.
- Optional: on the right:
- Change the parent organization by providing the new value in the Parent Organization Name field. Start typing the new organization name in the field. After the first three characters, the platform displays a list of matching organizations for you to choose from. For more information about organizations on the platform, see Organizations.
Note: this field is only available if you're working in the context of a specific platform organization.
- Click the Advanced Options slider button (blue dot) and modify additional values as needed. For information about these fields, see What information should I specify in the Advanced Options?
- Change the parent organization by providing the new value in the Parent Organization Name field. Start typing the new organization name in the field. After the first three characters, the platform displays a list of matching organizations for you to choose from. For more information about organizations on the platform, see Organizations.
- Click Save.
To edit properties for an API or API version
Note: Properties may or may not be present, depending on the configuration of the Community Manager developer portal.
- Log in to the Akana API Platform and go to the overview page for your API.
- From the left menu bar, choose Details. The summary of the API design is displayed on the Details page.
- In the Properties section, click Edit.
- Edit the properties as needed. For help, refer to field-level help if needed. If you need additional assistance, contact the Site Admin.
- Click Finish.
How do I edit a SOAP-based API?
You can edit basic data about a SOAP-based API, such as name and description, in the same way as any other API; see To edit basic data about an API or API version.
To edit the design of a SOAP-based API, you can't use the API Designer as you can with a REST-based API. However, you can update a SOAP API by uploading a revised WSDL file. Follow the steps below.
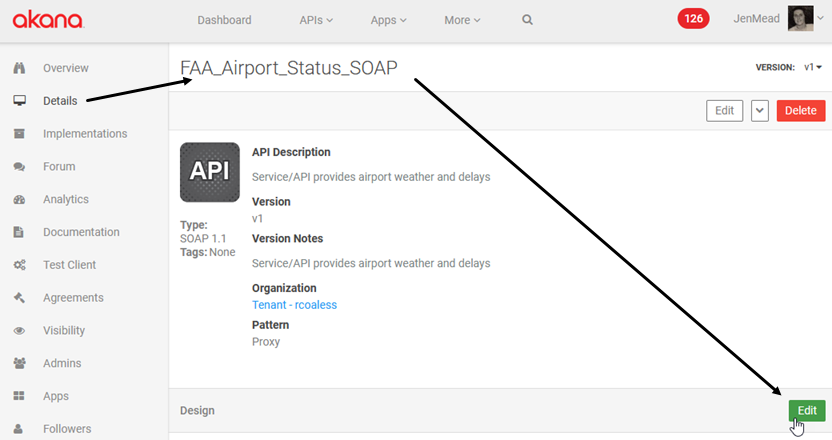
To update design information about a SOAP-based API or API version
- Log in to the Akana API Platform and go to the overview page for your API.
- From the left menu bar, choose Details. The summary of the API design is displayed on the Details page.
- In the Design section, click Edit, as shown below, to access the Import OAS3/Swagger/RAML/WSDL/WADL/GraphQL Document page.
- Specify the URL for the WSDL file, providing credentials if needed; or choose File and upload an individual file or ZIP file.
- Click Save. The API is updated.
How do I delete an API?
When you delete an API that has only one version, the API is deleted.
To delete an API
- Log in to the Akana API Platform and go to the overview page for your API.
- From the left menu bar, choose Details.
- At the top right, click Delete.
- At the confirmation prompt, click OK. The API is deleted.
Note: If the API has more than one version, the API is not deleted until the last version is deleted.
How do I add an API version?
You can have multiple versions for an API. One common use case is that the new version is being tested while the earlier version is servicing current traffic.
When you add the API initially, the first version is created automatically.
Note: When you add a new version, in most cases you can choose a different implementation pattern. For example, if your first version is Proxy, and you add a new version, you can choose an implementation pattern of Orchestration. The only exception is an API added as a Physical Service; in this case, you can't change the pattern. For more information, see What is the API pattern and which pattern should I choose?
To add an API version
- Log in to the Akana API Platform and go to the overview page for your API.
- From the left menu bar, choose Details. The summary of the API design is displayed on the Details page.
- From the drop-down menu at the top right, choose Add Version. The Add API Version page appears.
- Enter the version name.
- Choose how you want to create the new version:
- Clone current version: Makes a copy of the current version. You can then go in and modify as needed.
- I want to design this API version from scratch (REST only): allows you to design the API version from scratch.
- I have an OAS3/Swagger/RAML/WSDL/WADL/GraphQL document: If you choose this option, you can import an API description document for the API version.
- If you want to specify custom API properties, click the Advanced Options swipe button (blue dot), as shown below. For details about the options, see What information should I specify in the Advanced Options?
- Click Save.
Note: In some cases, if an extension is in place, additional fields might appear in the bottom section of the Add API Version page. If so, these additional fields collect information about your API version. Fields might be required or optional and might be of various types such as text-based or numeric, multiple selection, or dates. If you have questions about any of these fields, check the in-page tooltip (question mark to the right of the field) for help.
How do I edit an API version?
To edit API version information, follow the steps covered in To edit basic data about an API or API version. Version information is in the Advanced options on the right; see Step 5 in the procedure.
To edit the design information for the API version, such as operations and model objects, see Add or Modify an API using API Designer. Modifying an API version is essentially the same as modifying an API.
Should I allow anonymous access?
The Allow Anonymous Access option lets you enable or disable anonymous access to Sandbox and Live endpoints.
Allowing anonymous access to an API endpoint in a Sandbox implementation is useful if you want to offer a preview of an API to developers without requiring users to create an app or sign up to the platform. For example, if you have a specific feature set that you want to expose as part of promoting your API, you can expose those operations in your API configuration, and enable the Allow Anonymous Access option.
With anonymous access, developers can review your API documentation and try out the API without signing up and requesting access. If a developer tries out the API and likes it, he/she can then sign up, create an app on the platform, and request API access.
Your decision will depend on many factors including the nature of your app and your target audience.
We strongly recommend that you do not allow anonymous access to a Live implementation for security reasons. However, allowing anonymous access to a Sandbox implementation means that app developers can easily try out your API without having to set up an app on the platform.
Note that with anonymous access, viewing of metrics such as charts and logs is not supported.
To change this setting on an API, see To edit an API implementation (Step 4).
Should I require approval for API access requests?
Requiring approval for API access requests introduces a delay for app developers, but gives you the chance for manual intervention and gives you greater control.
One approach is to allow anonymous access, with no approval required, for a Sandbox implementation, but to require approval for access to a Live implementation.
In some cases, you might decide that even though you are allowing anonymous access to a Sandbox implementation, you'll still require approval for an API access contract. If the API allows anonymous access, app developers can access it without connecting the app to the API; however, unless there is a connection contract, the API doesn't show up in the app's Test Client for testing. For this reason, app developers might prefer not to take advantage of the anonymous access, but to request a contract instead, so that your API is available for selection in Test Client.
Even in this scenario, you might choose to allow anonymous access to the Sandbox implementation, not require approval for contracts in the Sandbox implementation, but require approval for contracts in the Live implementation. App developers could then request a contract in the Sandbox environment and would get immediate access to your API.
Note: If a security policy is applied to an anonymous API then it ceases to be anonymous irrespective of whether the API settings allow for anonymous access.
Why would I use the platform to proxy my API?
When you set up your API on the platform, using the platform as a proxy, your API is the Target API and the platform is the Proxy API. This allows you to configure an endpoint in a particular environment (for example, internal or external network) that is accessible by your target applications.
A proxy API endpoint exists in the Cloud and is similar to a virtual service. Users access the proxy that runs in the Cloud, rather than accessing the API endpoint directly. Traffic is channeled via the proxy to your target API. This is more secure for your API. You can also use a vanity hostname, to make things easier for your users.
Advantages:
Internal / External Networks—If you want to access your real API on an internal network, but want to expose specific functionality on an external network, you can add the API Target URL using the Add a New API function, and then virtualize the API by specifying a Proxy API Target URL for specific functionality you want to make available on an external network.
Bridge Between App and Proxy API—If your API is focused on the business aspects of the API or service, you can set up the proxy API to provide other tasks such as security enforcement or specifications required by the target (for example, API specs for the app team).
Sandbox / Live Implementation Access—App developers can access either your Live implementation, Sandbox implementation, or both.
Contract Enforcement—If you configure your API with a proxy, you can take advantage of the platform's contract enforcement functionality. Here's how it works:
- When you add an API to the platform your policy administrator adds a series of security policies to the Tenant Organization for your platform using the Akana Policy Manager Console. Site or Policy Administrators can refer to the Akana API Platform Installation Guide for more information. Email Technical Support for more information.
- In the platform, apps that would like to have access to your API submit and API Access Request.
- When the request is approved, the app is "connected" to the API.
- The security policies are in force when the app is connected to the API and ensure that only authorized applications can gain access to your API at runtime.
Note: if your API is not configured with a proxy, you will need to provide your own firewall rules and security approach to restrict applications making calls to your API.
Does the platform support overloaded operations?
The platform supports adding overloaded operations in API Designer. Overloaded operations are displayed in the generated Swagger documentation for the API via API > Documentation in the Akana API Portal.
However, the Swagger 2.0 standard specification does not support overloaded operations, so only one operation will show up in the generated API documentation. Also, if the Swagger documentation includes overloaded operations, the raw Swagger JSON is not available from API > Details > Implementations (bottom of page) > links to definition language (on the right). Instead, an error message is returned. The platform supports display of the generated swagger documentation to API users viewing API documentation via API > Document.
How can I control the search results entry for my API?
Valid in Version: 2019.1.32 and later
When users search for your API in the All APIs list, or perform any search that will include your API in the search results, a snippet of information is displayed about your API in the search results.
The search results entry is an opportunity to showcase your API in a brief summary.
In versions prior to 2019.1.32, the Community Manager developer portal displayed information from the API Description field for the search results entry. In version 2019.1.32 and later, it supports keyword search in the Summary field also. To match a search term, it pulls the copy for the search results entry from a concatenation of both these fields in the API definition:
- Summary
- API Description (or API Name if no API Description is provided)
Note: For information about setting up the Summary and API Description fields, see To edit basic data about an API or API version above.
How the search results entry is constructed
For the search results entry, the Search feature pulls from a concatenated string of the Summary and Description fields, using an ellipsis (...) as a delimiter if information is pulled from different sections.
There are two basic scenarios:
- With no search string provided:
In the All APIs list, if no search term is specified, the Search feature lists the Summary, if provided, then an ellipsis (...), then the Description (or API Name if Description is not provided). If the concatenation of these two fields is very long, only a segment of the Description is shown.
- With search string:
The Search feature pulls from the concatenated Summary and Description fields to create the search results entry. Where a match is found, a few words are included before or after the search word or string to provide context. If the search results entry includes information from both Summary and Description, an ellipsis is used as a separator. The word or words from the search string are bolded in the search results entry.
The exact format of the search results entry depends on the terms searched for, where they fall in the Summary and/or Description, and the amount of copy in the Summary and Description fields.
Depending on where the search term or terms appear in the concatenated string of Summary + Description, as well as the amount of copy, the search results entry might include:
- Only words from the Summary.
- Only words from the Description.
- Segments (or the entire copy, if short) from both Summary and Description.
Search entry results: examples
The examples below illustrate the following scenarios:
- Example #1: No search term
- Example #2: Only the Summary includes a match for the search term
- Example #3: Only the Description includes a match for the search term
- Example #4: Both Summary and Description include a match for the search term
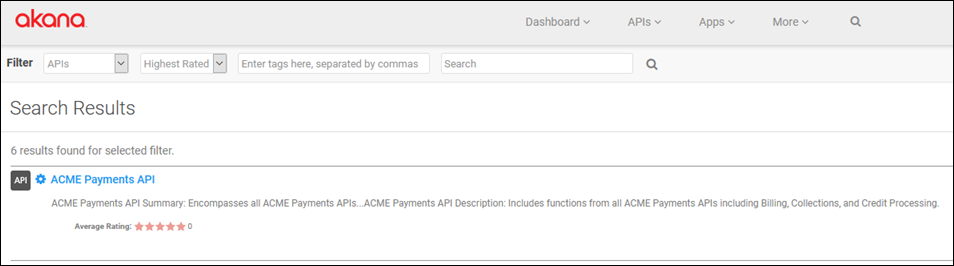
Example #1: No search term
In this example:
- Search term: None
- Summary text: ACME Payments API Summary: Encompasses all ACME Payments APIs
- API Description text: ACME Payments API Description: Includes functions from all ACME Payments APIs including Billing, Collections, and Credit Processing.
In this example, no search term was specified. Because the copy is not very long, the search results include the full Summary text, an ellipsis, and the full Description text.
Note: If the total text string is very long, only a segment of it is included in the search results.
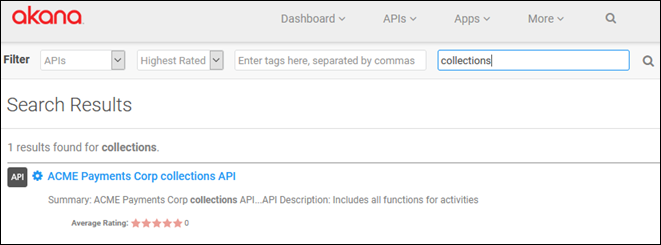
Example #2: Only the Summary includes a match for the search term
In this example:
- Search term: collections
- Summary text: Summary: ACME Payments Corp collections API
- API Description text: API Description: Includes all functions for activities related to collecting funds.
In this example, the search term appears in the summary. In the search results, it is highlighted. The search entry also includes the ellipsis and a fragment of the API Description. At least a few words are include before and after the search term in the search results, to provide context.
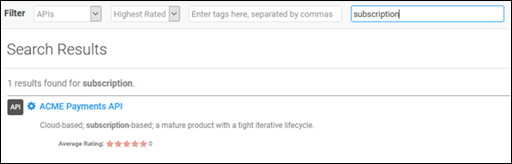
Example #3: Only the Description includes a match for the search term
In this example:
- Search term: subscription
- Summary text: Top-level API for all ACME Payments customers
- API Description text: Includes many features including access to operations in all secondary ACME Payments APIs; collections, invoicing, billing, and many other functions. Cloud-based; subscription-based; a mature product with a tight iterative lifecycle.
In this example, because of the length of the string of Summary + Description, partial copy is included in the search results. Only the segment of the API Description that includes the search keyword is included. At least a few words are included before and after the search term in the search results, to provide context.
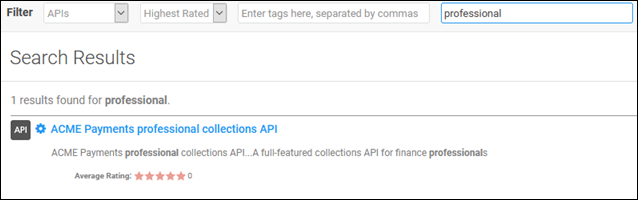
Example #4: Both Summary and Description include a match for the search term
In this example:
- Search term: professional
- Summary text: ACME Payments professional collections API
- API Description text: A full-featured collections API for finance professionals in Fortune 500 companies who want to use Cloud-based software for their collections activities, linking to banks and other financial institutions as well as customer databases.
In the search results entry, segments of the two fields, each containing the search term, are separated by an ellipsis (...) as shown below. Because the string of Summary + Description is longer, only applicable sections of the copy are included in the search results entry. As with earlier examples, at least a few words are include before and after the search term in the search results, to provide context. The search term is highlighted.
How can I validate the Swagger or OAS 3.0 file I upload when adding an API?
If you're creating APIs by uploading external API description documents in Swagger or OAS 3.0, the Community Manager developer portal does not automatically validate all aspects of the file. If the file is completely malformed, upload will fail, but if there are smaller errors, such as an invalid regular expression in the API description document, the developer portal accepts the file.
There are additional configuration settings available in the underlying infrastructure, the Akana Administration Console, that add validation. If needed, ask the Administrator to turn on one or more of these settings.
Navigation: Akana Administration Console > Configuration > com.akana.swagger.
| This setting... | Validates this standard... | Against this schema... |
|---|---|---|
| swagger.parser.v2.json.enableValidation | Swagger 2.0 JSON | https://github.com/OAI/OpenAPI-Specification/blob/main/schemas/v2.0/schema.json |
| swagger.parser.v2.yaml.enableValidation | Swagger 2.0 YAML | https://github.com/OAI/OpenAPI-Specification/blob/main/schemas/v2.0/schema.json |
| swagger.parser.v3.json.enableValidation | OAS 3.0 JSON | https://github.com/OAI/OpenAPI-Specification/blob/main/schemas/v3.0/schema.json |
| swagger.parser.v3.yaml.enableValidation | OAS 3.0 YAML | https://github.com/OAI/OpenAPI-Specification/blob/main/schemas/v3.0/schema.json |
Note: You can also use an online JSON schema validator tool to validate your Swagger or OAS 3.0 document: for example, https://www.jsonschemavalidator.net/.
Import/Export:
How do I export an API?
You can export information about an API to an external file. You can then import that file to another instance of the platform. One use of this feature is to move data from one environment to another, such as from a development environment to a testing or Live implementation.
You can also choose whether or not to export additional data associated with the API, such as policies, contracts, scopes, and documentation.
To export an API:
- Log in to the Akana API Platform and go to the overview page for your API.
- From the left menu bar, choose Details. The summary of the API design is displayed on the Details page.
- In the top section, click the drop-down, and choose Export.
- In the Export dialog, choose the versions you want to export (Current or All) and the options. If you want to export all information about the API, check all boxes. You can export the following data associated with the API:
- Export Operational Policies
- Export QoS Policies
- Export API Administrators
Note: the relationship of the user as an API admin is exported, but the user is not exported. The user must exist in the target environment. If the user does not exist when the information is imported, the API is created without that admin. From there, either a) the user can sign up and be invited to be an admin, b) the user can sign up and the API data can be reimported, c) another individual can be designated as an API admin.
- Export API Implementation Services
Note: If the API was created using an existing service, this option allows you to choose whether or not to export the API implementation services, as set up in Policy Manager. If the API was created as a new service, implementation services are always exported along with API.
- Export API Contracts
- Export Scopes
- Export Resources/Documentation
- Export API PKI
- Click Export.
- Choose to save or open the export file.
What are the contents of the API export file?
The API export file includes all the core information about the API, as well as any of the optional additional information you specified.
The file has a very specific structure. It will look something like the image below:
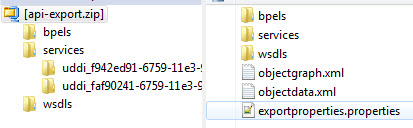
The export file will generally include the following:
- Files at root level:
- objectgraph.xml: An XML file that shows the relationships between resources.
- objectdata.xml: An XML-based summary of all the data in the export file.
- exportproperties.properties: a properties file showing which options were included in the export file.
- bpels: a folder containing XML business process files (bpel files). One for each operation, for each environment. So, for example, if the API has five operations, and runs in Sandbox and Live implementations, there are 10 bpel files.
- services: a folder containing a subfolder for each environment, each subfolder containing a bpel.xml file for the applicable service/environment.
- wsdls: a folder containing WSDL files for the service.
How do I import an API from an export file?
Once you've exported an API to an external ZIP file, it can be imported to another environment. For example, you can export from a development environment and then import to a testing or Live implementation.
The API Admin or Business Admin can export information about an API to an external file. However, only a Business Admin can import.
If you need help with import functions, contact your Administrator.
If you are an Administrator, see Export/Import (Business Admin help).


